SilverFast HDR supports not only RAW files created with SilverFast Ai, but also various RAW files from digital cameras.
With Ai you can save RAW files in the formats 48-bit HDR Color and 16-bit Grayscale. The latter format saves storage space for black and white images, but using it can cause problems later, since not all image editors fully support grayscale mode.
Unlike VueScan, SilverFast does not save the infrared channel separately in HDR. Doing an ICE correction later is not possible. Still, all other SilverFast filters can be applied to the RAW data afterwards, such as GANE for grain reduction.
As with VueScan, SilverFast does not save changes directly in the RAW data. Both programs write a second file and leave the RAW file to serve as a digital negative. Nikon’s NEF concept is more user-friendly, since everything is contained in one file.
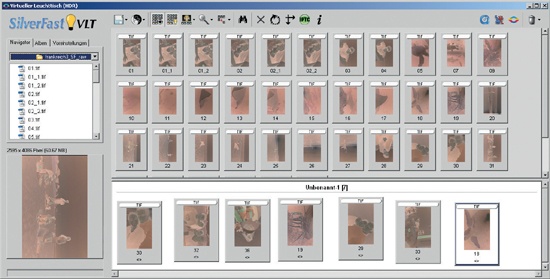
SilverFast VLT is the file browser and image management software from LaserSoft Imaging. The virtual light table helps sort and organize RAW files for processing in HDR. In addition to a number of RAW formats from cameras, HDR can also handle the SilverFast Ai TIFF-HDR format. It does not recognize Nikon scanner NEF files, but it does recognize NEF files that were produced using digital cameras. The program also supports the following camera formats: CRW (Canon), CS (Sinar), DCS (Kodak), MRW (Minolta), ORF (Olympus), RAF (Fuji), RAW (Leica, Panasonic), SRF (Sony), and X3F (Sigma). TIFF RAW files from VueScan cannot be processed since they have no gamma correction.
Note
RAW Conversion of an HDR Negative: Also Possible in Photoshop Unlike the gamma-uncorrected VueScan RAW files, HDR files can be easily converted in Photoshop. First, reverse the colors with Image ▸ Adjustments ▸ Invert. This action provides a positive, but still requires serious color correction. The easiest way to correct color is with Image ▸ Adjustments ▸ Auto Levels.
It is helpful to scan a bit larger and include the frame border. This portion of the negative is a perfect reference for the color black (for example, to be selected using the black eyedropper).
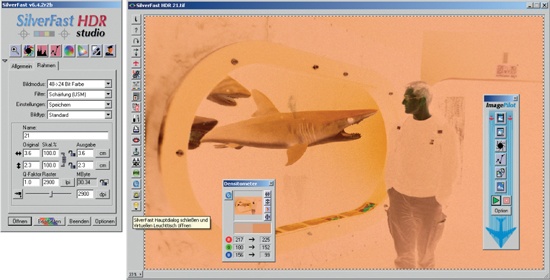
With SilverFast VLT, files to be opened in HDR can be selected by double-clicking the files on the light table. As soon as HDR opens a file, VLT closes, which initially can be confusing. The light bulb in the JobMan-ager or in the prescan window allows the user to switch between HDR and VLT.
The link between HDR and VLT is the JobManager. JobManager is always required for batch processing. Files are processed by selecting them with the mouse and dragging them into the JobManager window. When adding a file, the Options window opens and prompts for Settings and Picture Type. Only then will the image be added. Clicking on the Processing icon opens the image in HDR. Only one image may be open at a time. Overall, the way VLT is handled in connection with scanner RAW files is not very intuitive. Only VLT or HDR, but not both, can be open at one time, which is a problem since it is often necessary to jump between them during image processing. Especially with larger monitors, it would helpful to keep VLT open next to HDR.
Working with HDR differs only slightly from working with SilverFast Ai. One difference is the absence of ICE, because in the SilverFast RAW format the infrared channel is not stored separately. ICE must be invoked during the scan. However, batch processing of filmstrips is much more convenient in HDR than in Ai. With the JobManager, you can easily click your way through a long list of files. Previews will update to the selected image within seconds.
Using HDR makes sense if you split the scanning process into two steps: first, scan RAW files with only minimal adjustments. Then, add them to the Job Manager with VLT. In Job Manager, set the parameters for each image and save them. After all images have been prepared in this fashion, click on Start to begin the batch processing. Without any further user interaction, all images will then be written to the predetermined file location. As you can see, SilverFast’s HDR is an interesting approach to RAW data processing but has some limitations in functionality.