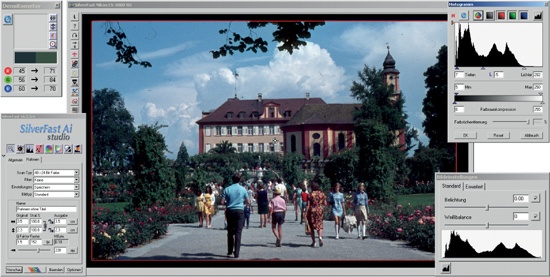
The SilverFast interface consists of several windows that can be freely arranged on the screen, but the size of the windows can be changed only to a certain extent. The layout is most suitable for the large monitors commonly used for image processing. The software’s user interface is rather antiquated and could do with a complete overhaul. The program itself is also sometimes quite slow. You will see the difference when you first work with SilverFast and switch to VueScan later. VueScan reacts much faster that SilverFast.
In the main window, you can set all the important scan parameters such as resolution, color depth, and image type. For scanning, you need to specify whether you want to scan in normal mode or in batch mode. One special feature of SilverFast not found on Nikon Scan or VueScan is a setting for Image Type. With that setting, you can select preconfigured filter settings for various types of subjects and lighting conditions. This is handy when you first start using the program, since you can quickly explore several variations without needing a lot of background knowledge as to how those settings work.

The ScanPilot is nothing but a tasklist. It allows you to activate all the options you want to configure before actually scanning. The ScanPilot leads you step-by-step through configuration where you can manually set all options you need. For beginners, this functionality is quite helpful; experienced users are faster without it.
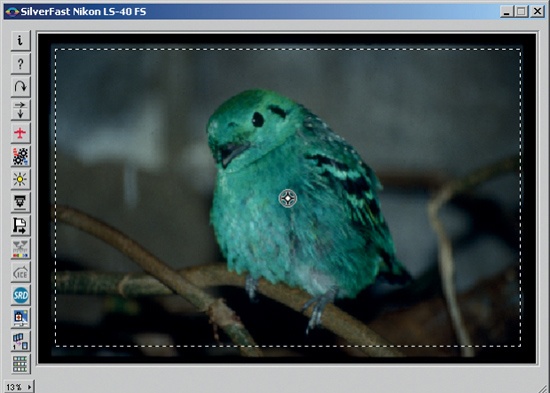
The prescan window shows a preview and a row of buttons for activating or deactivating various scanning options. The prescan window allows you to preview configuration changes. Unfortunately, it does not offer the Natural/Processed tabs that Nikon Scan does for quick comparison, which makes it difficult to keep track of elaborate changes. All changes are updated instantly in the prescan window.
Unlike Nikon Scan and VueScan, SilverFast does not have the option to generate prescans for an entire filmstrip in one go, and then switch freely between images. This can be annoying when working with a scanner with a filmstrip adapter: every time you switch to a new image, you will need a new, time-consuming prescan. The only way to avoid this problem is by scanning and saving images one by one with the JobManager.
With Overview, you can get a quick idea of what is on the filmstrip. Double-clicking on a thumbnail starts the prescan. Unlike the function in Nikon Scan, the index view in SilverFast can be printed. The print function for thumbnails in VueScan is actually superior, since several filmstrips can be grouped together in one file for printing. SilverFast’s Overview does not allow you to rotate images or to correct the filmstrip offset.

As with VueScan, SilverFast comes with a long list of film profiles for the color correction of negative films. When selecting the option Negative under the General tab in the main window, the NegaFix window pops up. SilverFast also allows you to generate and import your own film profiles. You can also fine-tune the profiles using a slider. The option Neg. Direct is available specifically for Nikon scanners; instead of the NegaFix profiles, this option uses the hardware-based negative conversion of the Nikon scanners. This option is useful if NegaFix does not have a profile for your particular film type, or if a profile is available but you are not satisfied with the resulting image quality. SilverFast in Neg.Direct mode, as well as Nikon Scan, both resort to the Nikon MAID libraries for analyzing the film. In general, these librairies produce good results, which can be superior to the standard film profiles. If you are using a Nikon Scanner, you should try them first before using anything else.
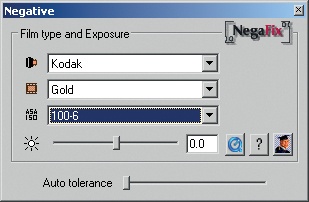
As of version 6.5, the Negafix tool has an automatic color correction function (called CCR) built in. If the current film profile is no longer accurate due to negatives fading with age, the software can be set to automatically remove the resulting color casts.

The Densitometer displays output values relative to the input value for a small area under the cursor. This is useful for editing colors. If you scan mostly for archiving and do not do much editing, you can just click to close this window.
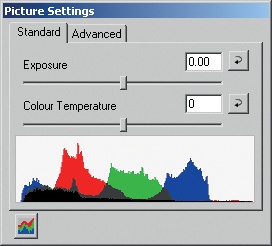
Under Picture Settings, brightness can be adjusted with Exposure, and colors can be made warmer or cooler with White Balance. Mid-tones can be adjusted with Brightness (mid-tones); the gray eyedropper performs the same function. Contrast and Saturation complete the menu. In Nikon Scan, color saturation can be adjusted with the LCH Editor. SilverFast’s solution with Picture Settings is less powerful but more userfriendly: histograms are shown in real-time, which sets them apart from the other histograms used for corrections in the program. Real-time histograms give a good view of the level distribution of the scanned image even before the scan is made.
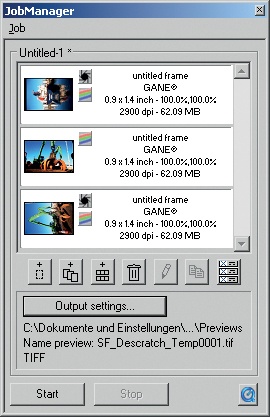
JobManager allows you to define tasks that the program can execute unattended. Typically, this is used for processing filmstrips. In the Silver-Fast scanning programs, the job settings are defined for images in the scan queue. In the editor, HDR can handle any image files. For flatbed scanners, it is even possible to create a scan queue with a mix of black and white negatives, color negatives, and color slides in any order. For Nikon scanners, JobManager cannot jump between the modes Negative and Neg.Direct. The user must select one or the other. Once the batch is done, the program sounds a beep, just like VueScan.
JobManager handling in my SilverFast Ai v6.5.5r4 was often quite complicated. Nikon Scan is much easier to use with the Nikon scanner/filmstrip adapter combination, and will enable you to achieve usable results more quickly.