
Opacity

The Opacity setting at the top of the Layers palette controls the opacity of the active layer. When this setting is lowered, the entire layer becomes partially transparent (transparent is the exact opposite of opaque). If you want to lower the opacity in a specific area instead of the entire layer, you can lower the opacity of the Eraser tool and then brush across the area of the layer you want to become more transparent—that is, unless the background is active. If you use the Eraser tool on the background, it will simply paint with your background color instead of truly deleting areas (remember, the background is always opaque).
Try this: Open the document you created earlier in this chapter. Create a new layer, and then use any painting tool to brush across the layer. Now, lower the Opacity setting in the Layers palette to 70% (Figures 3.15 to 3.17).
Figure 3.15. Layer at 100% opacity.

Figure 3.16. Layer at 70% opacity.

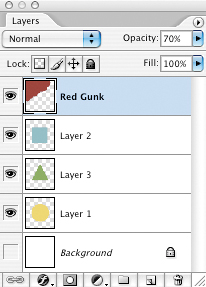
Figure 3.17. Lowering the opacity of a layer affects the entire layer.
 | When I need to precisely position a layer, I usually lower the Opacity setting just enough so I can see the underlying layers. After positioning the layer, just press 0 to bring the layer back to 100% opacity. |
Now let's compare this effect with what happens when you lower the Opacity setting of the Paintbrush tool. Create another new layer; however, this time leave the layer's Opacity setting at 100%. Now choose the Paintbrush tool, change the tool's Opacity setting to 70% (in the options bar), and then brush across the layer (just don't overlap the paint you created earlier). The paint should look exactly the same as the paint that appears in the other layer (Figures 3.18 and 3.19).
Figure 3.18. The Paintbrush options view.
![]()
Figure 3.19. Painting with a 70% Opacity setting.

Finally, create one more new layer, and paint across it with the tool's Opacity setting at 100%. Now, brush across an area with the Eraser tool using an Opacity setting of 30% (Figures 3.20 and 3.21).
Figure 3.20. The Eraser options view.
![]()
Figure 3.21. Using the Eraser tool with a low Opacity setting will also make areas of a layer transparent.

All of these options do the same thing to your image. You just have to think a bit: Do you want to apply the Opacity setting to the entire layer? If so, use the Layers palette's Opacity setting. Do you want to apply the Opacity setting to only part of the layer? If so, use the Opacity setting in the tool's options bar. Do you want to change the opacity of an area you've already painted across? If so, use the Eraser tool with an Opacity setting.
Photoshop always (well, almost always) offers you more than one way of doing things. It reminds me of my favorite hardware store, McGuckins. It's the kind of place that takes your breath away—it has everything! If you just want a screwdriver, you'll probably find an entire aisle full of screwdrivers, each one designed for a specific use. Photoshop has the same approach; you just have to play around with it to figure out which tool best suits your needs.