
Color Range
You can think of the Select > Color Range command as the Magic Wand tool on steroids. With Color Range, you can click multiple areas and then change the Fuzziness setting (how's that for a technical term?) to increase or reduce the range of colors that will be selected (Figures 2.57 and 2.58).
Figure 2.57. The original image. (©2005 Stockbyte, www.stockbyte.com)

Figure 2.58. The same image in the Color Range dialog box after clicking on multiple areas within her blouse.

As you click and play with the Fuzziness control, you'll see a preview of the selection in the middle of the Color Range dialog box. Areas that appear white are the areas that will be selected. The Selection and Image radio buttons allow you to switch between the selection preview and the main image. (I never actually use these two controls because I find it easier to switch to the image view at any time by just holding down Command on the Mac or Ctrl in Windows.) You can also see a preview of the selection within the main image window by changing the Selection Preview pop-up menu to Grayscale, Black Matte, White Matte, or Quick Mask (Figures 2.59 to 2.61).
Figure 2.59. Choosing Grayscale will display the same preview that appears in the Color Range dialog box.

Figure 2.60. Choosing Black Matte or White Matte will fill the unselected areas with black or white.

Figure 2.61. Choosing Quick Mask uses the settings in the Quick Mask dialog box to create a preview of the image.

The Eyedropper tool on the right side of the dialog box allows you to add and subtract colors from the selection. Using the Eyedropper with the plus symbol next to it is really helpful, because it allows you to click the image multiple times. With each click, you tell Photoshop which colors you want it to search for. A low Fuzziness setting with many clicks usually produces the best results (Figures 2.62 and 2.63).
Figure 2.62. An example of a single click with a high Fuzziness setting.
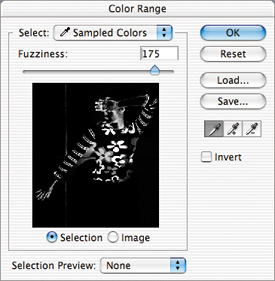
Figure 2.63. An example of five clicks with a low Fuzziness setting.

The selections you get from the Color Range command are not ordinary selections, in that they usually contain areas that are not completely selected. For instance, if you're trying to select the red areas in an image and there happens to be a flesh tone in the same image, the fleshy areas will most likely become partially selected. If you then adjust the image, the red will be completely adjusted, and the flesh tones will shift only a little bit.
If a selection is already present when you choose Select > Color Range, the command will analyze the colors only within the selected area. This means you can run the command multiple times to isolate smaller and smaller areas. If you want to have the Color Range command added to the current selection, be sure to hold down the Shift key when choosing Select > Color Range.