
Shadow/Highlight
The new Image > Adjustments > Shadow/Highlight command (Figure 6.92) is a good alternative to Curves when working with images that need more pronounced shadow and/or highlight detail. In its simplest form, you just move the Shadows slider to brighten the darker areas of your image (Figures 6.93 and 6.94) and/or move the Highlights slider to darken the brighter areas of your image (Figures 6.95 and 6.96).
Figure 6.92. The simple version of the Shadow/Highlight dialog box.

Figure 6.93. Original image. (©2005 Andy Katz)

Figure 6.94. Result of moving the Shadows slider to the right.

Figure 6.95. Original image. (©2005 Andy Katz)

Figure 6.96. Result of moving the Highlights slider to the right.

If you really want to get control over the adjustment, you'll definitely want to turn on the Show More Options check box so you can see the full range of settings available (Figure 6.97). I suggest that you start by setting the Amount to 0%, the Tonal Width to 50%, and the Radius to 30px in both the Shadows and Highlights area. The Amount setting determines how radical a change you'll make to your image. Because you're starting with that setting at zero, these settings won't do a thing to your image—yet.
Figure 6.97. The expanded Shadow/Highlight dialog box.

If you want to pull out some detail in the dark areas of your image, move the Amount slider in the Shadows area toward the right while you watch your image. Keep moving it until the dark areas of your image become the desired brightness. Now start messing with the Tonal Width setting. That will control the brightness range in your image. Extremely low settings will limit the adjustment to the darkest areas of your image; higher settings will allow the adjustment to creep into the brighter areas of your image (Figures 6.98 through 6.100). The Shadow/Highlight command adjusts areas based on the brightness level of the surrounding image. So, once you've defined the brightness range you'd like to work with (via the Tonal Width slider), you'll need to experiment with the Radius slider. That setting determines how much of the surrounding image you want Photoshop to look at when determining how to blend the changes you're making into the surrounding image. Just slide it around until the changes to the dark areas of the image look appropriate considering their surroundings. Moving it toward the right will cause the area you're adjusting to blend into the surrounding image more, whereas moving it to the left will cause a more pronounced difference between the shadows and midtones of your image (Figure 6.101). Once you've finished your first round with the settings, you'll most likely want to go back to the Amount and Tonal Width settings to fine-tune the result.
Figure 6.98. Original image.

Figure 6.99. Tonal Width 0%.
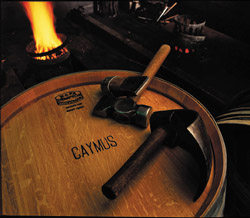
Figure 6.100. Tonal Width 30%.

Figure 6.101. This image is divided into thirds—the left uses a Radius of 0px, the middle uses 50px, and the right uses 100px. (©2005 Ben Willmore)
The Highlights area works with the same concepts we just talked about, but it attempts to darken the brightest areas of your image to exaggerate the detail in that area.
When you brighten the shadows or darken the highlights, you'll often exaggerate any color that was lurking in those areas (Figures 6.102 and 6.103). If you find the color to be a little too distracting, try moving the Color Correction slider toward the left to make the areas you've adjusted less colorful (Figure 6.104). Or, on the other hand, if you'd like to make those areas even more colorful, then move the slider toward the right. The default setting is +20, which is a good starting point.
Figure 6.102. Original image.

Figure 6.103. After adjusting the image with Shadow/Highlight, the color in those areas is exaggerated.

Figure 6.104. Moving the Color Correction slider toward the left will reduce the amount of color that shows up in the brightest and darkest areas of the image.

 | If you're having trouble seeing exactly what an adjustment is doing to your image, you should experiment with an extremely simple image until you get the hang of it. Try it on a new grayscale image that you've applied a gradient to. |
Once you have the brightness and color looking good, you'll need to fine-tune the contrast in the areas of the image that you haven't changed. You can do that by moving the Midtone Contrast slider to the left (to lower contrast) or right (to increase contrast). There aren't any set rules for using these sliders. Your image is your guide (Figures 6.105 through 6.107).
Figure 6.105. Original image. (©2005 Andy Katz)

Figure 6.106. Adjusted with Shadow/Highlight, Midtone Contrast –40.

Figure 6.107. Adjusted with Shadow/Highlight, Midtone Contrast +40.

Darkening the highlights on some images can make them look rather dull, especially when working with something that contains bright shiny objects (Figure 6.108). In order for something to look truly shiny, the brightest areas of the image (usually direct reflections of light into the camera lens) need to be pure white. If it's not white, then you get dullsville (Figure 6.109). If you notice those bright reflections becoming darker when you adjust the Highlights setting, then you'll need to mess with the White Clip setting that's found at the bottom of the Shadow/Highlight dialog box. With it set to zero, Photoshop is capable of darkening all the bright areas of the image. As you raise that setting, Photoshop will force a narrow range of the brightest shades in your image to pure white. The higher the setting, the wider the range of shades that Shadow/Highlight will end up forcing to white. Just watch your image and increase the White Clip setting until those shiny reflections look nice and bright (Figure 6.110).
Figure 6.108. The original image. (©2005 Stockbyte, www.stockbyte.com)

Figure 6.109. After darkening the highlights, the image looks a little dull.

Figure 6.110. Increasing the White Clip setting produces a higher-contrast image.
 | The Shadow/Highlight command cannot be used as an adjustment layer because it is too complex an adjustment. Adjustment layers are limited to things that can take any input (any shade of gray or color) and know what to do with it without having to know what the rest of the image looks like. Because Shadow/Highlight compares the area you're adjusting to its surroundings, it's not simple enough to be implemented as an adjustment layer. |
The Black Clip setting forces the darkest areas of your image to black to make sure that they won't be lightened when you move the Shadows Amount setting. That can be useful if you want high-contrast shadow areas or if you have text or other line art that wouldn't look right if they were lightened.
I'm amazed at how many images can benefit from a quick visit to the Shadow/Highlight dialog box. I use it so often that I've defined a keyboard shortcut to it. If you'd like to figure out how to do the same, be sure to check out the section on editing Keyboard Shortcuts in Chapter 1, “Tool and Palette Primer.”