
Photo Filter Adjustments
We'll create a special type of adjustment that should give you enough ammunition to start applying Adjustment Layers to your own images. A Photo Filter Adjustment Layer will allow you to quickly shift the overall color in your image. It has an effect that is much like placing a colored filter in front of a camera lens or putting on colored sunglasses. All you have to do is open an image and choose Photo Filter from the Adjustment Layer pop-up menu at the bottom of the Layers palette. When the Photo Filter dialog box appears (Figure 11.12), either choose a preset color from the Filter pop-up menu or click on the color swatch to choose your own custom color. Once you've chosen the color you desire, adjust the Density slider to control how radically the filter will affect the image (Figures 11.13 to 11.15). If you find that your image is getting too dark as you increase the Density setting, I'm betting the Preserve Luminosity checkbox is turned off. When that checkbox is turned off, adding a Photo Filter adjustment will darken your image, just as colored sunglasses allow less light to enter your eye. Turning on the Preserve Luminosity checkbox will prevent Photoshop from changing the brightness of your image, but will still allow you to shift its colors. I leave the Preserve Luminosity checkbox on for the vast majority of images that I adjust. I'd much rather make a separate Adjustment Layer (Levels, Curves, or any other type) if I want to change the brightness of the image.
Figure 11.12. The Photo Filter dialog box.

Figure 11.13. The original image. (©2005 Ben Willmore)

Figure 11.14. Result of applying a blue Photo Filter with a Density of 20%.

Figure 11.15. Result of applying a blue Photo Filter with a Density of 50%.

Just in case you skipped Chapter 10, “Color Manipulation,” and ended up here without knowing how to think about color adjustments in Photoshop, I'll clue you in on a basic concept of color manipulation. When you use a Photo Filter layer, you'll be pushing all the colors in your image toward one side of the color wheel. If your image has an obvious colorcast, then all of the colors within the image will be shifted to one side of the color wheel (Figures 11.16 and 11.17). When that's the case, you can often remove the colorcast by applying a Photo Filter that uses the color that's found directly across the color wheel from the color that is contaminating your image (blue in this case) (Figures 11.18 and 11.19).
Figure 11.16. This image was taken at sunrise, and therefore has a strong orange colorcast. (©2005 Ben Willmore)

Figure 11.17. When an image has an orange colorcast, all of the colors within the image will be shifted toward the orange side of the color wheel.
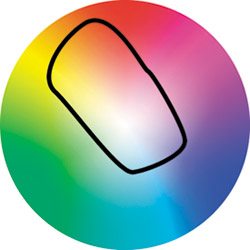
Figure 11.18. After applying a blue Photo Filter Adjustment Layer, the colorcast is gone.
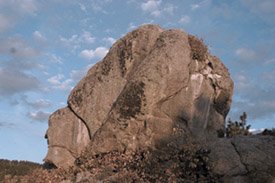
Figure 11.19. Applying a blue Photo Filter Adjustment Layer shifts the colors away from the orange side of the color wheel, bringing them closer to the blue side.

Now let's start to explore the more powerful aspects of Adjustment Layers.