
Layer Masks
By default, each Adjustment Layer comes equipped with a Layer Mask. This mask appears to the right of the adjustment icon. If no selection is present when the Adjustment Layer was created, the Layer Mask will be entirely white. In a Layer Mask, all white causes the adjustment to affect the entire image. Black, on the other hand, will prevent the adjustment from affecting areas. To control where an Adjustment Layer can affect your image, paint with black or white while the Adjustment Layer is active (Figures 11.34 to 11.36). The black and white paint will appear within the Layer Mask thumbnail image in the Layers palette (Figure 11.37).
Figure 11.34. Original, unadjusted image. (©2005 Andy Katz)

Figure 11.35. Unmasked adjustment result.

Figure 11.36. Result of painting on the Layer Mask to limit where the adjustment applies.

Figure 11.37. Layers palette view shows the paint that's been applied to the Layer Mask.

Painting with black will cause the image to revert back to its unadjusted state. Keep in mind that painting with black will not always cause drastic changes to your image. If the difference between the original and adjusted version of the image is subtle, painting with black will cause very subtle changes to the image.
If you get sloppy and paint with black over too large an area, you can switch to painting with white to effectively undo your painting (since the Layer Mask started out filled with white and white areas allow the adjustment to apply to the image).
You're not limited to using the painting tools to modify a Layer Mask. Any tool that is available to a grayscale image can be used to edit the Layer Mask. I like to use the Gradient tool to create very gradual transitions (Figures 11.38 to 11.40) and occasionally apply filters to a mask to generate an interesting transition.
Figure 11.38. Original, unadjusted image. (©2005 Ben Willmore)

Figure 11.39. Unmasked adjustment result.

Figure 11.40. Result of applying a gradient to the Adjustment Layer's Layer Mask.

Working With Selections
 | I often use the masking techniques described in Chapter 14, “Advanced Masking” to create a selection, and then use that selection to limit which area of my image is affected by an Adjustment Layer. |
If a selection is active at the time an Adjustment Layer is created, then the unselected areas will be filled with black in the resulting Layer Mask, thus preventing the adjustment from affecting those areas. This can confuse many users since the “marching ants” that indicate the edge of a selection will suddenly disappear when an Adjustment Layer is created. That is because that selection has been converted into a Layer Mask (Figures 11.41 and 11.42).
Figure 11.41. Selection visible before creating an Adjustment Layer. (©2005 Ben Willmore)

Figure 11.42. The selection has been converted into a Layer Mask that's used to darken the sky.

Using Quick Mask Mode
If you find painting on a Layer Mask to be more convenient than creating selections, but would prefer to isolate an area before applying an adjustment, try this:
Before adjusting the image, type Q to enter Quick Mask mode (which will not change the look of your image unless you happen to have a selection active). Now, paint with black over the areas you don't want to be affected by the adjustment you plan to make. The areas you paint over with black will show up as a red overlay on the image (Figure 11.43). If you accidently cause the red overlay to appear on an area that should be adjusted, then paint with white to remove the red overlay. Once the red overlay is covering all the areas that should not be adjusted, type Q to convert the Quick Mask into a selection and then, with that selection active, create an Adjustment Layer. The areas that appeared as red in Quick Mask mode will be black in the Layer Mask attached to the newly created Adjustment Layer, which will prevent the adjustment from affecting those areas (Figure 11.44).
Figure 11.43. Painting in Quick Mask mode. (©2005 Ben Willmore)

Figure 11.44. The resulting Layer Mask.

Disabling the Layer Mask
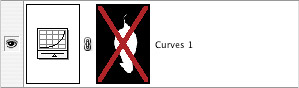
If you'd like to see what an image would look like if the Layer Mask wasn't limiting where an adjustment was applying, hold Shift and click in the middle of the Layer Mask to disable the mask. That will cause a red X to appear over the Layer Mask to indicate that it has been temporarily disabled (Figure 11.45). Once you're done viewing your image in that way, you can Shift-click the mask a second time to turn it back on.
Figure 11.45. The red X indicates the Layer Mask is not currently affecting the adjustment.
Viewing the Layer Mask Directly
When you paint on a Layer Mask, the resulting paint usually only appears in the tiny Layer Mask thumbnail image in the Layers palette. That can make it difficult to see what you're doing. To view the contents of the Layer Mask as a full-sized image, hold Option (Mac) or Alt (Windows) and click on the Layer Mask thumbnail in the Layers palette (Figure 11.46). You're welcome to modify the mask while viewing it directly. I use this view to inspect the results of painting on the Layer Mask and to clean up unexpected problems (like gaps between paint strokes). If you created a selection using an automated selection technique (like Color Range, the Background Eraser, or the Extract command), you might notice some noise in the Layer Mask (Figure 11.47). When that's the case, try using the noise reduction techniques covered in Chapter 12, “Sharpening” to rid the mask of the noise. Once you're done editing the mask in this view, hold Option (Mac) or Alt (Windows) and click on the Layer Mask thumbnail image again to turn off this view.
Figure 11.46. Viewing the Layer Mask in the main image window.

Figure 11.47. A noisy mask.

Viewing the Layer Mask as a Color Overlay
You can view the contents of a Layer Mask as a color overlay on your image by typing when an Adjustment Layer is active (much like Quick Mask mode, which we talked about earlier). I use this view to see how closely my painting matches the subject of the photograph (Figure 11.48) and to touch up the results by painting with black or white. When you're done using this view, just type a second time to turn off the colored overlay. You can also modify the color being used by double-clicking on the Layer Mask thumbnail image in the Layers palette (Figure 11.49).
Figure 11.48. Viewing the Layer Mask as a color overlay. (©2005 Andy Katz)

Figure 11.49. Double-clicking the Layer Mask allows you to specify the color that will be used for the overlay.

Moving or Copying The Mask To Another Layer
In Photoshop CS2, you can drag a Layer Mask from one layer to another. All you have to do is click in the middle of the Layer Mask thumbnail image and release the mouse button after moving your mouse onto another layer. If you'd rather copy the Layer Mask instead of moving it, hold the Option key (Mac) or Alt key (Windows) when dragging the mask.
Masking Multiple Adjustment Layers
If you have multiple Adjustment Layers that you'd like to apply to a particular area of your image, select those Adjustment Layers, choose Layer > Group Layers, and then click on the Layer Mask icon at the bottom of the Layers palette to add a Layer Mask to the group (Figures 11.50 and 11.51). Any changes made to the Layer Mask that is attached to the group will affect all the Adjustment Layers within the group. You can even paint on the Layer Mask attached to each individual Adjustment Layer to further limit where it can affect the image.
Figure 11.50. Select the layers you'd like to group.
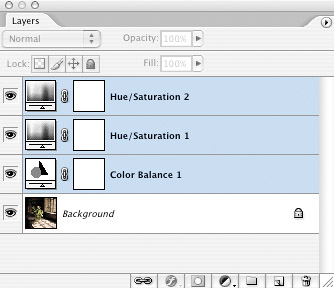
Figure 11.51. Add a Layer Mask to the group to mask all the layers within the group.
