
Chapter 6. Understanding Curves
Courtesy of Nick Koudis, www.koudis.com

Have patience. All things are difficult before they become easy.
—Saadi
If I were going to be dropped on a deserted island and could bring only one thing with me, I might choose a Swiss Army knife. With that knife, I could cut firewood, spear fish, and clean my teeth (remember the toothpick?). Much like a Swiss Army knife, Image > Adjustments > Curves can be used for just about anything. In fact, if I had to pick one adjustment tool to use all the time, it would definitely be Curves. By mastering the Curves dialog box, you have so much control over your images that you might wonder why you would ever need to use the Levels or Brightness/Contrast dialog box. Let's take a look at some of the things you can do with the Curves dialog box. You can
Pull out far more detail than is possible to see with the Sharpening filters (Figures 6.1 to 6.3).
Figure 6.1. The original image. (©2005 Ben Willmore)

Figure 6.2. After applying the Unsharp Mask filter.
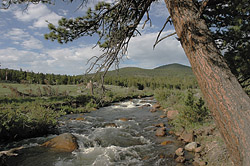
Figure 6.3. After a simple Curves adjustment.

Lighten or darken areas without making selections (Figures 6.4 and 6.5).
Figure 6.4. The original image. (©2005 Ben Willmore)

Figure 6.5. After a simple Curves adjustment.

Turn ordinary text into extraordinary text (Figures 6.6 and 6.7).
Figure 6.6. The original text effect.

Figure 6.7. After a simple Curves adjustment.

Enhance color and contrast in seconds (Figures 6.8 and 6.9).
Figure 6.8. The original image. (©2005 PhotoSpin, www.photospin.com)

Figure 6.9. After a simple Curves adjustment.

None of these changes could be made by using Levels or Brightness/Contrast (that is, not without making complicated selections or losing control over the result). Now you can see why you'll want to master Curves!
Using Curves, you can perform all the adjustments available in the Levels, Brightness/Contrast, and Threshold dialog boxes, and much, much more. In fact, you can independently adjust each of the 256 shades of gray in your image (Figure 6.10).
Figure 6.10. Photoshop's adjustment hierarchy.

 | I still use Levels on the vast majority of grayscale images I scan. It has the advantage of being simpler than Curves, offers a Threshold mode to show where I'm forcing areas to black and white and simply requires less brain power to use. I think of Levels as the first step to optimizing a grayscale image and Curves as an optional step that's needed when Levels can't produce the end result you're looking for. |