
Using Adjustment Layers
Let's take a look at the accessories that are attached to an Adjustment Layer (Figure 11.8) so you'll know what I'm talking about once we start to use all this stuff. On the far left, you'll find an eyeball icon that determines if the Adjustment Layer is currently affecting the appearance of your image. To its right is another icon that represents the type of adjustment that is being applied (Figure 11.9). When you double-click on the adjustment icon, you'll be sent back into the dialog box that was used when the Adjustment Layer was created, which will allow you to modify the adjustment settings being applied to the image (for instance, if you have a Levels Adjustment Layer, you'll be sent back to the Levels dialog box). To the right of the adjustment icon is a link symbol which really doesn't apply to Adjustment Layers. And to the right of that is a Layer Mask, that allows you to limit where the adjustment will affect the underlying image.
Figure 11.8. The anatomy of an Adjustment Layer.
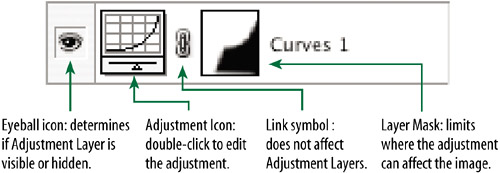
Figure 11.9. The Adjustment Layer icons represent the type of adjustment being applied.
