
Limiting The Brightness Range That's Affected
You can limit the brightness range that an Adjustment Layer is able to affect by double-clicking to the right of the Adjustment Layer's name and adjusting the Blending Sliders. The Blending Sliders are found at the bottom of the Blending Options section of the Layer Style dialog box (Figure 11.52).
Figure 11.52. The Blending Sliders are found at the bottom of the Layer Style dialog box.
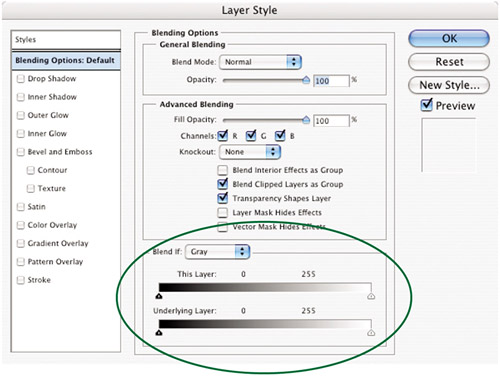
The sliders found under the This Layer heading will analyze the result of the adjustment being applied and allow you to hide the dark (left slider) or light (right slider) portions of that result so that you can see the underlying image (which is usually the original photograph). The sliders found under the Underlying Layer slider will cause the dark (left slider) or bright (right slider) portions of the original image to show through and therefore prevent the adjustment from affecting those areas. You can hold Option (Mac) or Alt (Windows) and drag any one of the sliders to split it into two halves, which will produce a gradual transition between the area that is being hidden and the rest of the image (for a more detailed explanation of the Blending Sliders, check out Chapter 15, “Collage.”)
Blending sliders are particularly useful when darkening or adding contrast to part of an image using a Levels or Curves Adjustment Layer. Oftentimes certain areas of the image change too much as you make the adjustment. But by simply letting parts of the underlying image show through (using the Blending sliders), the adjustment doesn't affect the entire image (Figure 11.53).
Figure 11.53. This image is divided into thirds. The middle is what the image looked like before it was adjusted, the left is what I got after tweaking the image with Curves, and the right is the result of limiting the changes so they don't affect the areas that contain a lot of blue light (the sky). (©2005 Ben Willmore)

You can also use Blending sliders when colorizing an image. Create a Hue/Saturation Adjustment Layer, and turn on the Colorize checkbox to add some color. Then, double-click just to the right of the Adjustment Layer's name and allow the darkest areas of the underlying image to show through (lower-left slider). Make sure to split the sliders rather wide to ensure a smooth transition. This is what usually separates realistic-looking images from the fake ones, because not much color shows up in the darkest areas of most color photographs (Figures 11.54 to 11.56).
Figure 11.54. The original full-color image. (©Stockbyte, www.stockbyte.com)

Figure 11.55. Result of converting to grayscale and then adding color.

Figure 11.56. Result of using the Blending sliders to limit how much color is applied to the darkest areas of the image.
