
Sharpen Luminosity
If you look closely at a color image after it's been sharpened, you might notice bright-colored halos around objects that were not all that colorful in the original photo (Figure 12.58) (like a red halo around a pink dress). To prevent that type of unwanted sharpening artifact, choose Edit > Fade immediately after sharpening an image. When the Fade dialog box appears, set the Mode pop-up menu to Luminosity and then click the OK button (Figure 12.59). That will force the sharpening you just applied to affect only the brightness of the image and will prevent it from shifting or intensifying the colors in your image (Figure 12.60). If you read a lot of books and magazine articles about Photoshop, you might discover that many people attempt to get the same result by converting their image to LAB mode and then sharpening the image. The only problem with that approach is that any time you change the mode of your image, you lose a little quality. So, I only switch modes when I have a good reason to do so. Fade gives us the same benefits as converting to LAB mode, so I prefer to leave my image in the mode it started in when I sharpen it.
Figure 12.58. After sharpening this image, the color became more intense in the transition areas. (©Stockbyte, www.stockbyte.com)

Figure 12.59. Choose Edit > Fade and set the Mode pop-up menu to Luminosity.
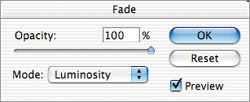
Figure 12.60. After fading with Luminosity, the color went back to normal. This might be hard to see in printed form; look closely at the edge of the collar where it touches her skin.
