
Channel Mixer
So far, most of the adjustments we've talked about have been relatively straightforward. You usually tell Photoshop what you want to change (midtones, highlights, and so on) and then tell it what you'd like to shift them toward. But the Channel Mixer is a different beast. It forces you to think about how Photoshop works behind the scenes. The Channel Mixer lets you literally mix the contents of the channels that show up in the Channels palette (Window > Channels).
When you choose Image > Adjustments > Channel Mixer, you can choose the channel you'd like to affect from the Output Channel pop-up menu. Then you can move the Source Channels sliders to brighten or darken the output channel (Figure 10.84). Because RGB mode creates your image out of red, green, and blue light, moving sliders toward the right will add more light and therefore brighten the output channel based on the contents of the channel whose slider you moved. Moving the slider in the opposite direction will reduce the amount of light being applied to the output channel. CMYK mode creates your image out of four colors of ink, so moving a slider toward the right will add additional ink to the output channel, thereby darkening it. Moving a slider to the left in CMYK mode will lessen the amount of ink in the output channel, effectively brightening it. This might sound complicated at first, but once you see a few examples, you should start to see the simplicity behind it.
Figure 10.84. The Channel Mixer dialog box.

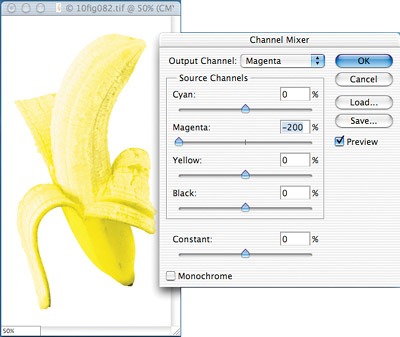
Let's say you have a CMYK mode image of a banana (Figure 10.85) and you'd like to reproduce it using only two colors of ink. That way you could save money and show off to your friends that you've really mastered Photoshop. Well, because most bananas are yellow, I think we'll end up using yellow ink for the banana, and then we'll use some black ink so we can get shadows that are darker than the yellow ink. I'd start by choosing Image > Adjustments > Channel Mixer, and then I'd choose Cyan from the Output Channel pop-up menu and move the Cyan Source Channels slider all the way to the left to indicate that you don't want to use any of what was originally in the Cyan channel (Figure 10.86). Then choose Magenta from the Output pop-up menu and move the Magenta slider all the way to the left to clear out the Magenta channel (Figure 10.87).
Figure 10.85. The original banana image is in CMYK mode. (©2005 PhotoSpin, www.photospin.com)

Figure 10.86. Moving the Cyan slider all the way to the left will remove all cyan from the image.

Figure 10.87. Moving the Magenta slider all the way to the left will remove all magenta from the image.
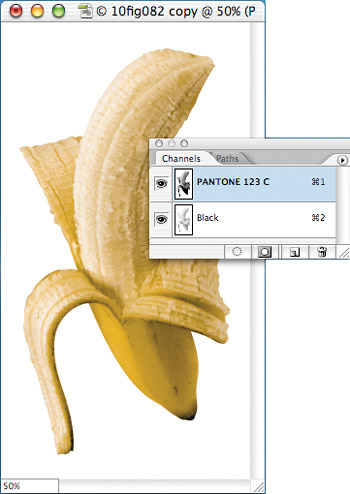
Now the image should be made out of just yellow and black ink, but it most likely looks quite light because there's not enough black ink to compensate for not using any cyan or magenta ink. To fix that, choose Black from the Output Channel pop-up menu, and then slide the Cyan and Magenta sliders toward the right until the brightness looks as close to the original as you can get (Figure 10.88). (Turn the Preview check box off and back on again to compare the original to the end result.) Once you have it as close as you can get to the look of the original, click OK and then drag the Cyan and Magenta channels to the trash at the bottom of the Channels palette. Finally, to get a more appropriate shade of yellow, double-click to the right of the name of the Yellow channel in the Channels palette so you can pick a new color and experiment until the image looks the best it can (Figure 10.89). If you'd like to know more about reproducing images using inks other than CMYK, then be sure to check out the Spot Color section in Bonus Chapter 2, “Channels,” on the CD at the back of the book.
Figure 10.88. Adding what used to be in the Cyan and Magenta channels to the Black channel will compensate for using fewer inks.

Figure 10.89. The final image is made out of only two colors of ink!
Now that you've seen one example, let's use the Channel Mixer to convert a full-color image into a grayscale one. You might think that you could just choose Image > Mode > Grayscale and be done with it. Well, that's fine if you don't really care about the quality of the end result or if you're in a big hurry. But, if you want the highest-quality result, then you'll either want to use the technique I talked about in the Hue/Saturation section of this chapter or you'll want to experiment with the Channel Mixer. But before you get started, go open the Channels palette and click through all the channels to get an idea of what you'll be working with (Figure 10.90). You'll need to start with one of those channels as the base of your grayscale conversion, so make note of which one displays the best grayscale version of the image. Now, choose Image > Adjustments > Channel Mixer, and turn on the Monochrome check box at the bottom of the dialog box to remove all the color from your image. Then, to start with the channel you liked best, move the appropriate slider to the 100% position and move the other sliders to 0% (Figure 10.91). Now experiment with moving the other sliders to the right and left to see how they affect the image. As you move a slider toward the right, the image will get brighter, which will necessitate that you move another slider toward the left to compensate. By using different mixes of the channels, you'll get different grayscale results. There is no obvious formula for what will give you the best results; you'll just have to experiment until you like the detail, contrast, and brightness of the end result (Figure 10.92). A general rule of thumb is that getting the sliders to add up to 100% should deliver an image that is close to the same brightness as the original image. Once you like what you have, click OK and then choose Image > Mode > Grayscale.
Figure 10.90. Channels from left to right: red, green, blue. (©2005 Stockbyte, www.stockbyte.com)

Figure 10.91. Dial in the channel that looked the best.

Figure 10.92. This is just one of many end results you could get with a few minutes of experimentation.
