Contrast Blending Modes
The majority of blending modes available on the next section of the menu combine the ideas we've used in the Darken and Lighten blending modes. In all of these modes, 50% gray simply disappears, and anything darker than 50% has the potential of darkening the underlying image, while areas brighter than 50% have the potential to brighten the underlying image. In essence, these modes increase the contrast of the underlying image by brightening one area while darkening another.
Overlay Mode
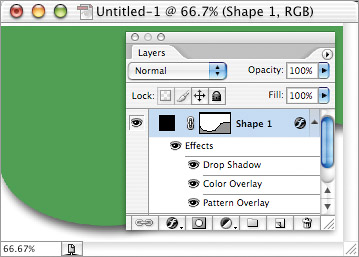
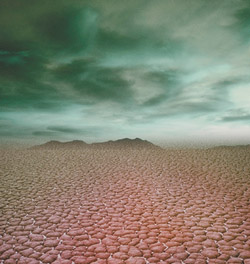
In Overlay mode, the information on the underlying image is used to brighten or darken the active layer. Any areas darker than 50% gray will act like ink (or Multiply mode), while any areas brighter than 50% gray will act like light (or Screen mode). Overlay mode is useful when you want to add color to the underlying image while maintaining its highlights and shadows (Figures 13.68 and 13.69). I also use this mode a lot when I'm working with Layer Styles. If I use both a pattern fill and a color overlay, then the color overlay always completely covers up the pattern that is underneath it. But if I apply the color using the Overlay blending mode (in the Layer Style dialog box), it allows the highlights and shadows from the texture to brighten and darken the color that I'm applying (Figures 13.70 and 13.71). This allows me to create many grayscale patterns and then colorize them with the Color Overlay layer style.
Figure 13.68. The original image. (©Stockbyte, www.stockbyte.com)

Figure 13.69. Result of placing solid red on a layer set to Overlay mode.

Figure 13.70. When you use color overlay and a pattern fill, the color obstructs your view of the pattern.

Figure 13.71. Applying the color overlay in Overlay mode allows it to combine with the underlying pattern.

Soft Light Mode
As with the other modes in this category, Soft Light mode makes 50% gray disappear while making brighter areas brighten and darker areas darken the underlying image. It usually does this with more subtle results than those you get in either Overlay or Hard Light mode. I primarily use this mode for applying textures to photographs. I cover a bunch of texture techniques in Bonus Chapter 4, “Type and Background Effects,” but for now let's create just one. Open any photographic image and create a new, empty layer above that image. Next, type D to reset your foreground and background colors, and then choose Filter > Render Clouds. Now choose Filter > Stylize > Find Edges, and then Filter > Stylize > Emboss. Set the angle to 45°, the height to 1, and the amount as high as it can go. If you've done everything right, you should end up with a texture that resembles most refrigerators. To apply that texture to the underlying image, set its blending mode to Soft Light at the top of the Layers palette (Figure 13.72).
Figure 13.72. A texture applied in Soft Light mode. (©2005 PhotoSpin, www.photospin.com)

Soft Light mode is also useful when you're attempting to add a reflection to a metallic image. Just place the image you want to reflect on a layer above the metallic object, and set its blending mode to Soft Light (Figures 13.73 and 13.74).
Figure 13.73. Two layers, both set to Normal mode. (©Stockbyte, www.stockbyte.com)

Figure 13.74. Result of switching the top layer to Soft Light mode.

Hard Light Mode
This has got to be one of my absolute favorite blending modes. In essence, it's a combination of Multiply mode (which acts like ink) and Screen mode (which acts like light). In Hard Light mode, any areas that are 50% gray will disappear, areas darker than 50% will darken the underlying image, and areas brighter than 50% will brighten the underlying image. You'll find me using this mode anytime I use the Emboss filter. When I choose Filter > Stylize > Emboss, I end up with a gray image that has almost no hint of the colors from the original image (Figures 13.75 and 13.76). But the gray gunk I do end up with happens to be exactly 50% gray (in RGB mode), which means that I can choose Edit > Fade Emboss and set the mode to Hard Light, and bingo…the gray is gone (Figure 13.77)! So Hard Light mode allows me to emboss an image while maintaining its color qualities. You can go one better by duplicating the layer before you emboss it. Then, choose Image > Adjustments > Desaturate to ensure there won't be any color shifts (Figures 13.78 and 13.79). Next, set the duplicate layer to Hard Light mode, and then apply the Emboss filter. This way you'll get a real-time preview instead of staring at a bunch of gray stuff while you're applying the filter.
Figure 13.75. The original image. (©2005 Andy Katz)

Figure 13.76. The Emboss filter delivers a gray result.

Figure 13.77. Result of applying the Emboss filter in Hard Light mode.

Figure 13.78. Embossing a color image produces color residue.

Figure 13.79. Desaturating the image prevents color residue.

Vivid Light
This mode is a combination of Color Dodge and Color Burn. In Vivid Light mode, areas darker than 50% darken and the colors become more saturated; areas brighter than 50% brighten and the colors become more saturated. This mode is great when an image really needs some kick. Just duplicate the layer and set it to Vivid Light mode. You'll most likely need to turn down the Opacity setting in order to get an acceptable result (Figures 13.80 and 13.81). I also use Vivid Light when I want to apply a texture to an image and I'm concerned that Overlay, Soft Light, or Hard Light mode will make the colors look a little too dull. For example, you can create a new layer above the image you want to texturize. Next, choose Filter > Render > Clouds, then apply Filter > Sharpen > Unsharp Mask with settings of 500, 1.5, and 0, and finish by applying Filter > Stylize > Emboss with settings of 145, 1, and 500. Now if you set the texture layer to Vivid Light mode, you'll be adding texture and enhancing the colors in the image (Figures 13.82 and 13.83).
Figure 13.80. The original image could use a little contrast and saturation. (©2005 PhotoSpin, www.photospin.com)

Figure 13.81. Result of duplicating the layer and setting it to Vivid Light mode.

Figure 13.82. The original image. (©Stockbyte, www.stockbyte.com)

Figure 13.83. Texture applied in Vivid Light mode.

Linear Light
This mode is a combination of Linear Dodge and Linear Burn. I try this mode anytime I'm considering using Hard Light mode. It produces a higher-contrast result where more areas will become pure black and pure white. This is another mode that is great with textures. I mainly use it when I want the highlights and shadow areas of a texture to become pure white and pure black, which usually makes the texture look extra crisp. If you'd like to give it a try, just create a new layer above the image you want to enhance, then fill that layer with white. Now, to make the texture, choose Filter > Artistic > Sponge, and use settings of 2, 12, and 5 to pull out some contrast; then choose Image > Adjustments > Auto Levels and finish it off with Filter > Stylize > Emboss with settings of 135, 1, and 65. Once you set the blending mode to Linear Light, you should see what I'm talking about (Figures 13.84 and 13.85). If you find that the colors become too vivid, then duplicate the original image, place it on top of the layers stack, and set its blending mode to Color (Figures 13.86 and 13.87).
Figure 13.84. The texture that will be applied to a photo.

Figure 13.85. Applying the texture in Linear Light mode produces more saturated colors. (©2005 Andy Katz)

Figure 13.86. Place a duplicate of the original image on top, and set the mode to Color.

Figure 13.87. Result of applying a duplicate of the original in Color mode.

(We'll talk about Color mode in a bit.) I often use this technique to create a high-contrast, soft-focus look. I'll end up with three versions of the original image, the bottom one being normal, the middle one being blurred and set to Linear Light mode, and the top one being set to Color mode and not blurred (Figures 13.88 to 13.90).
Figure 13.88. The original image. (©Stockbyte, www.stockbyte.com)

Figure 13.89. Blurring a duplicate layer set to Linear Light mode produces saturated colors.

Figure 13.90. Result of applying the original image in Color mode.

Pin Light
This mode is a combination of Lighten and Darken modes. I find that I use this mode mainly when I'm experimenting with filters. I'll end up trying all the contrast modes, and on occasion Pin Light will be the most effective. But it's not very often that I think of a technique that is created specifically with Pin Light in mind. Here's an example of a situation where I ended up liking what Pin Light gave me. I duplicated the original layer, set the top layer to Pin Light, and left the bottom layer set to Normal. Then, with the top layer active, I chose Filter > Sketch > Note Paper and used settings of 25, 5, and 2. That created 3D highlights, but too much of the gray background was showing up (Figure 13.91). To finish it off, I chose Image > Adjustments > Levels and moved the middle slider until the background disappeared (Figure 13.92).
Figure 13.91. The Note Paper filter delivers a result that contains large areas of gray.

Figure 13.92. Applying the filter in Pin Light mode and adjusting the image with Levels. (©Stockbyte, www.stockbyte.com)

Hard Mix
This mode will posterize the underlying layers based on the Fill Opacity setting of the layer that is using the Hard Mix blending mode. A high Fill Opacity will deliver extreme posterization, whereas lower Fill Opacity settings will deliver a smoother-looking image (Figures 13.93 to 13.95). If the brightness of the layer is near 50% gray, then the brightness of the underlying image will not change. Anything brighter than 50% gray will brighten the underlying image, whereas anything darker will darken it (Figures 13.96 to 13.99). A layer filled with 50% gray (RGB = 128, 128, 128) will neither brighten nor darken the underlying image, although varying the Fill Opacity will still control its posterization.
Figure 13.93. The original image.

Figure 13.94. Result of duplicating the layer and setting the blending mode to Hard Mix.

Figure 13.95. Result of lowering the Fill Opacity of the duplicate layer to 70%.

Figure 13.96. The original image.

Figure 13.97. Using 50% gray will leave the brightness of the underlying image unchanged.

Figure 13.98. Using a shade brighter than 50% gray will brighten the underlying image.

Figure 13.99. Using a shade darker than 50% gray will darken the underlying image.

I like to use Hard Mix to create a “clipping display” just like what you'd get when you Option-drag (Mac) or Alt-drag (Windows) one of the sliders in Image > Adjustments > Levels or the Camera Raw dialog box. All you have to do is choose Layer > New Fill Layer > Solid Color, set the Mode pop-up menu to Hard Mix, and then work with a shade of gray. Using black will show you all the areas that are being blown out to white, whereas using white will show you all the areas that are plugged up to black. I just create two layers at the top of the Layers palette and turn them on whenever I need to check to see if I've lost detail in the highlights or shadows. This technique will be useful to you only if you're knowledgeable about clipping displays, so be sure to read Chapter 9, “Using Camera Raw,” if you need a refresher.
Using Hard Mix mode with a 50% Fill Opacity often looks identical to the results you get using the Vivid Light blending mode at 100% Fill Opacity. For that reason, I try Hard Mix and experiment with the Fill Opacity setting anytime I'm experimenting with the Vivid Light blending mode.
How to Tell Them Apart
Here's my general thinking when using the contrast blending modes. Overlay mode will make the underlying image more prominent than the active layer. Hard Light mode does the opposite, making the active layer more prominent. Soft Light mode usually makes both layers equally prominent. Vivid Light acts a lot like Hard Light, but will increase the saturation of the colors while preserving more of the highlights and shadows from the underlying image. Linear Light is also like Hard Light, but it has a greater tendency to make areas pure black and pure white. Finally, Pinlight and Hard Mix are the loners in this group. Hard Mix mode will increase the saturation of the colors and posterize the image, while lightening the underlying image in the highlight areas of the active layer and darkening the underlying image in the shadow areas. Pin Light compares the two layers, brightens the underlying image in the high-light areas of the active layer, and darkens the underlying image where there are shadows in the active layer (in a rather unpredictable way).
