
Resolution and File Size
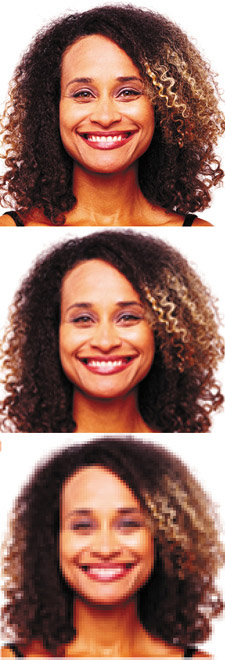
Let's see how the resolution setting you scan with affects your file sizes. Let's say you have a 1-by-1-inch original. If you scan it at 200ppi, the file size will be 117KB (uncompressed). At 100 ppi, it would be 29KB, and at 50ppi, it would be only 7KB (Figure 4.27). In general, it's best to go with the lowest setting that will give you a good result. The settings mentioned earlier in this chapter are the optimal settings, which in general will be the settings that give you the absolute highest-quality result. If you decide to use anything lower than what I mentioned earlier, be sure to do a test to ensure that your image doesn't become pixilated when it's printed.
Figure 4.27. Top to bottom: 200ppi, 100ppi, 50ppi. (original image ©2005 Stockbyte, www.stockbyte.com)
If you're not sure how the image will be reproduced, then scan for the most demanding type of output you think you'd ever use, because you can always change things later. Let's take a look at what your options are for post-scan resolution changes.
Resampling
If you'd like to change how large the pixels are that make up your image (the ppi setting), just choose Image > Image Size and turn on the Resample Image check box.
Any changes you make to the resolution setting will make the pixels larger or smaller, but the image will stay the same overall size (Figure 4.28). This is useful when you get an image that was scanned for a high-end purpose (such as a brochure) and you want to, for example, reuse it in a newspaper. So, it might start with a resolution of 300ppi, but you need it to be only 170ppi. By making that change, the file size would become less than half of what it was at the higher resolution.
Figure 4.28. Top to bottom: Resampled from 50ppi to 200ppi, resampled from 100ppi to 200ppi, scanned at 200ppi. (original image ©2005 Stockbyte, www.stockbyte.com)


When Resample Image is turned on, it's kind of like printing your image and then placing it on a scanner and scanning it. That would be fine, as long as you're not asking to get more info out of it, because there simply isn't any more in the image. It doesn't usually harm an image to reduce its resolution using resampling because you are asking for less information than what's in the original, but there is no advantage to increasing the resolution. So, when using resampling, you should be fine as long as the file size is going down because you're starting with more than you needed. But if it's going up, then Photoshop doesn't really have enough info to do what you're asking for, and the quality of your image won't improve.
By watching the Pixel Dimensions area in the Image Size dialog box, you can tell if the changes you're making will cause Photoshop to discard pixels or add new ones. If the file size listed is smaller than the one shown to its right [128.2K (was 492.7K), for example], then Photoshop will need to discard information (pixels) to accomplish the change you've requested. If, on the other hand, the first number is larger than the second [513.0K (was 492.7K), for example], then Photoshop will have to create some new pixels in order to end up with the amount of information you've requested. To see how Photoshop thinks about adding pixels to your image, let's take a look at a very simple example: a 2-pixel–by–2-pixel checkerboard, with two each black and white pixels (Figure 4.29). If you enlarge this image to 200% so that it becomes 4 pixels by 4 pixels, the new image will contain four times as many pixels as the original. Photoshop must invent 12 new pixels to fill it out.
Figure 4.29. Left: The original 2-pixel-square image. Right: The result of enlarging the image to 4-pixels square.

The pop-up menu that appears to the right of the Resample Image check box determines how Photoshop will go about producing the number of pixels that make up your image. Let's take a look at each choice individually. I'll mention which choices to use in different situations.
Nearest Neighbor: This choice attempts to maintain the look of each pixel in the image by turning each pixel into a same-colored square. The results usually look as if you've simply zoomed in on the image in Photoshop. Unlike the other choices, it doesn't compare pixels to their neighbors (unless you scale your image up or down in increments less than 100%), so it is usually the fastest out of all the choices. This choice is good for enlarging screen shots (in increments of 100%) so that you can add higher resolution text or callouts to the image (Figures 4.30 and 4.31). It can also be useful when scaling down crisp-edged text and graphics. It's the only choice that attempts to maintain crisp edges when scaling an image up or down.
Figure 4.30. The original image with the area to be enlarged highlighted.

Figure 4.31. Enlarged 1200 percent using Nearest Neighbor.
Bilinear: This choice analyzes each pixel in an image based on how it relates to the pixels that surround it. It only pays attention to the pixels directly above, below, and to the right and left of itself. That's 1/4 of the number of pixels that the Bicubic methods use (we'll talk about Bicubic next), which makes this choice a bit faster than the other, but it does not produce high-quality results (Figure 4.32).
Figure 4.32. Enlarged 1200% using Bilinear.

Bicubic: With all the bicubic choices, pixels are analyzed based on all eight pixels that surround them (including the diagonal neighbors that Bilinear ignores). Because Bicubic uses four times as much information as Bilinear, it will be slower, but it will almost always produce a higher quality result. Use this mode when you want to get results similar to what earlier versions of Photoshop would produce (Figure 4.33).
Figure 4.33. Enlarged 1200% using Bicubic.

Bicubic Smoother: This choice analyzes the same amount of information as the Bicubic choice, but uses slightly different math in an attempt to produce less abrupt transitions in your image. This choice is usually best when enlarging images (file size increasing) because it will produce a less jaggy-looking result compared to the other choices (Figure 4.34).
Figure 4.34. Enlarged 1200% using Bicubic Smoother.

Bicubic Sharper: This choice is also similar to Bicubic, but it attempts to produce more abrupt transitions in your image, which will usually cause it to appear sharper than what you'd get with the other choices. This choice is usually the best when reducing images (file size decreasing) because it produces a less soft-looking result than the other choices (Figure 4.35).
Figure 4.35. Enlarged 1200% using Bicubic Sharper.

As a rule of thumb, use Bicubic Sharper when you're making the image smaller, use Bicubic Smoother for making the image larger, and use Bicubic when you're not sure which choice to use (when using Actions for example).
If you turn Resample Image off, then you're going to keep the same amount of information and just change the size the pixels will be when they are printed. The entire image will shrink, but you don't lose any information; you just make the pixels smaller (Figure 4.36). This is what you need to do to images that come from a digital camera, because it doesn't degrade the image in any way. The resolution is almost always set at 72, but the overall width and height are quite large. For instance, on my digital camera, I get images that are 35 by 26 inches at 72ppi. With a resolution setting that low, the images always print out jaggy. But, if I go to the Image Size dialog box, turn Resample Image off, and change the resolution to 300, I end up with an 8.5-by-6.5-inch image, and it doesn't look jaggy when it's printed.
Figure 4.36. Top to bottom: 200ppi, 100ppi, 50ppi. (original image ©2005 Stockbyte, www.stockbyte.com)

Another approach to achieving optimal resolution is to ignore the resolution setting when scanning and instead shoot for the correct file size. Let's see how that would work. You'd start off by using Photoshop's New dialog box as a file-size calculator. Simply enter the width and height you'd like to print your image at (let's say 12 by 14 inches) and enter the resolution setting required for the type of printing you'll be using (let's say 300ppi). With that information entered, set the Color Mode pop-up menu to RGB, choose the number if bits you plan to scan with (a standard file is 8 bits) and then note the image size listed on the right side of the New dialog box (Figure 4.37). In my example, Photoshop indicated that I'd need a 43.3MB file. Now let's say we're scanning a 35mm slide, which is a little less than 1.5 inches in size. Using the file-size trick, I don't have to figure out the proper resolution and scaling settings; instead, I'd just experiment with those settings until my scanner indicates that I'd end up with a 43.3MB file. Then, once I'm done scanning the image, I'd have to choose Image > Image Size, turn off the Resample Image check box, and enter the width I was looking for (12 inches, in my case). That will keep the same amount of information in the file but will make sure that the pixels are set to the proper size to get what I was looking for. I'd end up with a 12-by-14-inch image with a resolution of about 300ppi. Try it out; it sounds much more complicated than it really is.
Figure 4.37. The New dialog box.

If you send out for a high-end scan, the company that scans your image might not care what resolution you are looking for. They often only care about the file size. If that's the case, then use the New dialog box to calculate the file size that is needed for the output you desire, just as we did earlier.