
Continuing from the first step, we will now create our menu game object in the scene, with which we will be able to open and close the menu window. Pressing the M key will open the menu window, and clicking on the close button in the window will close the menu window. We will also create three tab buttons for the player to be able to see through the different pages, STATUS, INVENTORY, and EQUIPMENT, as we can see in the following screenshot:

Just make sure that we have our Player.png texture in the Chapter2/images folder. Now, we are ready.
We will begin by creating the menu:
- First, we want to create an empty game object in our scene and name it
menu; go to GameObject | Create Empty and name itMenuObject. We will use this object for our menu. - Next, we will create the menu JavaScript that will control our entire menu; go to Assets | Create | Javascript, name it
Menu, double-click on it to launchMonoDevelop, and we will get our hands dirty with the code. - Open the
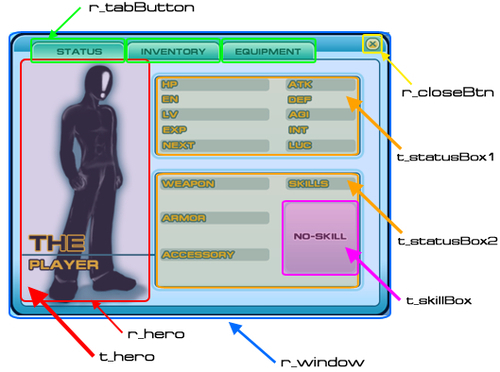
Menu.jsfile, and type these variables as follows://For toggle the open and close our menu window //We made it static so that we can access this variable from everywhere. public static var b_openMenu : boolean; public var customSkin : GUISkin; //We assign our MenuSkin here public var t_hero : Texture; //Character background texture public var t_statusBox1 : Texture; //First Info box background texture public var t_statusBox2 : Texture; //Second Info box background texture public var t_skillBox : Texture; //Skill box background texture private var in_toolbar : int = 0; private var s_toolbars : String[] = ["STATUS", "INVENTORY", "EQUIPMENT"]; private var r_hero : Rect = new Rect (19, 35, 225, 441); private var r_window : Rect = new Rect (10, 10, 640, 480); private var r_closeBtn : Rect = new Rect (598, 8, 26, 22); private var r_tabButton : Rect = new Rect (35, 15, 480, 40);
Here, we just created the necessary variables for our Menu window, as shown in the following screenshot:
- Next, we will set
b_openMenutofalsein theStartfunction, because we don't want our menu to show until the player presses the M key, so type the code as follows:public function Start () : void { b_openMenu = false; //Set our menu disabled at the first run } - Then, we go to the
Updatefunction and set it as follows: - Next, we will use the
OnGUIfunction to create our window. - In the
OnGUIfunction, we will assign ourcustomSkin, create a window menu, make it draggable, and check to make sure that the window is always on the screen; so add this code after theUpdatefunction://All GUI Class will create in this function public function OnGUI () : void { GUI.skin = customSkin; //Assign our MenuSkin to the Gui Skin if (b_openMenu) { //If open menu == true create a menu window r_window = GUI.Window (0, r_window, DoMyWindow, ""); //create a new window by the size of rect //This whole code is to make sure that our window can't be dragged outside of the screen area /////////////////////////////////////////////////////////////////////////////// r_window.x = Mathf.Clamp(r_window.x, 0.0, Screen.width - r_window.width); r_window.y = Mathf.Clamp(r_window.y, 0.0, Screen.height - r_window.height); //////////////////////////////////////////////////////////////////////////////// } } //Our window function operates here private function DoMyWindow (windowID : int) : void { //We create tab button here. in_toolbar = GUI.Toolbar (r_tabButton, in_toolbar, s_toolbars, GUI.skin.GetStyle("Tab Button")); switch (in_toolbar) { case 0 : //Status //Create a status page break; case 1 : //Items //Create an item page break; case 2 : //Equip //Create an equipment page break; } //Draw our background character texture GUI.DrawTexture(r_hero, t_hero); //We create a close button here if (GUI.Button (r_closeBtn, "", GUI.skin.GetStyle("Exit Button"))) { b_openMenu = false; } //Make our window dragable in whole area GUI.DragWindow(); }Since we want everything inside our menu window, we used the
DoMyWindowfunction to take aGUI.Windowas one parameter. Inside theDoMyWindowfunction, we create all the buttons and textures. Then, we make our window draggable by addingGUI.DragWindow(). With that we are done with coding for this step. - Next, go back to Unity,click on
Menu.js, and drag-and-drop it to theMenugame object in the Hierarchy. Next, click on theMenugame object in the Hierarchy, open the Menu (Script), and set the parameters as follows:- Custom Skin: Drag-and-drop our
MenuSkin(GUISkin) here - T_hero: Drag-and-drop
blackDude.pngfrom theChapter2/imagesfolder here - T_status Box 1: Drag-and-drop
stat1.pngfrom theChapter2/imagesfolder here - T_status Box 2: Drag-and-drop
stat2.pngfrom theChapter2/imagesfolder here - T_skill Box: Drag-and-drop
skill0.png from theChapter2/imagesfolder here
- Custom Skin: Drag-and-drop our
- Then, we can click on the play button to see the result. In the game scene, we can press the M key to bring up our window and click the x button at the top-right corner to close it.
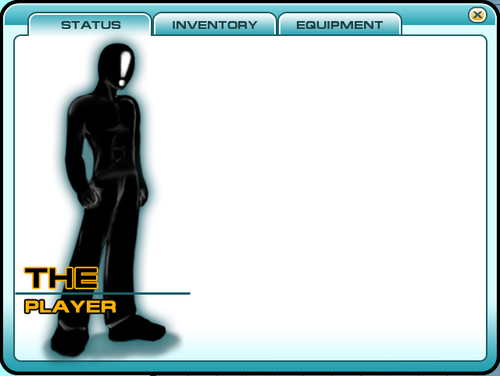
We just created a menu window, which can be opened by pressing the M key and closed by clicking on the x button at the top-right corner of the menu window. We also have our character texture nicely placed inside our menu window. Next, we made this window draggable and made sure it is always on the screen by using the following code:
r_window.x = Mathf.Clamp(r_window.x, 0.0, Screen.width - r_window.width);
r_window.y = Mathf.Clamp(r_window.y, 0.0, Screen.height - r_window.height);
Basically, we set the minimum limit of our window in the x-position to 0 and the maximum to the screen width subtracted by the window width; we also set the minimum limit of y-position to 0 and the maximum to the screen height subtracted by the window height.
We will see this result when we click play the game and try to drag this window off the screen. Lastly, we created a tab that can be clicked to change to a different page.
In this step, we were using a
GUI class to create our window, box, and button, but we can also use a GUILayout class to create the same thing as we did with GUI class. The only difference between these two classes is that GUI will need to take a Rect object to specify the size and position of the UI. On the other hand; GUILayout doesn't need to take the Rect object. It will automatically adjust the size related to the source it has. Let's say, we want to create a box that contains a text or image, GUILayout will automatically adjust the height and width to nicely fit your text or image. For the position, GUILayout will automatically set the first position to the top-left corner of the screen, which is (0, 0), and it will continue to the right or down depending on the GUILayout object that we already have on the screen. However, the downside is that we will not be able to create a fixed position or size for the GUILayout. So, both classes are very powerful to use. We can use them in different situations.
You can see more details of the GUI class at this URL:
http://unity3d.com/support/documentation/ScriptReference/GUI.html.
You can also see the details of the GUILayout class at this URL:
http://unity3d.com/support/documentation/ScriptReference/GUILayout.html.
The GUI.DragWindow() function allows us to create a draggable window by specifying the drag area on our window. You can visit the following URL to see the details:
http://unity3d.com/support/documentation/ScriptReference/GUI.DragWindow.html.
We will see this function take one Rect parameter, which is the area that allows the user to drag the window around. However, we didn't assign Rect parameters to our GUI.DragWindow() function, which means that we can drag the whole window area.