
From the last section, we have the setup for the Aiming button to stop our character's movement as well as control the animation of our character by using crossFade()
. In this section, we will add the aiming animation, shot animation, scope target UI, rocket launcher script, and rocket launcher object.
We will start with creating a rocket launcher and adding the New3PSController script to it. Then, our character will be able to shoot the rocket:
- Go to Unity editor, GameObject | Create Empty, and name the object
RocketLauncher, and then we drag this object inside the Main Camera object in the Hierarchy view as shown in the following screenshot: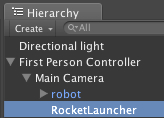
- Then, go to the Inspector view of the
RocketLauncherto set up the Transform | Position, X: 0, Y: 0, Z: 2. Next, we create the GUITexture for the scope target by going to GameObject | Create Other | GUI Texture and naming itScopeUI. Go to its Inspector and set the following:- GUITexture
- Texture:
scopeTarget.png(Chapter5/UI folder/scopeTarget) - Pixel Inset
- X: -16, Y: -16, Width: 32, Height: 32
- Texture:
- GUITexture
- Create a new
RocketLauncherscript by going to Assets | Create | Javascript and name itRocketLauncher, double-click on it to open MonoDevelop. Then, go to the script and replace the code as follows:public var speed : float = 10; public var ammoCount : int = 20; private var lastShot : float = 0.0; public function Fire(_reloadTime : float) : void { if (Time.time > (_reloadTime + lastShot) && ammoCount > 0) { //Get the last shot time lastShot = Time.time; //Decrease the bullet ammoCount--; } } public function Reload () : void { ammoCount = 20; } - Go back to Unity and go to the Project view and drag your
RocketLauncherscript to theRocketLauncherobject in the Hierarchy view. - Go to the
New3PSControllerscript to add the highlighted code between themaxRotateYandmouseLookparameters (before theAwake()function), as shown next://Camera Rotation Limit public var minRotateY : float = -15; public var maxRotateY : float = 60; //Scope UI public var scopeUI : GUITexture; //Rocket Launcher public var rocketLauncher : RocketLauncher; //Shot Params private var b_isPrepare : boolean = false; private var b_isShot : boolean = false; //Mouse Look private var mouseLook : MouseLook_JS; //Character Motor private var motor : CharacterMotor;
- Then, go to the
Update()function and add the code before and insideif (Input.GetKey(KeyCode.E)) {(afterif (directionVector != Vector3.zero) {statement) as highlighted:if (directionVector != Vector3.zero) { } //Reload the rocket bullet if (Input.GetKey(KeyCode.R)) { BroadcastMessage("Reload"); } if (Input.GetKey(KeyCode.E)) { //Show the Scope UI scopeUI.enabled = true; //Set the maximum and minimum limit rotation on Y-axis for the main camera //Set the maximum and minimum limit rotation on Y-axis for the main camera mouseLook.minimumY = minRotateY; mouseLook.maximumY = maxRotateY; //Checking if the character is playing the shot animation if (!b_isPrepare) { b_isShot = false; //Play the shot preparing animation function WaitForPrepare(); } else { //If the player click fire play the shot animation again if ((Input.GetButton("Fire1")) && (!b_isShot)) { b_isShot = true; //Play the shot animation function WaitForShot(); } } //No Movement Direction motor.inputMoveDirection = Vector3.zero; } - Go to the
elsesection and add the highlighted code at the first line beforeif (Camera.main.GetComponent(MouseLook)) {, as follows:else { //Hide the Scope UI scopeUI.enabled = false; //Set the prepare animation to false b_isPrepare = false; //No Y-axis Rotation mouseLook.minimumY = 0; mouseLook.maximumY = 0; //Change the movement speed of the character if (Input.GetKey(KeyCode.LeftShift) || Input.GetKey(KeyCode.RightShift)) { - We are now done with the adding part for the
Update()function. We will need to add other two functions for theWaitForPrepare()andWaitForShot()functions. So, let's go to theUpdate()function before@script RequireComponent (CharacterMotor)line and add the following two functions:private function WaitForShot () : IEnumerator { _animation[shotAnimation.name].speed = shotAnimationSpeed; _animation[shotAnimation.name].wrapMode = WrapMode.ClampForever; _animation.PlayQueued(shotAnimation.name, QueueMode.PlayNow); BroadcastMessage("Fire", shotAnimation.length); //Call Fire function in attached scripts of this GameObject or any of its children yield WaitForSeconds (shotAnimation.length); b_isShot = false; } private function WaitForPrepare () : IEnumerator { _animation[shotAnimation.name].speed = shotAnimationSpeed * 2; _animation[shotAnimation.name].wrapMode = WrapMode.ClampForever; _animation.CrossFade(shotAnimation.name, 0.6); yield WaitForSeconds(shotAnimation.length); b_isPrepare = true; }The preceding two functions are basically to play the aiming and shooting animation. Now, we are done with adding the
New3PSControllerscript. - Then, go back to Unity and click on the First Person Controller object in the Hierarchy view, and go to its Inspector view; at the New 3PSController (Script) drag both objects that we just created, as follows:
- Scope UI: ScopeUI (Drag ScopeUI object here)
- Rocket Launcher: RocketLauncher (Drag RocketLauncher object here)
We are done with this section. Click Play to see the result. Now, if you hold the E key, the scope target will appear and our character will start playing aiming animation. If we left-click on the mouse while holding the E key, the character will start playing the shot animation. However, there is no rocket coming out right now. We will create the rocket and the particle object in the next section.
In this step, we just added some code to our New3PSController.js for controlling the aiming and shot animation as well as created the rocket launcher object and script that will trigger when the user presses fire or aim. We also created the GUITexture object to show the scope target graphic, which will show when the player presses E to aim and hide when the player doesn't press E.
In the Fire() function, we added the rocket launcher object. We checked for the time that our rocket will be fired after the shot animation ended by checking for the reloaded time plus the last time that the character was shot. We also decreased the amount of bullet when the character clicks shot. In the next section, we will add the rocket prefab and the particle object in the Fire() function.
If we take a look at New3PSController.js, we will see that we used the BroadcastMessage("Reload"); and BroadcastMessage("Fire", shotAnimation.length);. Both of these functions basically call all the functions named Reload or Fire, in this game object or any of its children. This is a great way to make our script and object more organized.
We can have different scripts attached to the children of this object and trigger at the same time. For example, BroadcastMessage("Fire", shotAnimation.length) will call the Fire(var f:float) function in each component attached to the object (irrespective of whether we're calling it on the Component or the GameObject). So, when the user hits fire, we will have the rocket shot at the same time with the smoke coming out from the launcher without having to code everything in one big script. We can see more details from the following links:
http://unity3d.com/support/documentation/ScriptReference/Component.BroadcastMessage.html.
http://unity3d.com/support/documentation/ScriptReference/GameObject.BroadcastMessage.html.
Next, we will take a look at the waitForShot() function, we will see that we use _animation.PlayQueued(shotAnimation.name, QueueMode.PlayNow); instead of the CrossFade() function. This is because we want to play the shot animation as soon as the player presses fire. The PlayQueued() function will help us to fade between the same animation smoothly. We can see further details of this function from the following website:
http://unity3d.com/support/documentation/ScriptReference/Animation.PlayQueued.html.