
In the last section we created the destructible wall object, which contains four cubes, each with the Rigidbody and Box Collider attached to it, and we can shoot to break it.
In this last section, we will create the rockslide that the rock will fall on when the player hits the trigger area and creates the Rocks and TriggerArea script to enable and disable the Rockslide object.
Go to GameObject | Create Empty to create the empty game object and name it Rockslide and reset its position to X: 0, Y: 0, Z: 0.
Then, create another empty game object by going to GameObject | Create Empty; name it Break and drag it inside the Rockslide, as shown in the following screenshot:
Next, create two cube objects, which will be the static object to make it look like some part of the rock is still stuck to the terrain, and the trigger area to make the rock fall down when the player hits it. Before we start, we need to reset the Transform of the Break game object to default by clicking on the little gear on the right-hand side and then choose Reset.
We will start by creating eight cubes to represent the rock pieces that will fall down:
- Let's go to GameObject | Create Other | Cube, name it
Cube1, and drag it inside theBreakgame object insideRockslide, which we just created. - Then, we will add the Rigidbody to the
Cube1by going to Component | Physics | Rigidbody. - Next, we will go to the cube Inspector view to set up the parameters as follows:
- Transform
- Position: X: -1.5 Y: 0 Z: 0
- Rotation: X: 0 Y: 0 Z: 0
- Scale: X: 3 Y: 3 Z: 5
- Box Collider
- Material: Rock (Drag Rock physics material in the
Chapter7folder to Project view here)
- Material: Rock (Drag Rock physics material in the
- Mesh Renderer
- Materials:
- Size: 1
- Element 0: Rock (Drag Rock material in the
Chapter7folder in Project view here)
- Materials:
- Rigidbody
- Mass: 6000
- Is Kinematic: Check
- Transform
- Now, we have finished setting up the first cube. Let's duplicate seven more cubes by pressing Command + D (for Mac) or Control + D (for Windows) keys, and naming all seven cubes
Cube2,Cube3,Cube4,Cube5,Cube6,Cube7, andCube8similar to what we did for theWallgame object in the third step. Then, we go to each new cube's Inspector view and set up its position as follows:- Transform (Cube2)
- Position: X: 1.5 Y: 0 Z: 0
- Transform (Cube3)
- Position: X: -1.5 Y: 0 Z: 5
- Transform (Cube4)
- Position: X: 1.5 Y: 0 Z: 5
- Transform (Cube5)
- Position: X: -1.5 Y: 0 Z: 10
- Transform (Cube6)
- Position: X: 1.5 Y: 0 Z: 10
- Transform (Cube7)
- Position: X: -1.5 Y: 0 Z: 15
- Transform (Cube8)
- Position: X: 1.5 Y: 0 Z: 15
- Transform (Cube2)
- Now, we need two static objects that won't be falling down. Let's duplicate the
Cube1object that we just created by pressing Command + D (for Mac) or Control + D (for Windows), name itCubeBase1, and drag it outside theBreakgame object but inside theRockslidegame object, as shown in the following screenshot: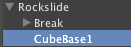
- Go to the CubeBase1 Inspector view and set the parameters as follows:
- Transform
- Position: X: 0 Y: 0 Z: -5
- Rotation: X: 0 Y: 0 Z: 0
- Scale: X: 6 Y: 3 Z: 5
- Rigidbody: Right-click and choose Remove Component
- Transform
- Duplicate this object to another side by pressing Command + D (for Mac) or Control + D (for Windows), name it
CubeBase2, and set its Transform as follows:- Transform
- Position: X: 0 Y: 0 Z: 20
- Rotation: X: 0 Y: 0 Z: 0
- Scale: X: 6 Y: 3 Z: 5
- Transform
- We are almost done creating this object. The last thing is creating the trigger area to make the rock fall down when the player hits this area. So, we go to GameObject | Create Empty, name it
TriggerArea, and drag it inside theRockslidegame object. - Then, add the Box Collider to it by going to Component | Physics | Box Collider, and then set the parameters as follows:
- Transform
- Position: X: -35 Y: -15 Z: -3
- Rotation: X: 0 Y: -25 Z: 0
- Scale: X: 1 Y: 1 Z: 1
- Box Colider
- Is Trigger: Check
- Size: X: 12 Y: 36 Z: 24
- Transform
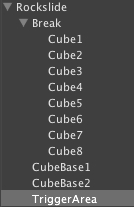
We are done with creating the Rockslide game object, which will look something similar to the following screenshot:
We now need to create the new script to control the Rockslide. Go to Assets | Create | Javascript, name it Rocks, and replace the code as follows:
public var downForce : float = 10;
private var a_rigid : Rigidbody[]; //Array of the children's Rigidbody
private var b_isTrigger : boolean = false;  // Is this object is already triggered (Use for Trigger object)
private var in_count : int = 0; //Counting the number of Kinematic Rock

//Setup Index of Children before start
public function Awake () : void {
  b_isTrigger = false;
  a_childRock = new Array();
  int_childLength = 0;
  in_count = 0;
  //Get all children's rigidbody
  a_rigid = gameObject.GetComponentsInChildren.<Rigidbody>();
}

// Use this for initialization
public function Start () : void {
  //Disable rigidbody before it triggered or hit by rocket
  DisabledRigidBody();
}
From the preceding code, we get the array of the children of rigidbody by using the gameObject.GetComponentsInChildren.<Rigidbody>() function. Next, we will add the code to make the rocks stop moving when they fall down and their velocity is close to zero by adding the following code:
//  Update every frame
public function Update () : void {
  if (b_isTrigger == true) {
    for (var r : Rigidbody in a_rigid) {
      if (r.isKinematic == false) {
        var f_sqrLen : float = (r.velocity).sqrMagnitude;
        if (f_sqrLen <= 0.0) {
          r.useGravity = false;
          r.isKinematic = true;
          in_count++;
        }
      }
    }
    //Stop updating if all the rocks stop moving
    if (in_count >= a_rigid.Length) {
      b_isTrigger = false;
    }
  }
}
As the last step of the script, we will add the function for getting and setting b_isTrigger, and also enable and disable rigidbody, as shown in the following script:
public function GetTrigger() : boolean {
  return b_isTrigger;
}

public function SetTrigger( _isTrigger : boolean) : boolean {
  b_isTrigger = _isTrigger;
}

public function EnabledRigidbody () : void {
  for (var r : Rigidbody in a_rigid) {
    r.useGravity = true;
    r.isKinematic = false;
    //Apply the velocity to the rigidbody in the -y direction to make the object fall faster
    r.velocity = new Vector3(0, -downForce, 0);
  }
}
public function DisabledRigidBody() : void {
  for (var r : Rigidbody in a_rigid) {
    r.useGravity = false;
    r.isKinematic = true;
  }
}
We will use this Rocks script with our Break game object in the Rockslide to enable and disable rigidbody of its children by setting the isKinematic to false or true.
Next, we will need another script to control the trigger area, which will trigger the Rockslide falling down. Go back to Unity and go to Assets | Create | Javascript to create a new script and name this new script TriggerArea, and replace the code as follows:
public var rocks : Rocks;

public function OnTriggerEnter(collider : Collider) : void {
  if ((collider.transform.tag == "Player") && (rocks.GetTrigger() == false)) {
    rocks.EnabledRigidbody();
    rocks.SetTrigger(true);
  }
}
The preceding code basically tells us that if the player enters the trigger area, we will enable the rigidbody and make the rock fall down.
Go back to Unity and we will do the last step, which is attaching the script to the Rockslide game object. Let's click on the Break game object inside Rockslide and drag the Rocks script on it.
Then, we will click on the TriggerArea object inside Rockslide and drag the TriggerArea script that we just created on it. Then, we will go to the TriggerArea
Inspector view and set the following:
- Trigger Area (Script):
- Rocks: Break (Drag Break game object, the child of the
Rockslideobject, to the Hierarchy here)
- Rocks: Break (Drag Break game object, the child of the
Finally, we will click on the Rockslide game object and set its Transform as follows:
- Transform:
- Position: X: 1069 Y: 32.5 Z: 677
- Rotation: X: 0 Y: 140 Z: 0
- Scale: X: 1 Y: 1 Z: 1
Now, we are finished, let's click Play to see our result. We will see that if we are entering the TriggerArea the rock will start falling down.
We have created another destructible object, which will fall down when the player gets close to it by creating the trigger area that will be triggered when the player has entered the area. We also created the new TriggerArea script that was used to detect the player as well as the Rocks script to enable rigidbody and make the object destructible.
In this step, we have used the rigidbody.isKinematic = true to disable our rigidbody and enable the rigidbody by setting it to false. This is the trick that we can use to check whether our object reacted with the physics or not. We can also adapt this trick when we want to play animation of this object that has the rigidbody attached to it by setting the rigidbody.isKinematic to true—to play the animation and disable the physics movement—or setting the rigidbody.isKinematic to false—to disable the animation and enable the physics movement.