Here we are at the last section of this chapter. As we know from the last step, we need a way to show the number of rockets left on the screen. In this step, we will create the rocket UI, which will show the number of rockets left and the rocket graphics. We will use both GUITexture and OnGUI() to create the UI.
This is the last section, which will create the RocketUI script to display the remaining rocket bullets on the screen:
- Go to Assets | Create | Javascript and name it
RocketUI. Then, double-click on it to open MonoDevelop and replace the script as follows:public var rocketLauncher : RocketLauncher; public var customSkin : GUISkin; public var width : float = 80; public var height : float = 25; public var pixelShift : int = 2; public function OnGUI() : void { GUI.skin = customSkin; DrawShadowText(new Rect(Screen.width*transform.position.x, (Screen.height*(1.0 - (transform.position.y - 0.005))), width, height), rocketLauncher.ammoCount.ToString(), customSkin.GetStyle("RocketText"), Color.white); } //Draw a 45 degree black shadow text by shifting 2 pixel bottom-right public function DrawShadowText (position : Rect, text : String, style : GUIStyle, textColor : Color) : void { var backupStyle : GUIStyle = style; //Draw a Shadow Text style.normal.textColor = Color.black; //Shift 2 pixel left and 2 pixel bottom position.x += pixelShift; position.y += pixelShift; GUI.Label(position, text, style); ///////////////////////////////////////////// //Draw a Text style.normal.textColor = textColor; //Shift pixel back position.x -= pixelShift; position.y -= pixelShift; GUI.Label(position, text, style); style = backupStyle; // Set style back } - Now, go back to Unity editor. Create the new GUISkin by going to Assets | Create | GUI Skin and name it CustomSkin; then click to bring up its Inspector view and set the following:
- Font: Federation (Drag the Federation font in
Chapter5/Fontsfolder here) - Custom Styles
- Size: 1
- Element 0:
- Name: RocketText
- Normal
- Text Color: R: 255, G: 255, B: 255, A: 255
- Font: Federation
- Font Size: 20
- Font Style: Bold
Other than the parameters mentioned earlier, we will leave everything as default.
- Font: Federation (Drag the Federation font in
- Next, create the new
GUITextureobject by going to GameObject | Create Other | GUI Texture and name it asRocketUI. Next, we drag ourRocketUIscript, which we just created on this object. Then set the following:- Transform: Position: X: 0.91, Y: 0.08, Z: 0
- GUITexture:
- Texture: rocketUI (Drag the
rocketUI.pngin theChapter5/UIfolder from the Project view here) - Pixel Inset: X: -64, Y: -32, Width: 128, Height: 64
- Rocket UI (Script)
- Rocket Launcher: RocketLauncher (Drag RocketLauncher child of the First Person Controller here)
- Custom Skin: CustomSkin (Drag the CustomSkin that we just created in the Project view here)
We are now done with this chapter. We can click Play to see the result, and now if we press the R key to reload the bullet, we will see the number changes to 20 as we set the maximum number of bullets.
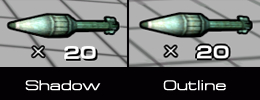
We just created the UI to show the rocket graphics UI and the number of bullets left by using GUITexture and OnGUI(). Here, we also created the text with a shadow by drawing another text layer and shifting the position bottom-right 2 pixels each, and then we drew the top layer by using the default position and color.
In Unity, there is no easy way to create an outline or shadow for the dynamic text that can be easily adjustable like other software such as Flash, Photoshop, and so on. So we can create it by drawing another layer to act as the outline of the shadow, as we did for the onGUI() function in this chapter.
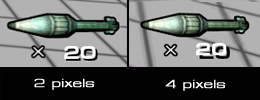
This is not the best way to create the outlined text or the shadow text because if we adjust the size of the pixel by shifting more than 2 pixels, we will see that the background text shifts too much and doesn't look like the outline or shadow, as we can see in the following screenshot:
In this section, we can just use this technique to create the shadow or outlined text because it is a quick way to create the outline or shadow for the dynamics text.