
In the last section, we created the Waypoints script and the Waypoints object
, which will be used to limit the enemy movement and direction. In this section, we need to create the enemy game object, which will contain the waypoint and our AI character. We will use a prefab similar to that of the player character but remove some of it that is not necessary for the enemy.
We will start by creating the empty game object to contain the AI and the Waypoints object:
- Go to GameObject | Create Empty to create the empty game object and name it
Enemy. Then, assign its transform by clicking on this game object and go to the Inspector view to reset the transform to default, as follows:- Position X: 0 Y: 0 Z: 0
- Rotation X: 0 Y: 0 Z: 0
- Scale X: 1 Y: 1 Z: 1
- Next, drag the
Waypointsgame object in the Hierarchy view that we created in the first section inside theEnemygame object. - Then, create another empty game object by going to GameObject | Create Empty again and this time name it
AI. Set the transform in theAIgame object as follows:- Position X: 0 Y: 0 Z: 0
- Rotation X: 0 Y: 0 Z: 0
- Scale X: 1 Y: 1 Z: 1
- Drag the
AIgame object inside theEnemygame object in the Hierarchy view, and then go to the Prefabs folder in the Project view. We will see therobot_AIprefab object; drag it inside theAIgame object, which is a child of theEnemygame object in the Hierarchy view similar to theWaypointsgame object, as shown in the following screenshot: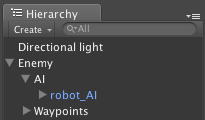
We still need one more thing inside our AI game object, which is the RocketLauncher. This is basically a similar setup as for our player character; so go to the First Person Controller game object, click on the arrow in front of it to bring down the Main Camera, and then click on the arrow in front of the Main Camera. We will see the RocketLauncher game object, which we need for our enemy. Let's press Ctrl + D (in Windows) or Command + D (on a Mac) to duplicate it, and then drag this duplicate RocketLauncher game object inside the AI game object, as shown in the following screenshot:

If we take a look at the Hierarchy view of the AI game and the Main Camera game object, we will see a similar structure. The only difference is that the AI game object has the AIController script and CharacterController
attached to it as we can see in the preceding screenshot.
Then, we will click on RocketLauncher to bring up its Inspector view and set up the Transform and Rocket Launcher (Script) as follows:
- Transform:
- Position X: 0.28 Y: 0.31 Z: 1.55
- Rocket Launcher (Script)
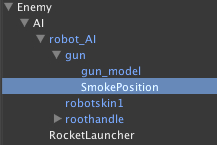
- Smoke Position: SmokePosition (Drag the
SmokePositionin therobot_AIprefab, as shown in the following screenshot.) - Ammo Count: -1
- Smoke Position: SmokePosition (Drag the
The last thing in this section—we will set up the position of our Enemy game object, which is the parent of the AI game object. So, let's click on the Enemy game object and go to its transform position, and then set the following:
- Position X: -2.43 Y: 1.3 Z: 4.9
Now, we are done with this section. In the next section, we will create the script to control our enemy to be able to walk, run, jump, and shoot.