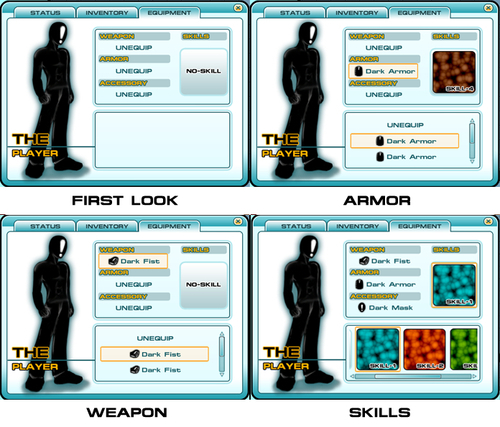
This is the last step of our menu. We will create a tab with which the player can change the weapon, armor, accessory, and skill of the character, which will also update the status tab, as we can see in the following screenshot:
We will start this section by adding the parameters:
- Go back to
MonoDevelop, openMenu.js, and add the following code to it://Equip tab private var r_equipBox : Rect = new Rect (237, 67, 360, 207); private var r_equipWeaponBox : Rect = new Rect (237, 280, 360, 157); private var r_statTextureEquip : Rect = new Rect (252, 81, 331, 142); private var r_skillBoxEquip : Rect = new Rect (460, 121, 127, 125); //The position of each equip button from 0 - weapon, 1 - armor, 2 - accessory, 3 - skill private var r_equipRect : Rect[] = [new Rect (252, 101, 180, 40), new Rect (252, 161, 180, 40), new Rect (252, 221, 180, 40), new Rect (464, 125, 119, 117)]; private var r_equipWindow : Rect = new Rect (500, 0, 70, 100); private var scrollPosition3 : Vector2 = Vector2.zero; private var scrollPosition4 : Vector2 = Vector2.zero; private var scrollPosition5 : Vector2 = Vector2.zero; private var scrollPosition6 : Vector2 = Vector2.zero; private var a_equipBoolean : boolean[] = new boolean[4]; private var in_toolWeapons : int = 0; private var in_toolArmors : int = 0; private var in_toolAccess : int = 0; private var in_toolskill : int = 0;
- Then, go to the
Start()function and add the following code at the end://Setup boolean equip for (var i : int = 0 ; i < a_equipBoolean.length; i++) { a_equipBoolean[i] = false; } - We go to
DoMyWindow (windowID : int)and uncomment the highlighted line as follows:case 2 : //Equip //Create an equipment tab EquipWindow(); break; - Next, we are going to create an
EquipWindow()function, which will control our equipment tab:private function EquipWindow() : void { GUI.Box (r_equipBox, ""); GUI.Box (r_equipWeaponBox, ""); GUI.DrawTexture(r_statTextureEquip, t_statusBox2); GUI.DrawTexture(r_skillBoxEquip, t_skillBox); SetupEquipBox(); } - In the next function, we will see four function calls, which are
SetupEquipBox(),ShowWeapon(),ShowArmor(),ShowAccess(), andShowSkill(). The first function is to set each equipment label as clickable or not. The other functions are enabled when the player clicks on each equipment label at the top box, and inside each function will contain the script that allows the player to change and select new equipment for weapon, armor, accessory, or skill. So, let's type the following code://Setting the ability to enabled or disable the button private function SetupEquipBox () : void { var equipContent : GUIContent[] = [gui_weaponCon, gui_armorCon, gui_accessCon, gui_skillCon]; for (var i : int = 0; i < a_equipBoolean.length; i++) { if (a_equipBoolean[i] == true) { //Set up disabled Button GUI.Label(r_equipRect[i], equipContent[i], "Disabled Click"); //Show each equipment window switch (i) { case 0: ShowWeapon(); break; case 1: ShowArmor(); break; case 2: ShowAccess(); break; case 3: ShowSkill(); break; } } else { //Set up enabled Button if (GUI.Button(r_equipRect[i], equipContent[i], "Selected Item")) { a_equipBoolean[i] = true; //Set others to false for (var j : int = 0; j < a_equipBoolean.length; j++) { if (i != j) { a_equipBoolean[j] = false; } } } } } } - Next, we will start the first function with the
ShowWeapon()function, which will display the weapon selection box; type the following code:private function ShowWeapon () : void { var in_items : int = 6; var itemsContent : GUIContent[] = new GUIContent[in_items]; //We create a GUIContent array of key item here (if you have more than 1 item, you can also use your item array instead of the current item) for (var i: int = 0; i < in_items; i++) { if (i == 0) { itemsContent[i] = GUIContent(s_unequip, ""); } else { itemsContent[i] = GUIContent(a_weapons[0].name, a_weapons[0].icon); } } scrollPosition3 = GUI.BeginScrollView (new Rect (257, 300, 320, 120), scrollPosition3, new Rect (0, 0, 280, 40*in_items)); //We create grid button here. in_toolWeapons = GUI.SelectionGrid (Rect (0, 0, 280, 40*in_items), in_toolWeapons, itemsContent, 1, GUI.skin.GetStyle("Selected Item")); //End the scrollview we began above. GUI.EndScrollView (); gui_weaponCon = itemsContent[in_toolWeapons]; } - Then, we will create the
ShowArmor()function, which will be used to display the armor box as follows:private function ShowArmor () : void { var in_items : int = 6; var itemsContent : GUIContent[] = new GUIContent[in_items]; //We create a GUIContent array of key item here (if you have more than 1 item, you can also use your item array instead of the current item) for (var i: int = 0; i < in_items; i++) { if (i == 0) { itemsContent[i] = GUIContent(s_unequip, ""); } else { itemsContent[i] = GUIContent(a_armors[0].name, a_armors[0].icon); } } scrollPosition3 = GUI.BeginScrollView (new Rect (257, 300, 320, 120), scrollPosition3, new Rect (0, 0, 280, 40*in_items)); //We create grid button here. in_toolArmors = GUI.SelectionGrid (Rect (0, 0, 280, 40*in_items), in_toolArmors, itemsContent, 1, GUI.skin.GetStyle("Selected Item")); // End the scrollview we began above. GUI.EndScrollView (); gui_armorCon = itemsContent[in_toolArmors]; } - Next, we will create the
ShowAccess()function, which will be used to display the accessory box as follows:private function ShowAccess () : void { var in_items : int = 6; var itemsContent : GUIContent[] = new GUIContent[in_items]; //We create a GUIContent array of key item here (if you have more than 1 item, you can also use your item array instead of the current item) for (var i: int = 0; i < in_items; i++) { if (i == 0) { itemsContent[i] = GUIContent(s_unequip, ""); } else { itemsContent[i] = GUIContent(a_accessories[0].name, a_accessories[0].icon); } } scrollPosition3 = GUI.BeginScrollView (new Rect (257, 300, 320, 120), scrollPosition3, new Rect (0, 0, 280, 40*in_items)); //We create grid button here. in_toolAccess = GUI.SelectionGrid (Rect (0, 0, 280, 40*in_items), in_toolAccess, itemsContent, 1, GUI.skin.GetStyle("Selected Item")); // End the scrollview we began above. GUI.EndScrollView (); gui_accessCon = itemsContent[in_toolAccess]; } - In the last function, we will create the
ShowSkill()function, which will be used to display the skills box as follows:private function ShowSkill () : void { var in_items : int = a_skills.length + 1; var itemsContent : GUIContent[] = new GUIContent[in_items]; //We create a GUIContent array of key item here (if you have more than 1 item, you can also use your item array instead of the current item) for (var i: int = 0; i < in_items; i++) { if (i == 0) { itemsContent[i] = GUIContent(t_skillBox); } else { itemsContent[i] = GUIContent(a_skills[i-1]); } } scrollPosition3 = GUI.BeginScrollView (new Rect (253, 286, 330, 140), scrollPosition3, new Rect (0, 0, 600, 117)); //We create grid button here. in_toolskill = GUI.SelectionGrid (Rect (0, 4, 600, 117), in_toolskill, itemsContent, in_items, GUI.skin.GetStyle("Selected Item")); // End the scrollview we began above. GUI.EndScrollView (); if(in_toolskill != 0) { gui_skillCon = itemsContent[in_toolskill]; } else { gui_skillCon = GUIContent(""); } } - Now, we go back to Unity and click on the Menu object in the Hierarchy to bring up its Inspector. Then, we set up the following properties:
- A_weapons
- Size: 1
- Element 0
- Icon: Drag-and-drop
weapon.pngfromChapter2/imageshere - Name: Dark Fist
- Amount: 1
- Icon: Drag-and-drop
- A_armors
- Size: 1
- Element 0
- Icon: Drag-and-drop
armor.pngfromChapter2/imageshere - Name: Dark Suit
- Amount: 1
- Icon: Drag-and-drop
- A_accessories
- Size: 1
- Element 0
- Icon: Drag-and-drop
accessory.pngfromChapter2/imageshere - Name: Dark Mask
- Amount: 1
- Icon: Drag-and-drop
- A_skills
- Size: 4
- Element 0: Drag-and-drop
skill1.pngfromChapter2/imageshere - Element 1: Drag-and-drop
skill2.pngfromChapter2/imageshere - Element 2: Drag-and-drop
skill3.pngfromChapter2/imageshere - Element 3: Drag-and-drop
skill4.pngfromChapter2/imageshere
- A_weapons
We finish the last step of the menu, click play, open the menu window, click on the EQUIPMENT tab, and roll over and click on the UNEQUIP label or the skill box. We will be able to change the character equipment, as we can see from the following screenshot:
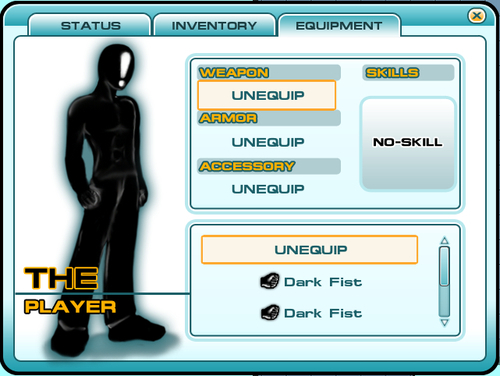
We just finished the last tab of our menu window. In this step, we created an EQUIPMENT button that will bring up the selection window, from which the player can choose the type of equipment or skill. It will update the current equipment status on the status tab too.
In the ShowArmor() function, we had the following code to display the six items in the scroll view, which is just an example to use, to set up the multiple selected items within the scroll view area when a_armors.length = 1:
var in_items : int = 6;
  var itemsContent : GUIContent[] = new GUIContent[in_items];
for (var i: int = 0; i < in_items; i++) {
     if (i == 0) {
        itemsContent[i] = GUIContent(s_unequip, "");
      } else {
        itemsContent[i] = GUIContent(a_armors[0].name, a_armors[0].icon);
      }
   }
The preceding code will assign the GUIContent to the itemContent[] array and display the result, as shown in the following screenshot:

Tip
If we have set the amount of a_armors.length to be more than 1, we can modify the code to something like the highlighted code as follows:
var in_items : int = a_armors.length+1;
var itemsContent : GUIContent[] = new GUIContent[in_items];
for (var i: int = 0; i < in_items; i++) {
     if (i == 0) {
        itemsContent[i] = GUIContent(s_unequip, "");
      } else {
        itemsContent[i] = GUIContent(a_armors[i-1].name, a_armors[i-1].icon);
      }
}
This will set the value of the display item in the armor box related to the length of a_armors. We assign in_items = a_armors.length+1 because we want to assign unequip as the first object. So, we add 1 to in_items for the for loop to unequip and the a_armors[]. We also subtract 1 from i in the a_armors[i-1].name and a_armors[i-1].icon. This will make sure that we aren't going out of the length, while we are looping through it.
In this step, we have created a vertical and horizontal scroll view by using GUI.BeginScrollView() to begin the scroll view at how this function works. Basically, we can use this function, which is very convenient to use, when we want to create a scrollable area that contains any type of GUI
object, because this function will automatically create a scrollable area from the two Rect parameters that we set up.
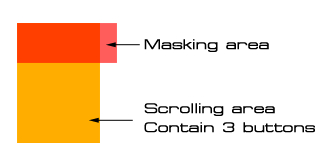
For example, in order to create a vertical scroll area at position x: 0, y: 0, width: 100 pixels, and height: 40 pixels, which contains three buttons with each button having 40 pixels height, we can have code like this:
var scrollPostion : Vector2 = Vector2.zero;
function OnGUI() {
  scrollPostion = GUI.BeginScrollView(Rect(0,0,100,40), scrollPostion, Rect(0,0,80,120));
  GUI.Button(Rect(0,0,80,40),"Button 1");
  GUI.Button(Rect(0,40,80,40),"Button 2");
  GUI.Button(Rect(0,80,80,40),"Button 3");
  GUI.EndScrollView();
}
From the preceding code, we can see that the GUI.BeginScrollView() function returns Vector2, which is a vertical and horizontal of this scroll view. It also takes two Rect objects, the first Rect is the area that the player will see or we can call a mask area. The second Rect is the area of our content, which is based on the content that we included between GUI.BeginScrollView() and GUI.EndScrollView() functions, which are the three lines of GUI.Button. We can also see more details of this function from the following URL.
http://unity3d.com/support/documentation/ScriptReference/GUI.B eginScrollView.html.
The following figure shows how the GUI.BeginScrollView()works in visual: