
From the last section, we now have our Enemy object, but there is no movement, yet. So, in this section, we will create the core script to control our enemy by using the similar concept used for the CharacterControl script in Project 4, The Hero/Heroine Part II—Animation and Controls, and New3PSController in Project 5, Creating a Rocket Launcher. We will mix both the scripts and create a new script to control the movements of our enemy following the waypoint and detect the player using the Waypoints script.
We will start by creating the AIController script:
- Go to Assets | Create | Javascript, name it
AIController, and double-click on it to open MonoDevelop. Since we need to attach the built-inCharacterController, we will replace the old code with the following:@script RequireComponent(CharacterController)
- Then, continue adding all necessary parameters to this script as follows:
//Waypoint
public var wayPoint : Waypoints;
//Rocket Launcher
public var rocketLauncher : RocketLauncher;
//Get the Player
public var player : Transform;
//Animation Params
public var _animation : Animation;
public var idleAnimation : AnimationClip;
public var walkAnimation : AnimationClip;
public var runAnimation : AnimationClip;
public var shotAnimation : AnimationClip;
public var walkAnimationSpeed : float = 1.5;
public var idleAnimationSpeed : float = 1.0;
public var runAnimationSpeed : float = 2.0;
public var shotAnimationSpeed : float = 0.5;
//Character movement speed
public var runSpeed : int = 6;
public var walkSpeed : int = 2;
public var jumpSpeed : float = 8.0;
public var gravity : float = 20.0;
//Shot Range
public var shotRange : float = 15.0;
//Detected the player - increase from the shot range
public var getPlayerRange : float = 5.0;
//Max distance from waypoint
public var waypointDistance : float = 10.0;
//To make the enemy walk for 4 seconds - then think
public var walkingTime : float = 4.0;
//To make the enemy stop for 2 seconds - then walk
public var thinkingTime : float = 2.0;
//Ai current HP
public var aiHP : float = 100;

//AI MAx HP
private var aiMaxHP : float;
//Character Controller
private var controller : CharacterController;
//Collision Flag return from Moving the character
private var c_collisionFlags : CollisionFlags;
//Move Params
private var f_verticalSpeed : float = 0.0;
private var f_moveSpeed : float = 0.0;
private var v3_moveDirection : Vector3 = Vector3.zero;
//Boolean
private var b_isRun : boolean;
private var b_isAiming : boolean;
private var b_isJumping : boolean;
private var b_isStop : boolean;
//Shot Params
private var b_isPrepare : boolean = false;
private var b_isShot : boolean = false;
//Rotate Params
private var q_currentRotation : Quaternion; //current rotation of the character
private var q_rot : Quaternion; //Rotate to left or right direction
private var f_rotateSpeed : float = 1.0; //Smooth speed of rotation
//Stop time Counting
private var f_lastTime : float = 0;
With the preceding code, we basically created all the necessary parameters for our
AIControllerscript. - Now we will create the
Awake()function to set up the necessary values for our parameter before it gets initialized in theStart()function, so add the following code://Using Awake to set up parameters before Initialize public function Awake() : void { controller = GetComponent(CharacterController); b_isRun = false; b_isAiming = false; b_isJumping = false; f_moveSpeed = walkSpeed; c_collisionFlags = CollisionFlags.CollidedBelow; f_moveSpeed = walkSpeed; //To make the character stop moving at a certain time f_lastTime = Time.time; //Tracking the time between each movement of the character b_isStop = false; aiMaxHP = aiHP; //Set up animation speed and wrapmode _animation[walkAnimation.name].speed = walkAnimationSpeed; _animation[walkAnimation.name].wrapMode = WrapMode.Loop; _animation[runAnimation.name].speed = runAnimationSpeed; _animation[runAnimation.name].wrapMode = WrapMode.Loop; _animation[idleAnimation.name].speed = idleAnimationSpeed; _animation[idleAnimation.name].wrapMode = WrapMode.Loop; }In the preceding
Awake()function, we just assigned the value of each parameter, set up the movement speed, animation clip speed, animation wrapmode of the enemy, and the current time, which we will use to calculate the time to stop the enemy or make him walk. - Next, add the following
Start()function to set the position of our enemy equal to the first waypoint position://Initialize public function Start() : void { transform.position = wayPoint.StartPosition(); } - After adding the
Start()function, we need the function to check for theCollisionFlagsparameter of the enemy to see if our enemy hits the ground, which is very similar to theCharacterControlscript that we used in Project 4, The Hero/Heroine Part II—Animation and Controls://Checking if the character hit the ground (collide Below) public function IsGrounded () : boolean { return (c_collisionFlags & CollisionFlags.CollidedBelow); } - Next, create
OnCollisionEnter(), which is the built-in function to check whether the enemy got hit by the player, and decrease the hit-points if necessary. Also, we can add another function to get the percent of the current enemy hit-points and maximum enemy hit-points by adding the following code://Checking for the collision if the rocket hit the enemy public function OnCollisionEnter(collision : Collision) : void { if (StaticVars.b_isGameOver == false) { if (collision.transform.tag == "Rocket") { var rocket : Rocket = collision.gameObject.GetComponent(Rocket); var f_damage : float = rocket.getDamage(); //Clamp down the hitpoint - not lower than 0, and not higher than max hitpoint aiHP = Mathf.Clamp(aiHP-f_damage, 0, aiMaxHP); } } } //Get the percent of the maximum HP with the current HP public function GetHpPercent() : float { return aiHP/aiMaxHP; } - Then, we will create four functions to give the enemy a personality and make our enemy smarter:
- The first one is the
Shoot()function, which will make the enemy shoot when the player is within shooting range of the enemy by checking the distance of the player and enemy. We will also use thePhysics.Raycast()function to see if there is any wall blocking the direction of the shot; if there isn't, we just make the enemy shoot by adding the following code://Give the Enemy Characteristic ////////////////////////////////////////////////////////////// //Checking for the character is shooting public function Shoot (_direction : Vector3) : boolean { var hit : RaycastHit; //Checking if the player hit the shooting range if (Vector3.Distance(transform.position, player.position) <= shotRange) { // Cast ray shotRange meters in shot direction, to see if nothing block the rocket if (Physics.Raycast(transform.position, _direction, hit, shotRange)) { if (hit.transform.tag != "Wall") { b_isAiming = true; return b_isAiming; } } } b_isAiming = false; return b_isAiming; } - Second, we will create the
Jump()function to make our enemy smarter by using anotherPhysicsclass function,Physics.CapsuleCast(). This function will cast the capsule object from the enemy's position towards its movement direction to see if the enemy hits the wall. This will trigger the enemy to jump over the wall and continue walking towards its direction as in the following code://Make character Jump public function Jump (_direction : Vector3) : boolean { //Checking for Jumping if the next y position is different than the current y position var hit : RaycastHit; var p1 : Vector3 = transform.position + controller.center + Vector3.up * (-controller.height*0.5); var p2 : Vector3 = p1 + Vector3.up * controller.height; // Cast character controller shape moveSpeed meters forward, to see if it is about to hit anything if ((Physics.CapsuleCast (p1, p2, 0.1, _direction, hit)) && (c_collisionFlags & CollisionFlags.Sides)) { if (hit.transform.tag == "Wall") { return true; } } return false; } - Then, we will check the distance between the player and the enemy to see if the distance is higher than the
shotRangeand inside theshotRange+getPlayerRange. So, let's add it as follows://Make the enemy run when the player hit certain radius which is between the shotRange and getPlayerRange public function Run () : boolean { //Checking for Running if ((Vector3.Distance(transform.position, player.position) <= (getPlayerRange+shotRange)) && ((Vector3.Distance(transform.position, player.position) > shotRange))) { b_isRun = true; } else { b_isRun = false; } return b_isRun; } - In the last function, to control the enemy behavior, we will make our enemy walk and stop for a certain amount of time:
//Calculate the time that let enemy walk and stop for the certain time
public function IsThinking() : boolean {
  //Get the time when enemy stop walking
  if (b_isStop) {
    var f_time : float = thinkingTime;
  } else {
    //Get the time when enemy is walking
    f_time = walkingTime;
  }
  if (Time.time >= (f_lastTime + f_time)) {
    if (b_isStop) {
      b_isStop = false;
    } else {
      b_isStop = true;
    }
    f_lastTime = Time.time;
  }
  return b_isStop;
}
Now we are done with all the functions that give personality to our enemy.
- The first one is the
- The next step is the
Update()function, which will control all the movement and animation of our enemy. So, let's type it as follows:public function Update() : void { if (StaticVars.b_isGameOver == false) { var v3_rocketDirection : Vector3 = (player.position - transform.position).normalized; //Checking if the enemy position is away from the waypoint in the certain distance, //Make the enemy stop running, shooting, and walk back to the target waypoint if (wayPoint.AwayFromWaypoint(transform, waypointDistance)) { b_isAiming = false; b_isRun = false; } else { //Checking if the enemy is not aiming - check for running if (!Shoot(v3_rocketDirection)) { //Checking if the ai is run or not aiming Run(); } } - Continue to add the following script in the
Update()function, which will check when the enemy isn't aiming, and then we will check forb_isRunto see if the enemy is running or not:if (!b_isAiming) { //If the ai is running don't make it think //Get the direction if (b_isRun) { var v3_targetDirection : Vector3 = wayPoint.GetDirectionToPlayer(transform, player); //Move Direct to the player } else { if (thinkingTime > 0) { if (!IsThinking()) { v3_targetDirection = wayPoint.GetDirection(transform); //Use random Direction } else { v3_targetDirection = Vector3.zero; } } else { v3_targetDirection = wayPoint.GetDirection(transform); //Use random Direction } } - Add the script to get the movement direction of the enemy and check for the jumping behavior as follows:
//If the target direction is not zero - means there is no button pressing if (v3_targetDirection != Vector3.zero) { //Rotate toward the target direction v3_moveDirection = Vector3.Slerp(v3_moveDirection, v3_targetDirection, f_rotateSpeed * Time.deltaTime); //Get only direction by normalize our target vector v3_moveDirection = v3_moveDirection.normalized; } else { v3_moveDirection = Vector3.zero; } //Checking if character is on the ground if (!b_isJumping) { //Holding Shift to run if (b_isRun) { f_moveSpeed = runSpeed; } else { b_isRun = false; f_moveSpeed = walkSpeed; } //Press Space to Jump if (Jump(v3_moveDirection)) { b_isJumping = true; f_verticalSpeed = jumpSpeed; } } - Now we can add gravity checking, get the actual movement direction, and apply the animation clip as we did in the
CharacterControlscript in Project 4, The Hero/Heroine Part II—Animation and Controls. Let's add the script as follows:// Apply gravity if (IsGrounded()) { f_verticalSpeed = 0.0; //if our character is grounded b_isJumping = false; //Checking if our character is in the air or not f_inAirTime = 0.0; f_inAirStartTime = Time.time; } else { f_verticalSpeed -= gravity * Time.deltaTime; //if our character in the air //Count Time f_inAirTime = Time.time - f_inAirStartTime; } // Calculate actual motion var v3_movement : Vector3 = (v3_moveDirection * f_moveSpeed) + Vector3 (0, f_verticalSpeed, 0); // Apply the vertical speed if character fall down v3_movement *= Time.deltaTime; //Set the prepare animation to false b_isPrepare = false; //////////////////////////////////////////////////////// //Checking if the character is moving or not if (v3_moveDirection != Vector3.zero) { if (f_moveSpeed == walkSpeed) { _animation.CrossFade(walkAnimation.name); } else { _animation.CrossFade(runAnimation.name); } } else { _animation.CrossFade(idleAnimation.name); } // Move the controller c_collisionFlags = controller.Move(v3_movement); //Update rotation of the character if ((v3_moveDirection != Vector3.zero) && (!b_isAiming)) { transform.rotation = Quaternion.LookRotation(v3_moveDirection); } - Now we are done with the no aiming part. We will continue to add the script to check for the aiming part, which is similar to what we did in Project 5, Creating a Rocket Launcher. So, let's add the script as follows:
} else {//Aiming v3_moveDirection = Vector3.MoveTowards(v3_moveDirection, v3_rocketDirection, 0.1); v3_moveDirection = v3_moveDirection.normalized; // Apply gravity if (IsGrounded()) { f_verticalSpeed = 0.0; //if our character is grounded b_isJumping = false; //Checking if our character is in the air or not f_inAirTime = 0.0; f_inAirStartTime = Time.time; } else { f_verticalSpeed -= gravity * Time.deltaTime; //if our character in the air //Count Time f_inAirTime = Time.time - f_inAirStartTime; } // Calculate actual motion v3_movement = Vector3 (0, f_verticalSpeed, 0); // Apply the vertical speed if character fall down v3_movement *= Time.deltaTime; //Checking if the character is playing the shoot animation if (!b_isPrepare) { b_isShot = false; //Play the shot preparing animation function WaitForPrepare(); } else { if (v3_rocketDirection == v3_moveDirection) { if (!b_isShot) { b_isShot = true; //Play the shoot animation function WaitForShot(); } } } // Move the controller c_collisionFlags = controller.Move(new Vector3(0, v3_movement.y, 0)); //Update rotation of the character transform.rotation = Quaternion.LookRotation(v3_moveDirection); } - As the last step of the
Update()function, we will add the script for the game over state and close our function as follows:} else { //Gameover _animation.CrossFade(idleAnimation.name); } } - Then, we will add two functions, which will be used to control the aiming and shoot animations:
//Wait for shoot animation private function WaitForShot () : IEnumerator { _animation[shotAnimation.name].speed = shotAnimationSpeed; _animation[shotAnimation.name].wrapMode = WrapMode.ClampForever; _animation.PlayQueued(shotAnimation.name, QueueMode.PlayNow); BroadcastMessage("Fire", shotAnimation.length); //to enable all the function name Fire in every MonoBehaviour Script yield WaitForSeconds (shotAnimation.length); b_isShot = false; } //Wait for aiming animation private function WaitForPrepare () : IEnumerator { _animation[shotAnimation.name].speed = shotAnimationSpeed * 2; _animation[shotAnimation.name].wrapMode = WrapMode.ClampForever; _animation.CrossFade(shotAnimation.name, 0.6); yield WaitForSeconds(shotAnimation.length); b_isPrepare = true; } - The last function that we add is the
OnDrawGizmos()function, which we used in the last step to draw the line between the player position and the enemy position://Draw Gizmos and Directional line from the enemy position to the player position public function OnDrawGizmos() : void { if (player != null) { Gizmos.color = Color.blue; Gizmos.DrawLine(transform.position, player.position); } }
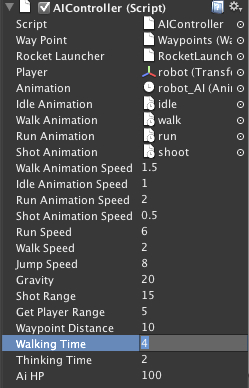
With that we are done with our AIController script. Next, we will go back to Unity and apply the AIController script to the AI game object by dragging it from the Project view to the AI game object in the Hierarchy view. Then, we will go to its Inspector view and set the following:
- Character Controller
- Height: 2.25
- Radius: 0.4
- Step Offset: 0.4
- Skin Width: 0.05
- AIController (Script)
- Way Point: Waypoints (Drag the
Waypointsgame object to the Hierarchy view here) - Rocket Launcher: RocketLauncher (Drag the
RocketLaunchergame object inside theAIgame object to the Hierarchy view here) - Player: robot (Drag the
robotgame object inside theFirst Person Controllergame object to the Hierarchy view here) - Animation: robot_AI (Drag the
robot_AIgame object inside this AI game object to the Hierarchy here) - Idle Animation: idle (Drag the
idleanimation inside theChapter5/Robot Artwork/robot@idle/to the Project view here) - Walk Animation: walk (Drag the
walkanimation inside theChapter5/Robot Artwork/robot@walk/to the Project view here) - Run Animation: run (Drag the
runanimation inside theChapter5/Robot Artwork/robot@run/to the Project view here) - Shot Animation: shoot (Drag the
shootanimation inside theChapter5/Robot Artwork/robot@shoot/to the Project view here)
- Way Point: Waypoints (Drag the
The enemy will also walk for 4 minutes and stop for 2 minutes, and will jump over the wall.
We just created our AIController script by mixing two scripts, the CharacterControl script from Project 4, The Hero/Heroine Part II—Animation and Controls, and the New3PSController script from Project 5, Creating a Rocket Launcher.
We also added the new code section to give our enemy some characteristics and make it smart enough to shoot the player, run towards the player, jump when it hits the wall, and to stop and walk after a certain time.
In the Run() function, we used the if ((Vector3.Distance(transform.position, player.position) <= (getPlayerRange+shotRange)) && ((Vector3.Distance(transform.position, player.position) > shotRange))) {} statement to check for the distance between the enemy and the player, which we can see from the following diagram:
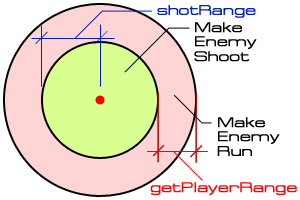
As we can see from the preceding diagram, the enemy will run towards the player if the distance between the player and the enemy is higher than the shotRange but lower than or equal to the getPlayerRange. And the enemy will shoot the player if the distance between him and the player is in the shotRange.
We also use both Physics.CapsuleCast()
and Physics.RayCast()
to check for the wall in front of the enemy.
In this step, we have used both the Physics.CapsuleCast() and Physics.RayCast() functions. Both functions are very useful when one wants to check if there is anything blocking the enemy movement direction or the rocket bullet direction.
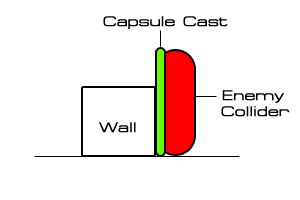
We use Physics.CapsuleCast() for our Jump() function
because we want to check the area in front of the enemy and whether the capsule hits the wall or not. We also check the CollisionFlag.Sides for when the side of enemy collides with the wall as we use in the Jump() function, as shown in the following script:
if ((Physics.CapsuleCast (p1, p2, 0.1, _direction, hit)) && (c_collisionFlags & CollisionFlags.Sides)) {In this script, we also give the radius of the Capsule a value equal to 0.1 because we want to make sure that our enemy is very close to the wall or collides with the wall to make it jump, as shown in the following diagram:
For Physics.RayCast(), it is very similar to the function that we used in the first chapter. It basically casts a ray from the position of the enemy's rocket launcher to the player by checking to see if there is anything blocking it, as shown in the following
diagram:
