From the last chapter, we have imported the 3D character model from 3D Studio Max and created the shader for it, but the model doesn't have any animation set up in it, yet. So, in this chapter we will learn more about how to set up the animation clip from the FBX model that is already exported from 3D software (in this book, we have used 3D Studio Max), and use it in Unity.
In Unity, we can import the FBX format file with the rigging animation and set it up for multiple clips to use, as we want. The concept is that we have one file that includes all small clips from walking, running, or jumping. Then, we divide it to each type of animation by telling Unity the range of frames for this animation. For example, if we create a walking cycle animation from frames 1 to 30, we can just tell Unity that we want to use the range of frames from 1 to 30 for the walking animation. This concept is very flexible to adjust and change the animation clip on the fly.
In this section, we will begin with setting up the new FBX file, which is the same model and shader from the last chapter, but this FBX file will include all the necessary animations that we need for this section:
- Create a new project with the name
CharacterAnimation, and this time we will include the built-inCharacter Controllerpackage by checking on the Character Controller.unityPackage in the Project Wizard, as shown in the following creenshot: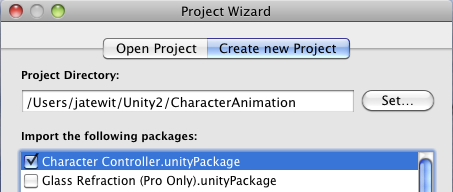
- Next, import the assets package by going to Assets | Import Package | Custom Package.... Choose
Chapter4.unityPackage, which we just downloaded, and then click on the Import button in the pop-up window, as shown in the followin screenshot: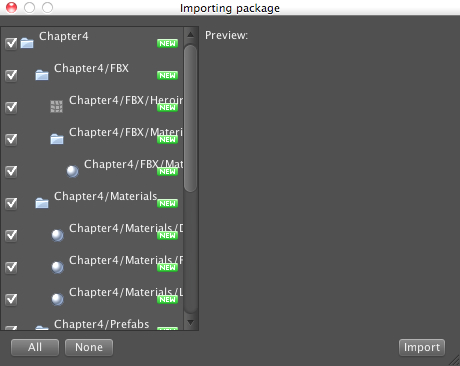
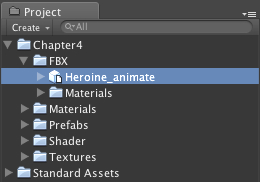
- Wait until it's done, and you will see the Chapter4 and Standard Assets folders in the Window view, as shown in the followin screenshot:
Now we are ready to start this section:
- Let's go to the
FBXfolder; click onHeroine_animateto bring up the Inspector view. Then, scroll down a bit until you see the Animations section in the FBXImporter. In the Animations section, you will see a small window below the word Slit Animations:
Here, we will see five parameters, which are Name, Start, End, WrapMode, and Loop. The Name parameter is the name of the animation that we want to assign. The Start parameter is the start frame of the clip. The End parameter is the end frame of the clip. The WarpMode parameter is the type of animation that we want, such as loop, default, once, and so on. And the last one, Loop, is the true or false parameter; if it is checked, Unity will automatically increase an extra frame at the end of animation to match with the first frame.
Note
There are two ways to import the animations to use in Unity. The first method is the one that we mentioned previously. We import a single model that contains all animations and split the animation by setting the duration of the frame. In the second method, we don't have to set up the animation frame from start to end. Unity will automatically export the animation clip for you. However, this method will need to import the multiple model files, each file having a different animation clip such as idle, walk, run, and so on. Also, we need to follow the naming convention for Unity to be able to import the animation clip properly. For example, we have imported the base FBX model name
Heroine_animatewithout any animation clip. Then we will import another FBX model that contains only idle animation; we should name itHeroine_animate@idle, as we can see in the following screenshot: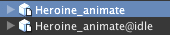
Tip
For more details, see the following website:
http://unity3d.com/support/documentation/Manual/Character-Animation.html.
- Next, we will create each animation clip by clicking on the plus sign on the right-hand side. After you click on the plus sign, you will see the clip added to this window. This is the animation clip that we can use in our game. For this chapter, we need five clips, so after clicking on the plus sign five times, we set it as follows:
- Name: idleStart: 7End: 210WrapMode: LoopLoop: uncheck
- Name: walkStart: 230End: 280WrapMode: LoopLoop: uncheck
- Name: runStart: 290End: 320WrapMode: LoopLoop: uncheck
- Name: jumpStart: 325End: 339WrapMode: DefaultLoop: uncheck
- Name: fallStart: 340End: 360WrapMode: DefautLoop: uncheck
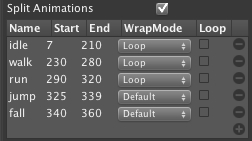
- Then, click on the Apply button at the end of the Inspector view. Now, we have finished adding our animation clip.
- Next, we want to add the level to our scene. Go to the Project view under the
Prefabsfolder and drag the Level Prefabs to the Hierarchy view, as we can see in thefollowing screenshot:
- Then, we need to add light to our scene. Go to GameObject | Create Other | Directional Light. In its Inspector view, set the Rotation in the X-axis to 30. (If you have the Unity Pro version, you can set it up to use the Hard Shadows or Soft Shadows to get a nice shadow on the ground.)
- Before we finish this step, we will add our character to the scene. Go to the
FBXfolder in the Project view and dragHeroine_animatto the Hierarchy view.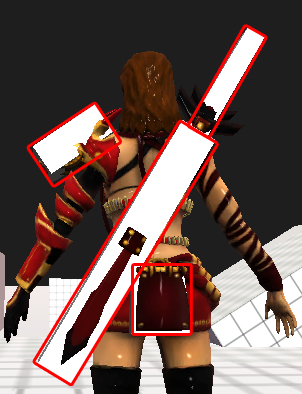
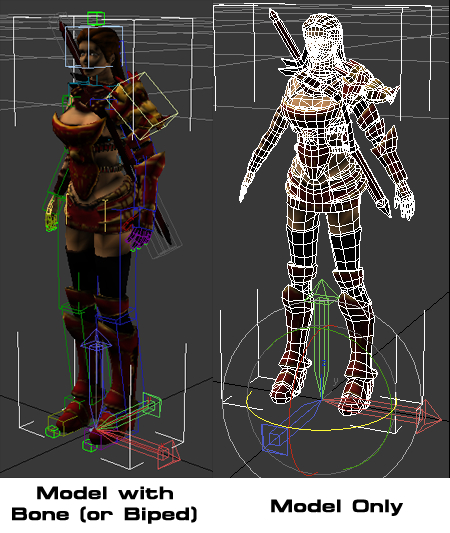
In the preceding screenshot, we can see the red frame, which shows the white boxes on the character that represent extra bones to control the extra objects on our character. In this case, the extra objects are the sword, sword sheath, dragonhead on the shoulder, and the back plate.
We don't need to show the mesh here, so we can remove or hide it, but we will remove it because we don't have to use the Mesh Renderer component in this case.
- Let's do this by clicking on the
Heroine_animatein the Hierarchy view. - Then, we will use the search box in the Hierarchy view to search and put bone in this box, as we can see inthe following screenshot:
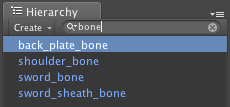
- Let's click on the first bone
back_plate_boneto bring up its inspector and go to the Inspector view, then right click on the Mesh Renderer component, and click Remove Component to remove it as we can seein the following screenshot: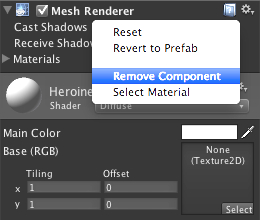
This will bring up the Losing Prefab popup; we just click Continue button to break it.
- Then, we go to the next bone
shoulder_bones,sword_bone, andsword_sheath_boneand perform tasks similar to what we performed for theback_plate_bone, and we will see all the white boxes disappear as sen in the following screenshot:
Basically, what we have done here is set up the animation clip for idle, walk, run, jump, and fall. Then, we also created the level and directional light for our scene. Next, we added our character, which included the animation clips that we have set up. Lastly, we removed the Mesh Renderer of the extra bones, because we don't want to show it in our scene.
Note
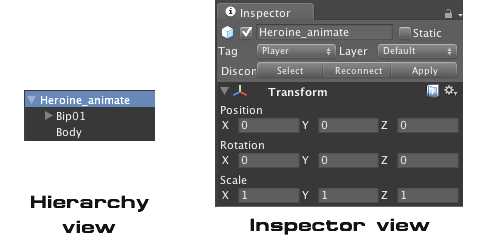
If you click on the Body object (the child of Heroine_animate) in the Hierarchy view to bring up its Inspector view, you will see the Skinned Mesh Renderer in the Inspector view. The Skinned Mesh Renderer is automatically added to the imported object when the imported object is skinned. The Skinned Mesh Renderer will take care of drawing the mesh attached to the animation. The advantage of using Skinned Mesh
is that we can enable or disable the bone by using scripting, which is very good for the ragdoll physics. We can take a look at the details from the following website:
http://unity3d.com/support/documentation/Components/class-SkinnedMeshRenderer.html.
In the last chapter, we exported the 3D model from 3D Studio Max, but we did so without the animation or rigging. So, we'd like to talk a bit about how to export the animation from 3D Studio Max with animation and all the rigs with it.
As we know, 3D Studio Max uses the Z-axis as the upward direction, but Unity uses the Y-axis for the same purpose. In Chapter 3, The Hero/Heroine Part I—Models and Shaders, when we exported the 3D model, we set the X rotation of the character pivot to -90 degrees. However, if we try to set up the character as the last, we will have the problem with the biped setup. To problem the problem this time, we don't have to set up the rotation in the X-axis of the pivot as in Chapter 3, The Hero/Heroine Part I—Models and Shaders. So, this means that we will leave the rotation of the pivot as default, asshown in the following screenshot:
This is because our character has two objects attached to it—the model and the bone. Then, when we import it to Unity, the FBXImporter in Unity will basically create the container and add both objects and its children, which will solve the problem of wrong rotation and set the default rotation of the model to X: 0, Y: 0, Z: 0, as we cn see in the following screenshot:
Some of you might be curious—how do we know when to rotate the pivot or not rotate the pivot in 3D Studio Max? Well, it's very simple; just remember that any 3D model that is static and not complicated or has only one mesh object included, will rotate the pivot. On the other hand, if we have a character model with rigging or maybe a simple mesh for detecting the collision, we can just leave it as it is.
Note
We can also fix the rotation of the imported model in Unity by creating the empty object as a parent of the imported model. For more information on how to fix the rotation of the imported model in Unity, we can go to the following website:
http://unity3d.com/support/documentation/Manual/HOWTO-FixZAxisIsUp.html.
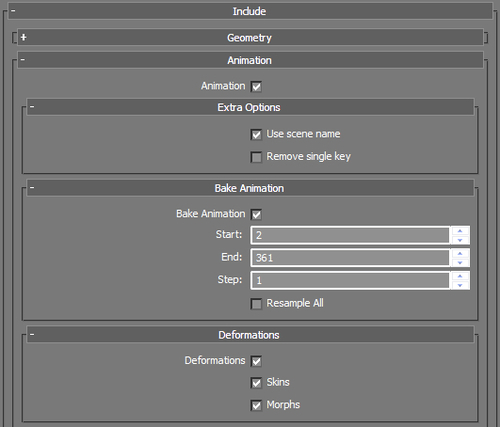
Next, we will take a look at how to set up the FBX exporter to export the 3D model with animation included. We can follow the next screenshot, which shows the extra parameter that we need to set when exporing the FBX file from 3D Studio Max:
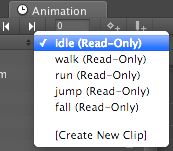
Then, we will take a look at the animation clip in the FBXImporter. We can see the action of each animation clip in Unity by clicking on Heroine_animate in the Heirarchy view; then go to Window | Animation, and we can bring up the Animation window. Here, we can click the play button to play each animation clip, and we can see the result on the editor. We can also change the animation clip by clicking on the name of the animation clip beside the character name below the play button, as e can see in the following screenshot:
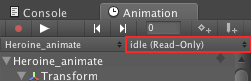
Then, we can click to choose the animation that we want to se, as shown in the following screenshot: