Now we are at the last step of this chapter. We will add the hit-point game object for the player and enemy as well as create the HitPointUI script.
Before we start creating the HitPointUI script
, we will need to create the HitPointUI game object to contain it:
- First, go to Unity and create an empty game object by going to GameObject | Create Empty, and name it
HitPointUI. Then, we will reset the Transform to default as follows:- Position X: 0 Y: 0 Z: 0
- Rotation X: 0 Y: 0 Z: 0
- Scale X: 1 Y: 1 Z: 1
- Next, create a new script by going to Assets | Create | Javascript, name it
HitPointUI, double-click on it to open MonoDevelop, and replace it with the following code:public var ai : AIController; public var player : New3PSController; public var frameTexture : Texture2D; public var hpTexture : Texture2D; public var aiTexture : Texture2D; public var textHpTexture : Texture2D; public var textAiTexture : Texture2D;
Here, we just set up all the parameters needed for our
HitPointUI. - Then, add the
Update()function to check for the game over state:public function Update() : void { //Checking if the player or AI Hit-point equal 0 or below 0 if ((player.GetHpPercent() <= 0.0) || (ai.GetHpPercent() <= 0.0)) { StaticVars.b_isGameOver = true; } } - We will add the
OnGUI()function to create the hit-point UI:public function OnGUI() : void { //Draw Text GUI.DrawTexture (Rect (10,10,46,32), textHpTexture); GUI.DrawTexture (Rect (10,42,95,32), textAiTexture); //Character Hp // Create one Group to contain both images // Adjust the first 2 coordinates to place it somewhere else on-screen GUI.BeginGroup (Rect (110,15,156,21)); // Draw the background image GUI.DrawTexture(Rect (0,0,156,21), frameTexture); // Create a second Group which will be clipped // We want to clip the image and not scale it, which is why we need the second Group GUI.BeginGroup (Rect (0,0,player.GetHpPercent() * 156, 21)); // Draw the foreground image GUI.DrawTexture (Rect (0,0,156,21), hpTexture); // End both Groups GUI.EndGroup (); GUI.EndGroup (); //AI HP // Create one Group to contain both images // Adjust the first 2 coordinates to place it somewhere else on-screen GUI.BeginGroup (Rect (110,47,156,21)); // Draw the background image GUI.DrawTexture(Rect (0,0,156,21), frameTexture); // Create a second Group which will be clipped // We want to clip the image and not scale it, which is why we need the second Group GUI.BeginGroup (Rect (0,0,ai.GetHpPercent() * 156, 21)); // Draw the foreground image GUI.DrawTexture (Rect (0,0,156,21), aiTexture); // End both Groups GUI.EndGroup (); GUI.EndGroup (); }In this function, we just use the new
GUIfunction,GUI.BeginGroup(), to draw the mask for the hit-point bar. - Now, we will go to back to Unity and drag the
HitPointUI.jsscript to theHitPointUIgame object in the Hierarchy view. Then we will go to its Inspector view and set the following:- Hit Point UI (Script)
- Ai: AI (Drag the
AIgame object inside theEnemygame object to the Hierarchy view here) - Player: First Person Controller (Drag the
First Person Controllergame object to the Hierarchy view here) - Frame Texture: hitPointFrame (Drag the
hitPointFrame.pngfrom theChapter6/UI/folder here) - Hp Texture: hitPointBarHP (Drag the
hitPointBarHP.pngfrom theChapter6/UI/folder here) - Ai Texture: hitPointEnemy (Drag the
hitPointEnemy.pngfrom theChapter6/UI/folder here) - Text Hp Texture: HP (drag the
HP.pngfrom theChapter6/UI/folder here) - Text Ai Texture: Enemy (drag the
ENEMY.pngfrom theChapter6/UI/folder here)
Now we have finished our game, so click on Play to see the result. We will see that when the player or enemy gets shot the hit-point bar will decrease.
We just created the UI game object and the script, which we use to control the hit-point UI. We also used GUI.BeginGroup()
to mask the decreasing damage from either the player or enemy hitpoints.
In this section, we have used GUI.BeginGroup()
to mask out the texture to show how much hit points are left. The GUI.BeginGroup() function
must be close to GUI.EndGroup().
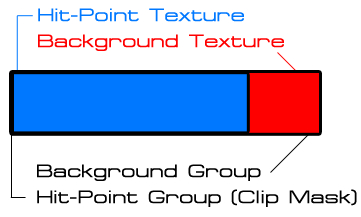
In our code, we basically created the first group to contain the background texture, which is the bar frame. Then, we drew another group on top of the first group, which contains the bar texture as a clip mask. This second group's width will relate to the hit-point value left for the player or enemy, as shown in the following code:
//Draw the background group
GUI.BeginGroup (Rect (110,15,156,21));
  GUI.DrawTexture(Rect (0,0,156,21), frameTexture);

// Create a second Group which will be clipped
  GUI.BeginGroup (Rect (0,0, player.GetHpPercent() * 156, 21));
  GUI.DrawTexture (Rect (0,0,156,21), hpTexture);

//End both Groups
  GUI.EndGroup ();
  GUI.EndGroup ();
From the preceding code, we can translate to the following diagram: