
In the last section, we imported the Chapter5 Unity package and created our scene, which included all the basic setup. In this step, we will create a New3PSController script by using the old built-in FPSInputController script, and add some script to control the animation or the character to run, walk, aim, or shoot. We will also create the MouseLook_JS script, which is the JavaScript version of the MouseLook built-in script that is written in C#. The MouseLook_JS script is used to control the rotation of the camera in our scene.
We are first going to create the New3PSController script.
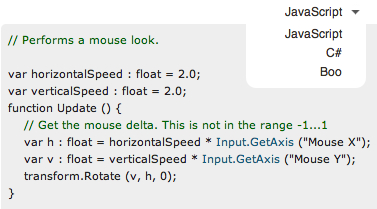
We will start by creating a new MouseLook_JS by going to Assets | Create | Javascript and name it MouseLook_JS, then double-click to open it in MonoDevelop and replace the script as follows:
@script AddComponentMenu("Camera-Control/Mouse Look JS")

enum RotationAxes { MouseXAndY, MouseX, MouseY }
public var axes : RotationAxes = RotationAxes.MouseXAndY;
public var sensitivityX : float = 15;
public var sensitivityY : float = 15;

public var minimumX : float = -360;
public var maximumX : float = 360;

public var minimumY : float = -60;
public var maximumY : float = 60;

private var rotationY : float = 0;

public function Start () : void {
  // Make the rigid body not change rotation
  if (rigidbody)
    rigidbody.freezeRotation = true;
}

public function Update () : void {
  if (axes == RotationAxes.MouseXAndY)
  {
    var rotationX : float = transform.localEulerAngles.y + Input.GetAxis("Mouse X") * sensitivityX;

    rotationY += Input.GetAxis("Mouse Y") * sensitivityY;
    rotationY = Mathf.Clamp (rotationY, minimumY, maximumY);

    transform.localEulerAngles = new Vector3(-rotationY, rotationX, 0);
  }
  else if (axes == RotationAxes.MouseX)
  {
    transform.Rotate(0, Input.GetAxis("Mouse X") * sensitivityX, 0);
  }
  else
  {
    rotationY += Input.GetAxis("Mouse Y") * sensitivityY;
    rotationY = Mathf.Clamp (rotationY, minimumY, maximumY);

    transform.localEulerAngles = new Vector3(-rotationY, transform.localEulerAngles.y, 0);
  }
}
Note
This script is the JavaScript version of the MouseLook built-in script. This way we can edit and adapt the script without bothering anything in the built-in script. Even though, in Unity we can use both C# and JavaScript languages in the same project (we will talk about this in more detail in Chapter 8, Let the World See your Carnage! Saving, Loading, and Posting your High Score), it's better to pick one language for the entire project because it will be very difficult to access the parameters between different languages.
Then, we will go back to Unity and create a new script named New3PSController by going to Assets | Create | Javascript. Then, we will right-click it and choose Sync MonoDevelop Project (if you set MonoDevelop as the main editor) or just double-click it to open the script. It will open the new script in MonoDevelop (or your default editor Unitron/UniScite).
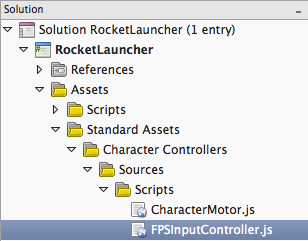
In MonoDevelop, at the top left in the Solution view, you will see the name of our project; click on the arrow in front of it. In the Assets folder, go to Assets | Standard Assets | Character Controllers | Sources | Scripts. Double-click the FPSInputController file to open it.
Next, we go to the FPSInputController file, copy the code in it to the New3PSController file that we just created. Then, we close the FPSInputController file, and go to the New3PSController file at the end of this script. We will see the following line of code:
@script AddComponentMenu ("Character/FPS Input Controller")Change the preceding line of the script to the following one:
@script AddComponentMenu ("Character/New 3PS Controller")We are changing the name of this script because we don't want to replace the built-in script with the new one. This script will be added to the Component menu, which we will see in the Unity Editor Component | Character | New 3PS Controller.
Now we are ready to create our script. We will start by creating the new parameters that will be used to control our character:
- Go to
New3PSController.js, and set up the new parameters. Go to the first line of this script and type the following highlighted code://Character movement speed public var runSpeed : int = 6; public var walkSpeed : int = 2; private var int_moveSpeed : int; //Animation Params public var _animation : Animation; public var idleAnimation : AnimationClip; public var walkAnimation : AnimationClip; public var runAnimation : AnimationClip; public var shotAnimation : AnimationClip; public var walkAnimationSpeed : float = 1.5; public var idleAnimationSpeed : float = 1.0; public var runAnimationSpeed : float = 2.0; public var shotAnimationSpeed : float = 0.5; //Camera Rotation Limit public var minRotateY : float = -15; public var maxRotateY : float = 60; //Mouse Look private var mouseLook : MouseLook_JS; //Character Motor private var motor : CharacterMotor;
Here, we just set up the necessary parameters for controlling the animation of our character, as we did in the last chapter, and set the Y-axis camera limit rotation.
- Next, we will add some code in the
Awake()function. Go to the function and add the following highlighted code:// Use this for initialization public function Awake () : void { motor = GetComponent(CharacterMotor); //Hide cursor Screen.showCursor = false; //Setup the character move speed to walk speed int_moveSpeed = walkSpeed; //Get MouseLook component mouseLook = Camera.main.GetComponent(MouseLook_JS); //Setup Animation _animation[walkAnimation.name].speed = walkAnimationSpeed; _animation[walkAnimation.name].wrapMode = WrapMode.Loop; _animation[runAnimation.name].speed = runAnimationSpeed; _animation[runAnimation.name].wrapMode = WrapMode.Loop; _animation[idleAnimation.name].speed = idleAnimationSpeed; _animation[idleAnimation.name].wrapMode = WrapMode.Loop; }Here, we just add the code to hide the mouse cursor, set the character movement speed value equal to the walk speed, get the mouse look component, and set up the animation speed and warp mode.
- Go to the
Update()function and add the highlighted code after theif (directionVector != Vector3.zero) {}statement:// Update is called once per frame public function Update () : void { // Get the input vector from keyboard or analog stick var directionVector = new Vector3(Input.GetAxis("Horizontal"), 0, Input.GetAxis("Vertical")); if (directionVector != Vector3.zero) { ............... } if (Input.GetKey(KeyCode.E)) { //Set the maximum and minimum limit rotation on Y-axis for the main camera mouseLook.minimumY = minRotateY; mouseLook.maximumY = maxRotateY; //No Movement Direction motor.inputMoveDirection = Vector3.zero; } else { //No Y-axis Rotation mouseLook.minimumY = 0; mouseLook.maximumY = 0; //Change the movement speed of the character if (Input.GetKey(KeyCode.LeftShift) || Input.GetKey(KeyCode.RightShift)){ int_moveSpeed = runSpeed; } else { int_moveSpeed = walkSpeed; } motor.movement.maxForwardSpeed = int_moveSpeed; motor.movement.maxSidewaysSpeed = int_moveSpeed; motor.movement.maxBackwardsSpeed = int_moveSpeed; //////////////////////////////////////////////////////// //Checking if the character is moving or not if (directionVector != Vector3.zero) { if (int_moveSpeed == walkSpeed) { _animation.CrossFade(walkAnimation.name); } else { _animation.CrossFade(runAnimation.name); } } else { _animation.CrossFade(idleAnimation.name); } // Apply the direction to the CharacterMotor motor.inputMoveDirection = transform.rotation * directionVector; motor.inputJump = Input.GetButton("Jump"); } }Note
In the preceding function, we have used
Input.GetKey(KeyCode.E)for aiming andInput.GetKey(KeyCode.LeftShift) || Input.GetKey(KeyCode.RightShift)for running, which will get the input as the E key and right arrow/left arrow keys on the keyboard. However, this isn't flexible if we want to change the input or if we want to put this game on another platform that doesn't have a keyboard. We can solve this by setting the custom Input button via the Input Manager and usingInput.GetButton()instead ofInput.GetKey(), which is much more dynamic for adjusting the input controller for different platforms. We can go to the Input Manager (Edit | Project Settings | Input), which we have already mentioned in the first chapter. - Go back to Unity, click on the First Person Controller object in the Hierarchy view, go to its Inspector view, and right-click the FPSInput Controller (Script) and choose Remove Component to remove it. Then, we will go to the Project view and drag the
New3PSControllerscript that we just created to the First Person Controller object in the Hierarchy view. - Go to the Inspector view of First Person Controller object in the New3PSController component and set the following:
- Animation: robot (
robotgame object in the Hierarchy view) - Idle Animation: idle (
Chapter5/Robot Artwork/robot@idle/idle) - Walk Animation: walk (
Chapter5/Robot Artwork/robot@walk/walk) - Run Animation: run (
Chapter5/Robot Artwork/robot@run/run) - Shoot Animation: shoot (
Chapter5/Robot Artwork/robot@idle/shoot)
The Idle, Walk, Run, and Shoot Animation will be located in the Project view inside
robot@idle,robot@walk,robot@run, androbot@shootobjects, as shown in the following screenshot: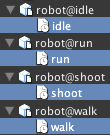
- Animation: robot (
- Before we finish the section, we will add our
MouseLook_JSscript to the First Person Controller instead of the oldMouseLook. So, click on the First Person Controller object in the Hierarchy view, go to its Inspector view. In the Mouse Look (Script) component, we will click on the circle icon at the right of Script and choose MouseLook_JS, as shown in the following screenshot: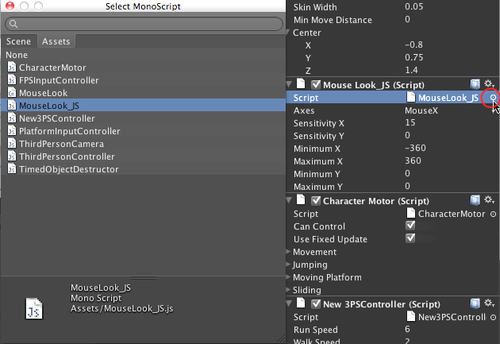
- Then, go down one step and click on the Main Camera object in the Hierarchy view; go to its Inspector view. In the Mouse Look (Script) component, click on the circle icon at the right of Script and choose MouseLook_JS as we did earlier.
Now, click Play to see the result. You will be able to control your character's moves; run by holding the Shift key and jump by pressing the space bar. However, pressing the E key will stop our character's movements because we didn't set up the aiming and shoot animation in our script yet. We will do this in the next section.
We just created our New3PSController.js script by using the old built-in FPSInputController.js script as the base script. We also added the new code section to control the animation of the character while it is moving, running, or idle. Then, we limited the movement and rotation of the camera by applying the character movement direction to Character Motor and the Main Camera.
Then, in the Update() function, we added the new section of the code to control the animation of our character. At first, we check whether or not the user has pressed E:
- If the user presses it, we want the character to stop moving and play the shooting animation to prepare the character to be able to fire. We also set the maximum and minimum of the camera rotation on the Y-axis, which limits the camera to rotate up and down only. Then, we set the
motor.inputMoveDirectiontoVector3.zerobecause we don't want our character to move while he/she is executing the shooting action. - On the other hand, if the user doesn't press E, we check for the user input. If the user presses the right arrow or left arrow, we change the speed to run speed; if not we set it to walk speed. Then, we applied the movement speed to
motor.movement.maxForwardSpeed,motor.movement.maxSidewaysSpeed, andmotor.movement.maxBackwardsSpeed.
Next, we checked the character movement direction to play the run animation, walk animation, or idle animation (we can also have the jump animation in here, but in this example we don't have the jump animation, so we just leave it).
At last, we applied the movement direction and jump to the character motor for the user to be able to control the movement of this character, and we are done with this step. In the next step, we will add the shoot animation and function, fire script, rocket launcher, and scope target to our character.
In this step, we have access to the Character Motor and can change MouseLook script to MouseLook_JS script. If we take a look at the Character Motor script, we will see that it has a lot of parameters to adjust. In our case, we only pass the inputMoveDirection, inputJump, movement.maxForwardSpeed, movement.maxSidewaysSpeed, and movement.maxBackwardsSpeed parameters. We don't need to go to every parameter in the Character Motor, but there is something that we will need to know to be able to use it with our script. The Character Motor will help us to calculate the smooth movement speed including moving forward, backward, and sideways. It will calculate the gravity when the character is jumping and falling as well as check for the moving platform.
Next, we will take a look at the MouseLook script. If we open up this script, we will see that it is written in C#, but we need not worry as Unity allows us to access the parameters even though we are using JavaScript. As we know, we can use C# (and also Boo) scripting language to write the script in Unity similar to JavaScript. So, let's open the MouseLook
and look inside—it's very similar to what we did for MouseLook_JS in JavaScript. However, there are numerous differences between writing JavaScript and C#, but we will talk about the basics of syntax.
Both of the preceding scripts do the same thing, but use different syntaxes. For example, if we want to create a float variable in JavaScript, we can use the following line of code:
public var myNumber : float = 0;
To create a function we can use the following line of code:
public function Myfuncion () : void { //dosomething }
On the other hand, if we are using C#, we can write the following line of code:
public float myNumber = 0F;
And for the function, we will use the following line of code:
public void Myfuncion () { //dosomething }
There is also some difference in syntax between both the languages. For more information, we can go to the following websites:
http://unity3d.com/support/documentation/ScriptReference/index.Writing_Scripts_in_Csharp.html
http://answers.unity3d.com/questions/12911/what-are-the-syntax-differences-in-c-and-javascrip.html.
We can also see the syntax for each language in the Unity scripting document, as shown in the following screenshot:
You can also buy the JavaScript to C# converter package or C# to Javascript converter package there.