
In the first section, we will create the waypoint script to place the waypoint for our AI movement direction, which can be edited in the editor. We will also learn how to use the OnDrawGizmos() function, which we have used in Project 1, Creating a Sprite and Platform Game.
In this chapter, we will add the functions below the OnDrawGizmos() function to show the visual for our waypoint.
We use the Gizmos.DrawIcon() function to draw the icon image, see the direction line between two waypoints by using the Gizmos.Draw
Line() function, to draw the line between two waypoints, and show the visual of the waypoint by using the Gizmos.DrawWireSphere() function to draw the wire sphere at the position of the waypoint.
First, we need to drag-and-drop the Gizmos folder, which is located outside the Chapter6 folder, as shown in the following screenshot:
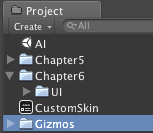
Why did we move the folder outside the Chapter6 folder?
Take a look at this: http://unity3d.com/support/documentation/ScriptReference/Gizmos.DrawIcon.html.
We see that the function takes two parameters: the first is the position of the object to draw the icon, and the second is the name of the icon image, which is string. The documentation says:
"The icon's path can be found in the
Assets/Gizmosfolder or in theUnity.app/Contents/Resourcesfolder."
This simply means that if we want to have our custom icon image, we basically need to put our image inside either of the folders mentioned earlier. Both the paths have advantages and disadvantages. If we want to use the image icon for every project in the same machine, we can put it inside the Unity.app/Contents/Resources folder, but this will be difficult when we want to move the project to another person. On the other hand, if we want to use only the icon image in this project, we can create a Gizmos folder in the Project view and put the icon image inside that folder, which we just did.
Now we are ready to start the first section:
- Create a new JavaScript file (we can add it to our
Scriptsfolder to make it more organized) by going to Assets | Create | Javascript, and name itWaypoints. - Double-click to open it in MonoDevelop and start creating the necessary parameters for this waypoint script. Let's replace the script as follows:
//Name of the icon image
public var iconName : String = "wayIcon.psd";
//Radius of each way point - use for checking the collision detection with the enemy
public var radius : float = 1.0;
//Toggle this to make the enemy move by order from the first index to last index (Looping)
public var orderDirection : boolean = false;

//Get all the transform of the waypoint - including the the parent
private var waypoints : Transform[];
//Current waypoint index
private var int_wayIndex : int;
//Next waypoint index
private var int_nextIndex : int;
//Length of all waypoints
private var int_wayLength : int;
//Movement direction of the enemy to next waypoint
private var v3_direction : Vector3;
//Checking if the enemy hit the waypoint
private var b_isHitRadius : boolean;
Here, we just finished implementing the necessary parameters to use for our waypoint.
- Next, we will add the
Awake()function to set up all the necessary parameters before calling theStart()function by adding the following code:Note
The
Awake()function is used to initialize all the variables before the game starts or before calling theStart()function. You can check out the following Unity scripting document for more details:http://unity3d.com/support/documentation/ScriptReference/MonoBehaviour.Awake.html.
//Set up all parameters before Initialize
public function Awake() : void {
  //Get all Transforms of the gameObject include the children and the transform of this gameObject
  waypoints = gameObject.GetComponentsInChildren.<Transform>();
  //Set up the length of all transform
  int_wayLength = waypoints.Length;
  int_wayIndex = 0;
  int_nextIndex = 1;
  //Checking the orderDirection; if it's false, it means the AI isn't moving by order, so using the random index of waypoint
  if(orderDirection == false) {
    var int_randomWay : int = Mathf.Floor(Random.value * int_wayLength);
    //Checking to make sure that the waypoint length is more than 1
    if (int_wayLength > 1) {
      //Use Random Index
      while (int_wayIndex == int_randomWay) {
        int_randomWay = Mathf.Floor(Random.value * int_wayLength);
      }
    }
    int_nextIndex = int_randomWay;
  }
  //Set the direction to zero
  v3_direction = Vector3.zero;
  //To ignore the first waypoint at the beginning of the game
  b_isHitRadius = true;
}
In this function, we get the transform of each waypoint in the
gameObjectand all the children included in thisgameObjectby using thegameObject.GetComponentsInChildren.<Transform>()to return the array of theTransformtype object. Then, we set the length of this array, the start index, and next index of the waypoint. We also check to see iforderDirectionisfalse, in which case the next index waypoint will be orderly picked. On the other hand, if it istrue, the next index waypoint will be randomly picked. - Next, we add the function to set up the position of the enemy at the start position of the waypoint, which we will call from the
Start()function of ourAIControllerscript in the next step. Add the following code:public function StartPosition() : Vector3 { return waypoints[0].position; }This way, we can make sure that the enemy will always start at the waypoint index
0. - Then, we will create the core of this function, which will calculate and return the direction of the current position character to the waypoint position. Type the following code:
//Return the direction of the enemy toward the next waypoint public function GetDirection( _AI : Transform ) : Vector3 { if (Vector3.Distance(_AI.position, waypoints[int_nextIndex].position) <= radius) { //Only check once when the AI hit the way point if (!b_isHitRadius) { b_isHitRadius = true; //Update the current way index int_wayIndex = int_nextIndex; //Get Direction by order if (orderDirection == true) { //Get the next way index int_nextIndex = (int_nextIndex + 1) % int_wayLength; } else { var int_randomWay : int = Mathf.Floor(Random.value * int_wayLength); //Checking to make sure that the waypoint length is more than 1 if (int_wayLength > 1) { //Use Random Index while (int_wayIndex == int_randomWay) { int_randomWay = Mathf.Floor(Random.value * int_wayLength); } } int_nextIndex = int_randomWay; } } } else { b_isHitRadius = false; } //Get Direction from the current position of the character to the next way point //Make sure that the y position equal to the waypoint y position var v3_currentPosition : Vector3 = new Vector3(_AI.position.x, waypoints[int_nextIndex].position.y, _AI.position.z); v3_direction = (waypoints[int_nextIndex].position - v3_currentPosition).normalized; return v3_direction; } - Next, we will add two more functions to check the direction from the enemy to the player, and check to see whether the enemy is away from the target waypoint at a specific distance or not. Both of these functions will give the enemy more characteristics. Let's type both the functions as follows:
//To get the direction from current position of the enemy to the player public function GetDirectionToPlayer ( _AI : Transform, _player : Transform ) : Vector3 { //Make sure that the y position equal to the waypoint y position var v3_currentPosition : Vector3 = new Vector3(_AI.position.x, waypoints[int_wayIndex].position.y, _AI.position.z); var v3_playerPosition : Vector3 = new Vector3(_player.position.x, waypoints[int_wayIndex].position.y, _player.position.z); v3_direction = (v3_playerPosition - v3_currentPosition).normalized; return v3_direction; } //Checking if the enemy is away from the target waypoint in the specific distance or not public function AwayFromWaypoint (_AI : Transform, _distance : float) : boolean { if (Vector3.Distance(_AI.position, waypoints[int_nextIndex].position) >= _distance) { return true; } else { return false; } } - The last function of this script is the
OnDrawGizmos()function, which will only be used in the editor or debugging process. We will use this function to draw the icon image, the radius, and the line direction between each waypoint. Let's add it as follows://Draw Gizmos and Directional line public function OnDrawGizmos() : void { //Get all Transform of this game objects include the children and the transform of this gameobject var waypointGizmos : Transform[] = gameObject.GetComponentsInChildren.<Transform>(); if (waypointGizmos != null) { if (orderDirection == true) { //Draw line by the order of each waypoint 0,1,2,3,... for (var i : int = 0; i < waypointGizmos.Length; i++) { Gizmos.color = Color.red; //Get the next way point var n : int = (i + 1) % waypointGizmos.Length; Gizmos.DrawLine(waypointGizmos[i].position, waypointGizmos[n].position); Gizmos.DrawIcon(waypointGizmos[i].position, iconName); Gizmos.color = Color.green; Gizmos.DrawWireSphere(waypointGizmos[i].position, radius); } } else { //Draw line from one point to every points except itself for (var j : int = 0; j < waypointGizmos.Length; j++) { for (var k : int = j; k < waypointGizmos.Length; k++) { Gizmos.color = Color.red; Gizmos.DrawLine(waypointGizmos[j].position, waypointGizmos[k].position); } Gizmos.DrawIcon(waypointGizmos[j].position, iconName); Gizmos.color = Color.green; Gizmos.DrawWireSphere(waypointGizmos[j].position, radius); } } } }We use
Gizmos.DrawLine()to draw the line between each waypoint, andGizmos.DrawIcon()to draw the icon image for each waypoint game object in the scene to make it easier to edit. Then, we useGizmos.DrawWireSphere()to draw and calculate the area of each waypoint related to theradius.
Now, we are done with the Waypoints script
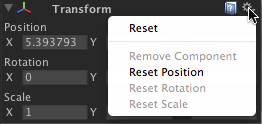
. Go back to Unity editor to create the waypoint game object by going to GameObject | Create Empty to create the empty game object and name it Waypoints. Then, drag the Waypoints script (that we just created) to this Waypoints game object, and set its Transform | Position to X: 0, Y: 0, Z: 0, Rotation X:0, Y: 0, Z: 0, Scale X: 1, Y: 1, Z: 1, or we can click on the little gear in the Inspector view and choose Reset to reset all to the default positions, as shown in the following screenshot:
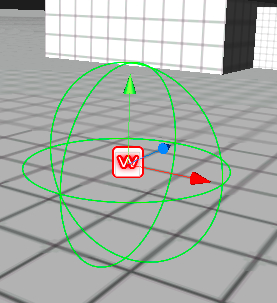
You will see something similar to the following screenshot:
Right now, we have the first or start position of the waypoint. We need more waypoint positions, which is very easy to achieve. You just need to create a new empty game object again and drag Waypoints inside. Go to GameObject | Create Empty to create the empty game object and name it Waypoint. Then, we drag the object to Waypoints, which we already have in the scene, and set its transform position to X: 5.2, Y: 0, Z: 4.3. We can also create more waypoints by pressing Crtl + D (in Windows) or Command + D (on a Mac) to duplicate another four Waypoint game object
, and set all these objects' transform positions as follows:
- Position X: 7.2 Y: 0 Z: 10.2
- Position X: 3.4 Y: 0 Z: 12.1
- Position X: -0.8 Y: 0 Z: 10.7
- Position X: -2.2 Y: 2.7 Z: 5.2
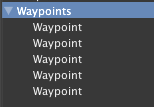
If we take a look at the Hierarchy view, we will see something similar to the following screenshot:
Then, if we click on Waypoints, and go to its Inspector view under the Waypoints (Script), we will see the Order Direction. We can also toggle it On or Off to enable the movement direction of the AI, which will also show the result on the editor screen by using the OnDrawGizmos() function
, as we can see in the following screenshot:
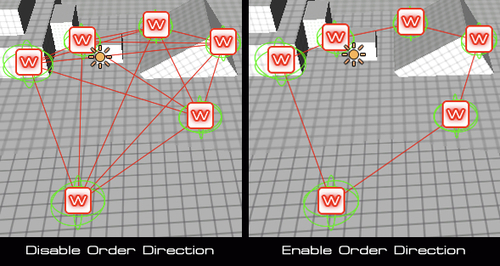
We can also move the waypoint object around to serve what we need or even increase or decrease the waypoint to fit our level.
Note
The waypoint script
will not work properly if we put the waypoint where the enemy can't walk through, which means that our enemy should be able to walk through and touch each waypoint (hit the green wire sphere area of each waypoint, as shown in the preceding screenshot). Otherwise, the enemy won't be able to move to the next waypoint.
We can also adjust the radius (you will see the green wire sphere change its size) in the Waypoints script, which will make our enemy start turning to the next waypoint faster or slower. However, we should be careful while adjusting the radius. If we set it too low, the character might not hit it and not turn to the next waypoint. So, the minimum radius should be 1.0.
In the next step, we will continue by creating the AIController script
to make our enemy walk through each waypoint.
What we have done here is created the waypoint, which basically controls the movement of the enemy. We started by creating the Waypoints script
, which gets the transform position of the game object and its children by using gameObject.GetComponentsInChildren.<Transform>().
Then, we added the getDirection() function
, which checked the distance between the enemy position and waypoint position, as shown in the following diagram:
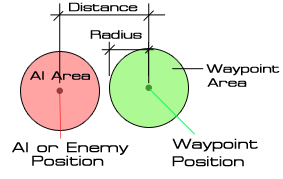
We can see from the preceding diagram that if the distance between the enemy and the waypoint position is smaller than the radius of the waypoint, it will trigger the waypoint to change the next waypoint index, which will also change the movement direction of the enemy.
Then, we added two functions: the first one is the GetDirectionToPlayer() function
which was used to make the enemy move towards the player, and the AwayFromWaypoint() function
was used to check the distance between the enemy and the next waypoint while the enemy is chasing the player. If it does, then we will return true and make our enemy go back to the next waypoint.
The GetDirectionToPlayer() function
will make the enemy follow the player at a certain distance, and the AwayFromWaypoint() function
will make the enemy go back to the waypoint if its position is too far away.
Next, we used the OnDrawGizmos() function
to create the visual for the waypoint game objects to show in the editor. The waypoint is the empty game object, which is sometimes difficult to edit in the editor because we cannot see it in the editors.
So, using gizmo is the best solution and the better way that Unity provides us to see the visual of some empty game object. We also have the trigger parameter
in the Inspector view to tell our enemy to walk randomly or by the order of the waypoint index.
At the beginning of the script, we use GetComponentsInChildren.<Transform>() function. Have a look at the Unity document at the following link:
http://unity3d.com/support/documentation/ScriptReference/GameObject.GetComponentsInChildren.html.
You might ask—why do we call it something different than the document, and why don't we just use the GetComponentsInChildren(Transform) or the difference between those two function calls? Well, as is specified in the document, we will see that the GetComponentsInChildren(Transform) function
will return Component[] Or, it means that the script is attached to this game object but not the Transform[] type, which we need for our Waypoints script.
In this Unity document page, if we scroll down a little bit, we will see the following screenshot, which gives us our answer:
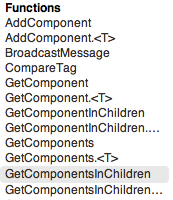
You will see that there are two types of GetComponentsInChildren() function
. So, refer to the following URL for more details:
If we go to the preceding link, we will see the following function:
function GetComponentsInChildren.<T> () : T[]
We can see that the preceding function takes the type T and returns an array of type T, which we will use in this step.
Tip
In our script, we cannot use the GetComponentsInChildren.<T>() function
, if we don't specify the type of our parameter as follows:
var waypointGizmos = gameObject.GetComponentsInChildren(Transform); //Correct
However, we will see the following error if we specify the type of our parameter:
var waypointGizmos : Transform[] = gameObject.GetComponentsInChildren(Transform); //Error
The preceding code will cause the error in Unity shown in the following screenshot:

It is better to specify the type of the parameter based on its performance.
Finally, we used the OnDrawGizmos() function
to create the visual for the waypoint game object, which will show only in the editor. We won't see anything while we are playing the real game after we build it.
However, if we want to see it while we are playing the game in the Game view, we can click on the Play button and click on the Gizmos button on the top-right to toggle the Gizmos On or Off as shown in the following screenshot: