From the last section, we got the controllable character with the animation, but the camera isn't actually following the character at all. So, in this section we will create the third-person camera to follow our character.
Create a new JavaScript in Unity by going to Assets | Create | JavaScript, and name it CharacterCamera. Then right-click on this script and click Sync MonoDevelop Project (or double-click it if we already set MonoDevelop as our main editor; if not it will open the default script editor, either Unitron or UniScite) to open MonoDevelop. Now we are ready to code.
Now, we will begin coding the CharacterCamera script:
- Type the parameters script as follows:
//Make sure that we have CharacterControl included in this gameobject
@script RequireComponent(CharacterControl)

//Angular smooth
public var smoothTime : float = 0.1;
public var maxSpeed : float = 150.0;

public var heightSmoothTime : float = 0.1;

public var distance : float = 2.5;
public var height : float = 0.75;

private var f_heightVelocity : float = 0.0;
private var f_angleVelocity : float = 0.0;

private var v3_velocity : Vector3;
//Transform
private var target : Transform;
private var cameraTransform : Transform;

private var f_maxRotation : float;
//Character Control
private var c_characterControl : CharacterControl;

//Target
private var f_targetHeight : float = Mathf.Infinity;
private var v3_centerOffset = Vector3.zero;
Using the preceding code, we created all the parameters to use in this script.
- Next, we will set up the parameters by using the
Awake()function:public function Awake () : void { //Get Our Main Camera from the scene cameraTransform = Camera.main.transform; target = transform; c_characterControl = GetComponent(CharacterControl); //Get target center offset var characterController : CharacterController = target.collider; v3_centerOffset = characterController.bounds.center - target.position; }In this function, we get the camera transform and the
CharacterControllerscript to get the center position of the target, which is the character we are pointing at. - Then, we will create a function to get the angle distance between the current angle and target; let's add the following code:
//Get the angle distance between two angle //This function took from the built-in Third-person Camera Script public function AngleDistance (a : float, b : float) : float { //Loop the value a and b not higher than 360 and not lower than 0 a = Mathf.Repeat(a, 360); b = Mathf.Repeat(b, 360); return Mathf.Abs(b - a); } - Next, we will create the
LateUpdate()function to update the camera position and rotation after all the objects have theirUpdatefunctions called. So, let's add the following code.Note
The
LateUpdate()function is the function that will be called after theUpdate()function has been called. This function will make sure that all the calculation in theUpdate()function is finished before we start theLateUpdate()function. We can see more details of this function at the following Unity website:http://unity3d.com/support/documentation/ScriptReference/MonoBehaviour.LateUpdate.html.
//We use LateUpdate here because we need to wait for the user input before we update our camera. public function LateUpdate () : void { var v3_targetCenter : Vector3 = target.position + v3_centerOffset; //Calculate the current & target rotation angles var f_originalTargetAngle : float = target.eulerAngles.y; var f_currentAngle : float = cameraTransform.eulerAngles.y; var f_targetAngle : float = f_originalTargetAngle; // Lock the camera when moving backwards! // * It is really confusing to do 180 degree spins when turning around. So We fixed the camera rotation if (AngleDistance (f_currentAngle, f_targetAngle) > 160 && c_characterControl.IsMoveBackward ()) { f_targetAngle += 180; } //Apply rotation to the camera f_currentAngle = Mathf.SmoothDampAngle(f_currentAngle, f_targetAngle, f_angleVelocity, smoothTime, maxSpeed); //Update camera height position f_targetHeight = v3_targetCenter.y + height; // Damp the height var f_currentHeight : float = cameraTransform.position.y; f_currentHeight = Mathf.SmoothDamp (f_currentHeight, f_targetHeight, f_heightVelocity, heightSmoothTime); // Convert the angle into a rotation, by which we then reposition the camera var q_currentRotation : Quaternion = Quaternion.Euler (0, f_currentAngle, 0); // Set the position of the camera on the x-z plane to: // distance meters behind the target cameraTransform.position = v3_targetCenter; cameraTransform.position += q_currentRotation * Vector3.back * distance; // Set the height of the camera cameraTransform.position.y = f_currentHeight; // Always look at the target SetUpRotation(v3_targetCenter); } - Finally, we will create the
SetupRotation()function to update the rotation of our camera. Type the following code:private function SetUpRotation (v3_centerPos : Vector3) { var v3_cameraPos = cameraTransform.position; //Camera position var v3_offsetToCenter : Vector3 = v3_centerPos - v3_cameraPos; //Get the camera center offset //Generate base rotation only around y-axis var q_yRotation : Quaternion = Quaternion.LookRotation(Vector3(v3_offsetToCenter.x, v3_offsetToCenter.y + height, v3_offsetToCenter.z)); //Apply the rotation to the camera var v3_relativeOffset = Vector3.forward * distance + Vector3.down * height; cameraTransform.rotation = q_yRotation * Quaternion.LookRotation(v3_relativeOffset); }
So, we are done with this chapter. We can go to Unity and click Play to see our result. We will see that now the camera is following our character.
We just created a third-person camera to follow our character. This script also allows us to set the distance from our character and the height of our camera position by using some code from the third-person camera built-in script and adapting it to our character.
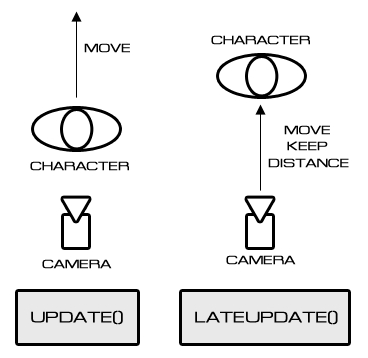
Why do we need the LateUpdate() function instead of the Update() function for this script? Well, we used it to guarantee that the player position is already updated when we are doing the camera calculations. If we are doing the calculation in the Update() function, the camera position might be calculated before the player position is updated. This will result in jitter.
We can also explain it this way: We wait for the input from the user and then get the direction where the character will go in the Update() function. Then, we use the position of the character as the target position that our camera will follow, and calculate the camera position in the LateUpdate() function. This way, we will be able to track each movement of our character and the camera will follow the direction smoothly without any jitter, as we can see in the folloing diagram: