
In this section, we will create new Unity JavaScript code to control the movement of our character, and a sprite animation for each action of our character. We have a choice to use Unitron (Mac), UniSciTE (Windows), or MonoDevelop, but in this book we will use MonoDevelop as our scripting editor instead of Unitron or UniSciTE. MonoDevelop is mainly designed for C# and .NET environment, so if you are comfortable with C#, you will probably love it. However, we will still use it to edit our JavaScript because it has a lot of functions that will help us to write the script faster and debug better, such as finding and replacing words in the whole project by pressing Command + Shift + F in Mac or Control + Shift + F in Windows, and autocomplete, to name a few. Moving from Unity JavaScript to C# is also a comparatively smooth transition.
Now, we are just about to start coding, but first let's make it organized:
- Create a new folder in your project window and name it
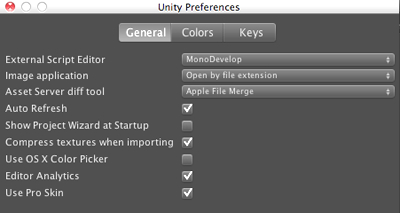
Scripting. This folder will contain our script for this chapter. - Next, we want to set up our Unity to use MonoDevelop as our main Scripting editor (Unity | Preferences in Mac or Edit | Preferences in Windows).
- We will see a Unity preferences window. In the General tab, go to the External Script Editor and change Use build-in editor (Unitron/UniSciTE) to MonoDevlop by clicking on Browse... and choose Applications | Unity |
MonoDevelop.appin Mac or {unity install path} | Unity | MonoDevelop |MonoDevelop.exein Windows, and we are done.Note
The default Unity script editor is set to Unitron/UniSciTE because they are the built-in editors that are included in Unity from the beginning. MonoDevelop is basically the IDE that is just included in Unity 3.X, which has a better scripting and debugging environment. We can see more information about how to set up the MonoDevelop on this website: http://unity3d.com/support/documentation/Manual/HOWTO-MonoDevelop.html.
- First, go to Assets | Create | Javascript and name our script as
CharacterController_2D. - Double-click on the script; it will open the MonoDevelop window.
- Now, we will see three windows in the MonoDevelop screen:
- On the top-left is Solution; we can see our project folder here, but it will only show the folder that contains a script.
- On the bottom-left, we will see a Document Outline; this window will show all the functions, classes, and parameters in the file.
- The last window on the right will be used to type our code.
- Let's get our hands dirty with some code—first create the
CharacterController_2Dclass. At present, we are creating parameters:public var f_speed : float = 5.0; public var loopSprites : SpriteManager[]; private var in_direction : int;
f_speedis the speed of our character, and we set it topublicso we can adjust it inside the Unity editor. The arrayloopSpritesof theSpriteManagerclass will control the update of our sprite animation texture, which we will create later.in_directiontracks the direction of our character, which will return only 1 (right direction) or-1(left direction). - Next, we will include the script in the
Start()function, which is already created by default:public function Start() : void { in_direction = 1; //Initialization Sprite Manager for (var i : int = 0; i<loopSprites.length; i++) { loopSprites[i].init(); } //Update Main Camera to the character position Camera.main.transform.position = new Vector3(transform.position.x, transform.position.y, Camera.main.transform.position.z); } - Next, we will include the script in the
Update()function, which is already created by default similar to theStart()function:// Update is called once per frame public function Update () : void { if (Input.GetButton("Horizontal")) { //Walking in_direction = Input.GetAxis("Horizontal") < 0 ? -1: 1; rigidbody.velocity = new Vector3((in_direction*f_speed), rigidbody.velocity.y, 0); //Reset Stay animation frame back to the first frame loopSprites[0].resetFrame(); //Update Walking animation while the character is walking loopSprites[1].updateAnimation(in_direction, renderer.material); } else { //Stay //Reset Walking animation frame back to the first frame loopSprites[1].resetFrame(); //Update Stay animation while the character is not walking loopSprites[0].updateAnimation(in_direction, renderer.material); } } - Then, we create a
LateUpdate()function, which is called after all theUpdate()functions have been called. We will use this function to update our camera position after our character movement by setting its transform to follow our character:public function LateUpdate() : void { //Update Main Camera Camera.main.transform.position = new Vector3(transform.position.x, transform.position.y, Camera.main.transform.position.z); } - Next, we create the
SpriteManagerclass to manage our sprite texture in theCharacterController_2D.jsfile; continue from our preceding script, and add the following:class SpriteManager { public var spriteTexture : Texture2D; //Set Texture use for a loop animation such as walking, stay, etc. public var in_framePerSec : int; //Get frame per sec to calculate time public var in_gridX : int; //Get max number of Horizontal images public var in_gridY : int; //Get max number of Vertical images private var f_timePercent : float; private var f_nextTime : float; //Update time by using frame persecond private var f_gridX : float; private var f_gridY : float; private var in_curFrame : int; public function init () : void { f_timePercent = 1.0/in_framePerSec; f_nextTime = f_timePercent; //Update time by using frame persecond f_gridX = 1.0/in_gridX; f_gridY = 1.0/in_gridY; in_curFrame = 1; } public function updateAnimation (_direction : int, _material : Material) : void { //Update material _material.mainTexture = spriteTexture; //Update frame by time if (Time.time>f_nextTime) { f_nextTime = Time.time + f_timePercent; in_curFrame++; if (in_curFrame>in_framePerSec) { in_curFrame = 1; } } _material.mainTextureScale = new Vector2 (_direction * f_gridX, f_gridY); var in_col : int = 0; if (in_gridY>1) { //If there is more than one grid on the y-axis update the texture in_col= Mathf.Ceil(in_curFrame/in_gridX); } if (_direction == 1) { //Right _material.mainTextureOffset = new Vector2(((in_curFrame)%in_gridX) * f_gridX, in_col*f_gridY); } else { //Left //Flip Texture _material.mainTextureOffset = new Vector2(((in_gridX + (in_curFrame)%in_gridX)) * f_gridX, in_col*f_gridY); } } public function resetFrame () :void { in_curFrame = 1; } } - Now, save it and go back to Unity; drag-and-drop our script to our
Player, then click onPlayerand go to the Inspector window. Click on the Loop Sprites, and set Size to 2, then set the following:- Element 0:
- Sprite Texture: s_set
- In_frame Per Sec: 2
- In_grid X: 2
- In_grid Y: 1
- Element 1:
- Sprite Texture: w_set
- In_frame Per Sec: 8
- In_grid X: 4
- In_grid Y: 2
- Element 0:
We are done. Let's click on the play button to play the game. We will see our Player moving his hand back and forth. Next, press the A key or ¬ key, D key or ® key to move
the Player to the left or to the right; now we see that he is walking. Isn't that cool?
We just created a script that controls the movement of our character, and his animation. First, we set in_direction to 1 because we want our character To start by facing the right-hand side. Then, we are looping through the array and initializing the SpriteManager class from its length. We will get the main camera from the current scene by using Camera.main. This syntax allows us to access the Main Camera object from anywhere we want, and then we assign the main camera position point to our character. Next, we will put the script in the Update() function, which is already created by default —similar to the Start() function. This function will be used to control our character movement from walking to jumping, and for updating the animation.
Then, we used the Input class to detect when the player presses a key on the keyboard. We do all the character control in the update() function. First, we use if (Input.GetButton("Horizontal")) { } to check if the player pressed a Horizontal key, (for which the default in Unity is A, D, left arrow, or right arrow key), and we move our character if he/she did. The first line in this if statement checks the direction, which we are using, in_direction =Input.GetAxis("Horizontal") < 0 ? -1: 1;, which means that if the player presses a Horizontal key, we will get the axis number from the Input.GetAxis("Horizontal") function. The Input.GetAxis function will return the range from -1 to 1 depending on the pressure of the player pressing. Then, we check if the number is lower than 0 or not, if it's then the function returns -1 (move to left), if not it returns 1 (move to right). Then in the line rigidbody.velocity = new Vector3((in_direction*f_speed), rigidbody.velocity.y, 0);,we applied the direction and speed to the rigidbody velocity. We don't apply any velocity in the Z-axis because we are not moving our character in that direction.
Lastly, we included the SpriteManager class in our CharacterController_2D.js file to control our sprite texture to play loop animation by using the maximum of frame we had calculated with the time to play each frame. Let's take a look at our SpriteManager class. spriteTexture is basically a set of sprite texture that get held in this class. This textures will get a call and apply to the main material texture when the character is changing their movement, such as from walk to stay, stay to walk, or walk to jump, and so on. in_framePerSec is the total frames of the sprite texture, which will be used to calculate when the next frame will be showed. in_gridX is the number of the row in our sprite texture, and in_gridY is the number of the column in our sprite texture, which will be used to calculate the Tiling and Offset of the texture that we have already seen in the last step. We also have private parameters f_timePercent, f_nextTime, f_gridX, f_gridY, and in_curFrame, which are used to calculate in the updateAnimation() function. Next, we have the init() function. This function is basically for setting up our parameters. Then, the updateAnimation() function will get the material and direction from our main character to calculate and update our sprite animation. Lastly, we have a resetFrame() function to reset our animation frame back to one.
There are a few more things that we need to know:
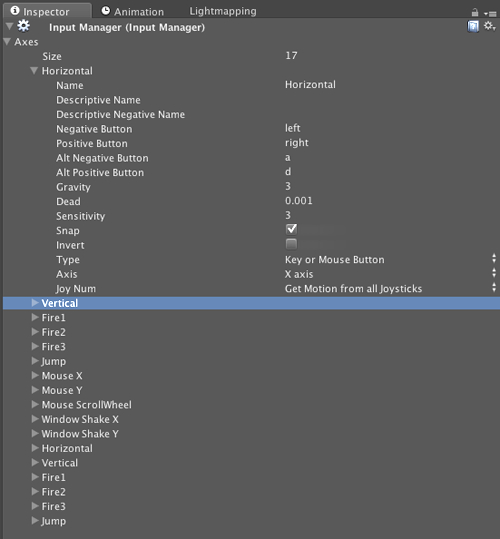
In Unity, we can set a custom Input Manager by going to Edit | Project Settings | Input. In the Inspector, click on Axes and you will see Size: 17, which is the array length of all the inputs. If we want more than 17 inputs, we can put the number here (the default is 17). Next, we will see all 17 names from Horizontal to Jump as a default setting. Each one will have its own parameters, which we can set up, as follows:
We can see the information of each parameter on the Unity website:
http://unity3d.com/support/documentation/Components/class-InputManager.html.
In our code, we use the Input.GetButton("Horizontal") function. GetButton means we are checking if the Horizontal button is being held down. The Horizontal is the name of the first input button, as we can see in the preceding screenshot. We can also use Input.GetKey("left") to control our character. It will have the same result with Input.GetButton, but the difference is GetKey will only detect the specific key in our code. It isn't flexible for the user to adjust the key configuration during the game play. The Negative Button and Positive Button here will send the negative and positivevalue, which in most cases is used for controlling direction such as left, right, up, and down. There is a Dead parameter, which will set any number that is lower than this parameter to 0, which is very useful when we use a joystick. Also, setting the Type to key/mouse button and enabling the Snap parameter will reset axis values to zero after it receives opposite inputs.