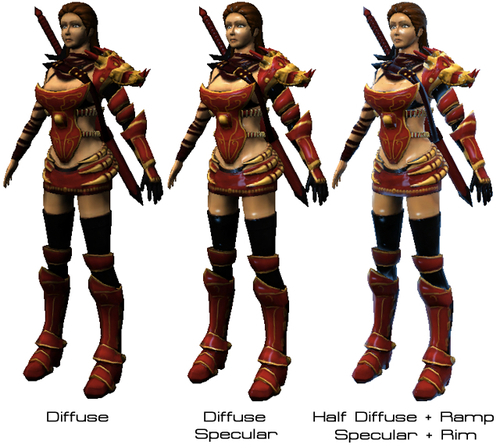
In this last step, we will add the last three properties, _RimColor, _RimPower, and _Ramp to get the toon shader result. The _RimColor and _RimPower properties basically control the back lighting effect of our character. The _Ramp properties will be the ramp textures that are used to calculate the lighting effect based on the angle between light direction and surface normal of the object.
This is the last section, after which you will be able to see the result of your custom shader.
- Go to MonoDevelop, open the
MyShader.shaderfile, and go to thePropertiessection and add the highlighted script as follows:Properties { _MainTex ("Texture", 2D) = "white" {} _BumpMap ("Bumpmap", 2D) = "bump" {} _AmbientColor ("Ambient Color", Color) = (0.1, 0.1, 0.1, 1.0) _SpecularColor ("Specular Color", Color) = (0.12, 0.31, 0.47, 1.0) _Glossiness ("Gloss", Range(1.0,512.0)) = 80.0 _RimColor ("Rim Color", Color) = (0.12, 0.31, 0.47, 1.0) _RimPower ("Rim Power", Range(0.5,8.0)) = 3.0 _Ramp ("Shading Ramp", 2D) = "gray" {} } - Go to the
SubShadersection, modify, and add the highlighted code as follows:SubShader { Tags { "RenderType"="Opaque" } LOD 400 CGPROGRAM // Custom lighting function that uses a texture ramp based on angle between light direction and normal // We use exclude_path:prepass because this lighting model won't work on the deferred lighting // Since we don't have the angle between the light direction and normal to calculate in the prepass #pragma surface surf RampSpecular exclude_path:prepass sampler2D _MainTex; sampler2D _BumpMap; sampler2D _Ramp; fixed4 _AmbientColor; fixed4 _SpecularColor; half _Glossiness; fixed4 _RimColor; half _RimPower; struct Input { float2 uv_MainTex; float2 uv_BumpMap; half3 viewDir; }; - Add the following highlighted code inside the
surf()function as follows:void surf (Input IN, inout SurfaceOutput o) { fixed4 c = tex2D (_MainTex, IN.uv_MainTex); o.Albedo = c.rgb; o.Alpha = c.a; o.Normal = UnpackNormal (tex2D (_BumpMap, IN.uv_BumpMap)); fixed rim = 1.0 - saturate(dot (normalize(IN.viewDir), o.Normal)); o.Emission = (_RimColor.rgb * pow (rim, _RimPower)); } - Finally, go to the custom lighting models function. Let's modify and add this highlighted code as follows:
inline fixed4 LightingRampSpecular (SurfaceOutput s, fixed3 lightDir, fixed3 viewDir, fixed atten) {
      //Ambient Light
      fixed 3 ambient = s.Albedo * _AmbientColor.rgb;

      //Ramp - Diffuse color
        fixed NdotL = saturate(dot (s.Normal, lightDir));
        fixed diff = NdotL * 0.5 + 0.5;
        fixed3 ramp = tex2D (_Ramp, float2(diff, diff)).rgb;
        fixed3 diffuse = s.Albedo * _LightColor0.rgb * ramp;
        //Specular - Gloss
      fixed3 h = normalize (lightDir + viewDir); // Get the Normalize of the lighting direction and view direction
         float nh = saturate(dot (s.Normal, h)); //Make sure that the return number isn't lower than 0 and greater than 1
         float specPower = pow (nh, _Glossiness);

         fixed3 specular = _LightColor0.rgb * specPower * _SpecularColor.rgb;

        //Result
        fixed4 c;
        c.rgb = (ambient + diffuse + specular) * (atten * 2);
        c.a = s.Alpha + (_LightColor0.a * _SpecularColor.a * specPower  * atten);

        return c;
    }
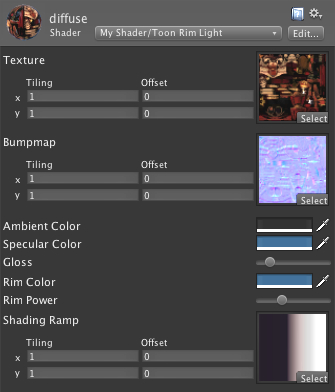
Finally, we go back to Unity and apply the ramp texture to our model. Let's click on the Heroine.FBX model in the Hierarchy view to bring up its Inspector view. In the Inspector view, we will go to the material component in the new property Shading Ramp and set the following:
- Shading Ramp: Drag-and-drop the
Ramp.jpgin theTexturesfolder from the Project view to this thumbnail
After finishing, we will see the Inspector view, as shown in the following screenshot:
Now, we can click Play to see the result, as shown in the following screenshot:
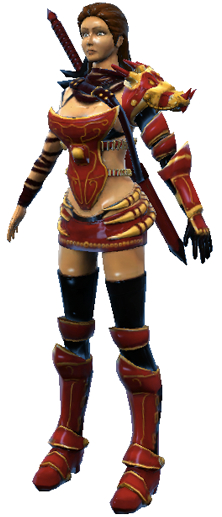
We can also move or rotate our camera to see our character with the shader in a different angle.
Next, we will go to our custom lighting function, LightingRampSpecular()
. In this function, we will add the following highlighted code:
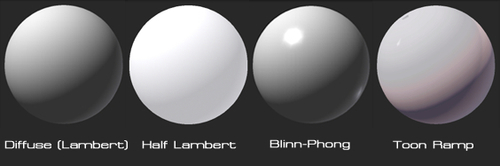
Next, we calculate the diffuse color by using the Half Lambert or Warp Lambert method to get the lighting warp around our model, and then we get the ramp texture from the property, and multiply it with the light color and our main color texture.
In this section, first we added three properties (_RimColor, _RimPower, _Ramp) in the Properties section, which will be used to calculate the rim light as well as the toon ramp shader style.
Then, we put exclude_path:prepass after #pragma surface surf RampSpecular. This means that we set our shader to compile without the deferred rendering. Why would we want to do this? Because our toon ramp shader needs the angle data between the light direction and surface normals to calculate the lighting that can't be calculated in the deferred rendering, so we exclude it.
Note
In Unity, we can choose three types of Rendering Paths: Vertex Lit, Forward, and Deferred Lighting. Vertex Lit is basically the lowest lighting quality and doesn't support any real-time shadows. Forward is shader-based, which is the default setting in Unity and only supports real-time shadow from one directional light. Deferred Lighting is the rendering path with the most lighting and shadow quality, which is only for the Unity Pro with no support on mobile devices. We can get more information about the Rendering Path from the following website:
http://unity3d.com/support/documentation/Manual/RenderingPaths.html
Next, we add half3 viewDir; in struct Input {}, which will allow us to get the user view direction vector. This parameter will be used to calculate the specular reflection on our model.
Inside the surf() function, we calculated the rim power or the brightness of our backlight, which is fixed rim = 1.0 - saturate(dot (normalize(IN.viewDir), o.Normal)); by using the saturation of the dot product of the view direction normalize and surface normals. In the next line (o.Emission = (_RimColor.rgb * pow (rim, _RimPower));), we multiply the rim light color with the power of the rim power that we got. Then, we assigned the result to o.Emission to show the rim light effect on our object.
Then, in the LightingRampSpecular() function, we changed the calculation of the lighting by using the Half-Lambert model, which will make our object brighter with the light that will warp around the object by dividing it by half and plus half (fixed diff = NdotL * 0.5 + 0.5;).
Note
Half-Lambert lighting is a technique first developed in the original Half-Life. It is designed to prevent the rear of an object losing its shape and looking too flat. Half Lambert is a completely non-physical technique and gives a purely perceived visual enhancement and is an example of a forgiving lighting model.
Reference from http://developer.valvesoftware.com/wiki/Half_Lambert.
Next, we use diff to calculate the ramp texture, _Ramp, to get the color result by using the tex2D() function (fixed3 ramp = tex2D (_Ramp, float2(diff, diff)).rgb;). Then we multiply this value with the diffuse color and light color (fixed3 rampDiffuse = s.Albedo * _LightColor0.rgb * ramp;), and we will get a result which is different from the previous section, as shown in the following screenshot: