
In this step, we will create our 2D character and material, which will contain our 2D character sprite sheet from our Chapter1 package folder. We will have our character act out three different types of animation: staying, walking, and jumping.
Let's make sure that we have all the sprites we need in the project folder:
- Go to
Chapter1/Characterswhere you will see three subfolders,Jump,Stay, andWalk. - Open the
jumpfolder. We will see the filesJ_Frame1.png,J_Frame2.png, andJ_Frame3.png. Next, open theStayfolder, we will see thes_set.pngfile. Then, open the last folderWalk, we will see thew_set.pngfile as shown in the following screenshot: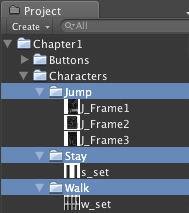
Now, we are ready to get started.
Since our character is a 2D sprite animation, we only need to have a plane object to contain it. Let's do it as the follows:
- Go to the
Planeprefab object in theFBXfolder and drag it into the Hierarchy view. - Next, right-click on the Animation component in the Inspector view and choose the Remove Component option to remove it. We will see the pop-up window, so just click on the Continue button, similar to the one we did for our
Backgroundobject. - Then, we click on this object and go to its Inspector view, and set it as follows:
- Tag: Player
- Position: x: -25, y: 16, z: 0
- Rotation: x: 0, y: 180, z: 0
- Scale: x: 5, y: 5, z: 1
- We will call our character
Player. Go to the Hierarchy view, right-click on thePlaneprefab object, and choose Rename to change the name to Player. - Next, go to Assets | Create | Material and name it M_Character.
- Go to material's Inspector view and set it up as follows:
- Shader: Transparent | Cutout | Soft Edge Unlit
- Base (RGB) Alpha (A)
- Drag-and-drop our
s_set.pngfrom theCharacters/Stayfolder to the texture thumbnail in material inspector - X: Tiling: 0.5, Offset: 0
- Y: Tiling: 1, Offset: 0
- Base Alpha cutoff: Drag the dragger to the very right end
- Next, we go back to the
Playerand assign this material to him by dragging and droppingM_Characterfrom the Project view to thePlayerobject in the Hierarchy view. Finally, add the Box Collider and add a RigidBody to thePlayer. We will use the Box Collider because ourPlayeris basically a plane and doesn't need any complex collider to detect his collision. - Let's click on the
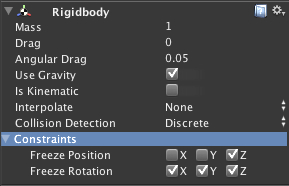
Playerand go to Component | Physics | Box Collider set Size: x: 0.4, y: 0.875, z: 1 and Center: x: 0, y: -0.06275, z: 0. - Then, we will add the RigidBody, which is used to calculate our walking speed, jumping, and collision detection with the level; go to Component | Physics | RigidBody and make sure that Use Gravity is On and the Kinematic option is Off.
- Set the freeze the rotation of the object (Freeze Rotation) by clicking on the arrow in front of Constraints. In Freeze Rotation, check each box X, Y, and Z to freeze rotation. We will also check the Z box to freeze the character movement in the Z-axis, as shown in the following screenshot:
We just created a plane that will act as our main character, our Player. We also created a material for our Player by using Transparent | Cutout | Soft Edge Unlit Shader. This Shader will cut out the Alpha channel and make it transparent. In addition, it will also soften the edge, not to the shape of the object it is on, but instead it will soften the edges of the image itself. We can control which portion of the image will be cut out, and how much the edge will soften by adjusting the Base Alpha Cutoff slider.
We also set the tiling for the X-axis to 0.5 because our image contains two frames, but we want to use only one image at a time. We used the Box Collider instead of Mesh Collider. We were also adding a RigidBody for our character and setting it to enable Freeze Rotation, which will ignore all the rotation on our character that will be calculated by Physics Engine in Unity. This will cause our Player not to rotate.
The RigidBody will also give our character the ability to activate the Physics Engine in Unity, such as gravity or velocity, and act as real-life physics. We will see this in the next step.
Why do we need to freeze the rotation and position of the Rigidbody in our character?
Note
We freeze the rotation of the Rigidbody because we are using the sprite texture to present the character movement. So, we don't want our character to rotate when it moves. We also freeze the position on the Z-axis because our character will only move on the X and Y axes. In this way, we can also save the CPU cycles because Unity will ignore the unnecessary calculation and only calculate the one it needs.
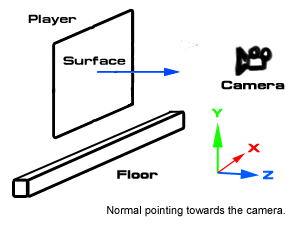
So why are we using Box Collider instead of Mesh Collider? Both the colliders are basically similar. Think about it this way: each surface of the mesh will have its own normal that will be perpendicular to each vertices and check if it hits any object. So, if we think about our plane object, we will see that it has only one face that has the normal pointing towards the camera. So, it means that if we apply the Mesh Collider to the plane object, we won't get any collision detection from the top, bottom, left, right, and back side of the plane. This is basically because there is no surface at the top, bottom, left, right, and back side of this object to create the collision detection with the other objects.
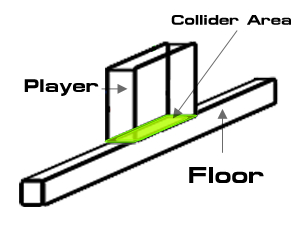
On the other hand, Box Collider uses the volume that it represents to check for the collision detection. This result will be a lot faster than the Mesh Collider. In this case, we are checking the volume of the character Box Collider with the the Floor
Box Collider to see whether there is any part of the Floor collider without Player or not, as we can see in the following diagram:
Next, we will talk about Tiling in Material, which is very similar to many 3D programs. Every texture that we applied to the material there will be stretched to fit in the square space, which we can see in the 1x1 cube.
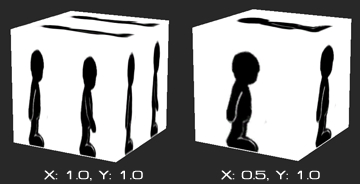
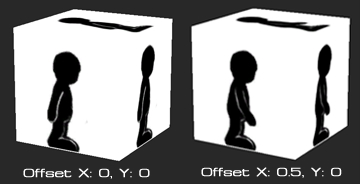
Tiling is very much similar to scaling, and it's basically repeating the texture on X and Y axes. So, if we set the Tiling X: 0.5, Y: 1.0, we see the result as shown in the previous figure with the texture on X-axis that scales half size, but it still looks the same in Y. We also see that the second image will show only the first left side of the texture (the first frame of our character). Now, if we want to show the right side of our texture what will we do? We will use Offset in Material, which will give a different result from Tiling. The Offset basically tells us the starting position of our texture. So, if we set the Offset X: 0.0, Y: 0.0, this means that our texture will display from the top-left corner of the original texture. On the other hand, if we set Offset X: 0.5, Y: 0.0, we will see the result that our texture's start point is at the middle of the original texture image, and we will see our material show the right side of our texture (the second frame of our character, as we can see in the following figure):
We can change the Tiling by calling the material.mainTextureScale function to set the X tile and Y tile, and use calling material.mainTextureOffset to set the X and Y Offset.
After learning this technique, we can manage our sprite image by just changing the number of Tiling and Offset of our character Material in the next step.