
Here we are in the second chapter. When we talk about traditional role-playing games, we will probably be thinking about the development of the character, such as the attributes, skills, powers, levels or experience, and so on. When we are playing an RPG, we typically have to open the menu or UI to adjust and manage our main character, such as increase the character attribute, change the weapon, or choose skills. The menu is very important in an RPG game. So, in this chapter, we will make the menu in an RPG game by using the GUI class in Unity.
We'll create a simple menu, yet complex enough for the RPG game. In this chapter, we will continue using some assets from the first chapter. So, we won't have to recreate the character again. This menu will include a STATUS tab, which will show the current attributes, skills, and equipment of our character. Next is an INVENTORY tab that will contain all the items that our character has as well as the information for each item when the user rolls over.
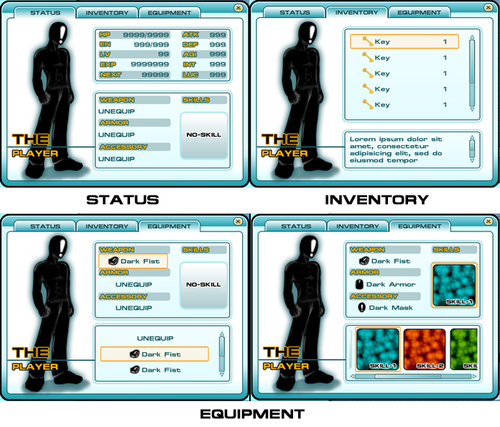
The last tab is the EQUIPMENT tab with which the user will be able to change the weapon, armor, accessory, and skill, as shown in the following screenshot:
The purpose of this chapter is to understand the GUI class in Unity and create our custom user interface, which is different from GUITexture that we used to create our restart button in the first chapter. There is also GUIText, which we will use to display the text of any font we import in the screen coordinate. Both are the type of rendering component that can be used once per object. So, if we try to create a complete menu, we will need many GUITexture
/GUIText objects and the scripts to handle them. On the other hand, GUI class is operating inside one function OnGUI, and we only deal with one object and only create a script that will display all buttons in the menu tab.
In this project, we will apply the custom GUI graphics to Unity by using GUI Skin. We can have multiple styles of our GUI graphics in Unity. Let's say that we have multiple types of fonts that we want to use in our menu; Unity has a way to do this. We can create a GUI Skin and apply our custom skin to the area that we want to show the font in. That is the great thing about Unity.
Now, we want to create a menu scripting class that will bring up a new menu window in the game scene when the player presses M. Next, we create a script to make three tab buttons, which will take the player to each tab, STATUS, INVENTORY, and EQUIPMENT.
In the STATUS tab, we will create a script that will show the image of our character, hit points, magic points, skill, and all the attributes of this character. Next, we will create an INVENTORY tab, which will contain all the items that the player can scroll up and down to choose an item. Finally, we will create the tab that the player can use to manage and change the equipment and skills of the character by clicking it.
Next, we will create a menu game object and apply the script to this game object. Lastly, we will add the parameter and textures to our menu and start playing.
When we complete this chapter, we will be able to create our custom UI for our RPG game, not only RPG, but we will also be able to create the user interface for every genre. Also, we will get a good understanding of the GUI class in Unity, which is very powerful, if we want to create an awesome user interface such as with Dragon Age, Final Fantasy, and so on.
Since we are creating a menu for an RPG style game, we need a menu that is a little more complex than the usual menu. So, it will be split into five tasks. Here is the outline of the tasks:
- Custom skin with GUI Skin
- Creating a menu object
- Creating a status tab
- Creating an inventory tab
- Creating an equipment tab
Before we start, we will need to get the project folder and assets from this book's website: http://www.packtpub.com/support?nid=8267, which includes the finished project from the first chapter and the assets that we need to use in this chapter. Browse to the URL and download the Chapter2.zip package; unzip it, and we will see Chapter2.unitypackage, which we will use to import to our second project in Unity.