
In this step, we will create the finish point, which is the door in this case. We will also create a Trigger Collider, which makes it so that the player can't end the game if he/she didn't collect our item; of course it's the key to our door.
Let's prepare and make sure that we have all the graphics that we need; go to the Graphics folder in the Project window, and make sure in our subfolder Level, we have doorClose.png, doorOpen.png, and key.png. Let's get start.
Here, we will create the object's Key and Door. Let's do this as follows:
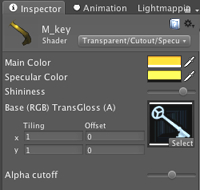
- Let's create the new material for our key, so go to Assets | Create | Material, name it
M_Key, and set the following:- Shader: Transparent | Cutout | Specular
- Main Color: R: 255, G: 166, B: 0, A: 255
- Specular Color: R: 236, G: 224, B: 26, A: 0
- Shininess: Drag the dragger almost to the right side
- Base (RGB) TransGloss (A)
- Drag-and-drop our
key.pngin theGraphics/Levelto the texture thumbnail in the material inspector:
- Next, we create another material for our door; go to Assets | Create | Material, name it M_Door, and set the following:
- Shader: Diffuse
- Main Color: R: 219, G: 255, B: 255, A: 255
- Base (RGB)
- Drag-and-drop our
doorClose.pngin theGraphics/Levelto the texture thumbnail in the material inspector
- Before we create our mesh object, we have to create a new
Tagfor ourDoorandKey, so go to Edit | Project Settings | Tags. - Under the Element 3 type Door, and under Element 4 type Key. Now, we will create a key object by using a plane in Unity; it's very similar to our
Player. So, go to thePlaneprefab object in theFBXfolder and drag it into the Hierarchy view. - In the Hierarchy view, right-click on the
Planeprefab object, and choose Rename to change the name to Key. - Next, right-click on the Animation component in the Inspector view and choose the Remove Component option to remove it. We will see the pop-up window, so just click on the Continue button similar to how we did for our
Playerobject. - Click on this object and go to its Inspector view, and set the following:
- Tag: Key
- Position: x: 21, y: 7.5, z: 0
- Rotation: x: 0, y: 180, z: 0
- Scale: x: 2.75, y: 2.75, z: 2.75
- Assign our
M_Keyto this material. Then add theBox Colliderto theKeyas we did for ourPlayer; go to Component | Physics | Box Collider set Size: x: 1, y: 1, z: 1 and Center: x: 0, y: 0, z: 0, and toggle Is Trigger to true. - Copy the
Keyby pressing Command + D or Control + D to create theDoorobject. Then, we name itDoor, assign materialM_Doorto it, and set the following:- Tag: Door
- Position: x: 19.5, y: 16, z: 0
- Rotation: x: 0, y: 180, z: 0
- Scale: x: 7.5, y: 7.5, z: 1
- We have finished creating our
DoorandKey. Next, we will go back to our code and add some scripting to make ourDoorandKeywork. Double-click ourCharacterController_2D.js, and add these parameters to it:public var doorOpenTexture : Texture2D; public var doorCloseTexture : Texture2D; private var b_hasKey : boolean;
- Then, we add these lines of code to the
Start()function://Start with no Key b_hasKey = false;
This will set the character to start without a key.
- Next, we add the
OnTriggerEnter()function to our code; this function will check if our character hitKeyorDoor:public function OnTriggerEnter (hit : Collider) : IEnumerator { if (hit.collider.tag == "Key") { if (!b_hasKey) { //We hit our Key b_hasKey = true; Destroy (hit.gameObject); } } if (hit.collider.tag == "Door") { if (b_hasKey) { //If we had Key and hit door the door will open hit.gameObject.renderer.material.mainTexture = doorOpenTexture; //wait for 1 second and destroy our character yieldWaitForSeconds(1); Destroy (gameObject); //We close the door hit.gameObject.renderer.material.mainTexture = doorCloseTexture; } } }In this function, we are checking if our character hit the
keyordoorby checking their tag. When the player hits thekey, the key will destroy itself and we set our character to have a key by settingb_hasKey = true. Also, when we hit thedoor, we are checking if our character has the key or not. If the character has the key, it will change the door texture todoorOpentexture. Then, we wait for one second to remove our character and we change the door texture back todoorClosetexture to close the door. - Before we are done, we need to add
doorOpen.pnganddoorClose.pngto thePlayer. Go back to Unity, and click on thePlayer; in the Inspector view now, we will see two new parameters, Door Open Texture and Door Close Texture; drag-and-dropdoorOpen.pngto Door Open Texture anddoorClose.pngto Door Close Texture. Now we are done.
Click play and try out your game, collecting the key and going to the door. Behold the door opening and closing!
We just created a key and door object, and placed them at our level. We also created the function that will trigger when the character hits the key and door objects. Then, we changed the texture of our door object when our character had a key object and hit the door. Lastly, we waited for one second to remove our character from the scene and changed the door texture back to closed state by using yield and Destroy.
We can pause or wait for the next action by using coroutines.
In our script, we need to wait for a second between opening the door and ending the game. We could do this by looping or performing some other task for a second, but that would stop the animations, the sound, and everything else. We get around this by using the yield command; this tells Unity to stop running our function and come back later (in our game, 1 second later as we call yield WaitForSecond(1)). By using the yield command our function becomes Coroutines and now it must return IEnumerator (Unity needs this so that it can tell when to start our function again). This means Coroutines can't return a value like a normal function. We can change most functions in our MonoBehaviours script into Coroutines, apart from the ones which already run in every frame, such as Update(), FixedUpdate(), OnGUI(), and so on. We can get more information about coroutines from the following Unity script reference:
http://unity3d.com/support/documentation/ScriptReference/Coroutine.html.
Next, we will talk about the return type. Sometimes, when we use JavaScript, we don't really care about what type to return or what type of parameters we will pass to the function, because it is really convenient to type only var myParams = 0 or function DoSomething(var). This isn't a bad thing to do, but if we are working with a team of people, it is very important to have code that is readable for others. So, it is better to have this habit. It also makes the code run faster, since it doesn't have to go and do type lookups. On the other hand, if we use C#, we will be forced by the language itself to type the return type of this function or the type of this parameter. So, it's a good thing to know because you will be able to read C# code easily if you have to and it is readable for everyone, even the person using C#.