
In the first section of this chapter, we will make all the necessary settings before we create our character on the scene. We will set up the imported assets and make sure that all the assets are imported in the proper way and are ready to use by using the Import Package in the Project view inside Unity. Then, we will set the light, level, camera, and put our character in the scene with the first-person controller prefab.
We will import the Chapter5.unitypackage package to Unity,which contains the
Chapter5 folder. Inside this folder, we will see five subfolders, which are Fonts, Level, Robot Artwork, Rocket, and UI. The Fonts folder will contain the Font file, which will be used by the GUI. The Level folder will contain the simple level prefab, its textures, and materials that we used in Chapter 3, The Hero/Heroine Part I—Models and Shaders, and Chapter 4, The Hero/Heroine Part II—Animation and Controls . Robot Artwork is the folder that includes the character FBX model, materials, and textures, which can be taken from the Unity FPS tutorial. The Rocket folder contains the rocket and rocket launcher FBX models, materials, and textures, which can be taken from the Unity FPS tutorial. Finally, the UI folder includes all the images, which we will use to create the GUI.
In this section, we will begin by importing the chapter 5 Unity package, checking all the assets, setting up the level, and adding the character to the scene with the FPS controller script.
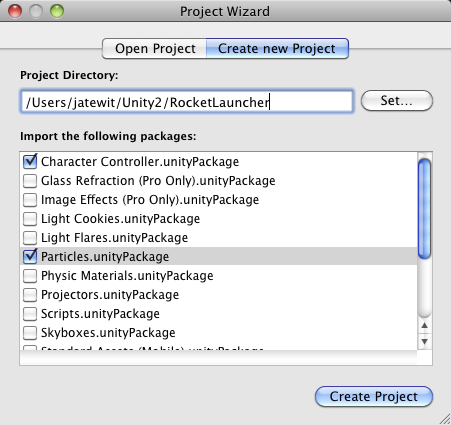
First, let's create a new project and name it RocketLauncher, and this time we will include the built-in Character Controller package and Particles package by checking the Character Controller.unityPackage and Particles.unityPackage checkboxes in the Project Wizard. Then, we will click on the Create Project button, as shown in the following screenshot:
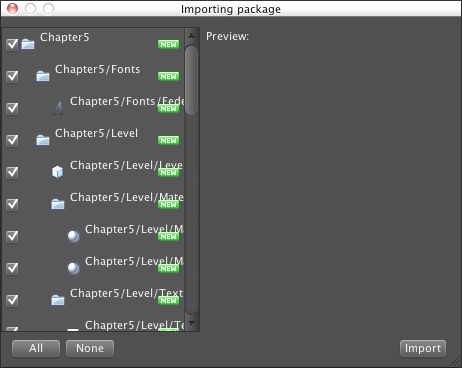
Next, import the assets package by going to Assets | Import Package | Custom Package.... Choose Chapter5.unityPackage, which we just downloaded, and then click
on the Import button in the pop-up window link, as shown in the following screenshot:
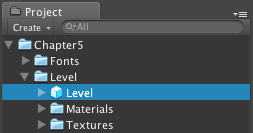
Wait until it's done, and you will see the Chapter5 folder in the Window view. Make sure that we have all five folders, which are Fonts, Level, Robot Artwork, Rocket, and UI, inside this folder. Now, let's create something.
In this section, we will set up the scene, camera view, and place our character in the scene:
- First, let's begin with creating the directional light by going to GameObject | Create Other | Directional Light, and go to its Inspector view to set the rotation X to 30 and the position (X: 0, Y: 0, Z: 0).
- Then, add the level to our scene by clicking on the Chapter5 folder in the Project view. In the Level folder, you will see the Level Prefab; drag it to the Hierarchyview and you will see the level in our scene.
- Next, remove the Main Camera from the Hierarchy view because we will use the camera from the built-in First Person Controller prefab. So, right-click on the Main Camera on the Hierarchy view and choose Delete to remove it.
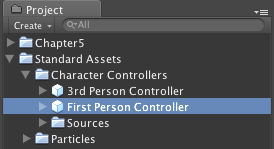
- Then, add the built-in First Person Controller prefab to the Hierarchy view by going to the Standard Assets folder. Under the Character Controllers folder, you will see the First Person Controller prefab; drag it to the Hierarchy view.
- In the Hierarchy view, click on the arrow in the front of the First Person Controllerobject to see its hierarchy, similar to the one shown in the following screenshot:

- Then, we go back to the Project view. In the Chapter5 folder inside Robot Artwork, drag the
robot.fbxobject (as shown in the following screenshot) on top of theMain Camerainside theFirst Person Controllerobject in the Hierarchy.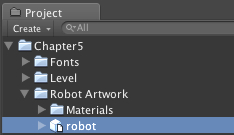
- This will cause the editor to show the window that tells us this action will break the prefab, so we just click on the Continue button to break it. It means that this game object will not be linked to the original prefab.
- Next, remove the
Graphicsobject above theMain Camera. Right-click on it and choose Delete. Now we will see something similar to the following screenshot:
Note
We have put the
robotobject as a child of the camera because we want our character to rotate with the camera. This will make our character always appear in front of the camera view, which is similar to the third-person view. This setup is different from the original FPS prefab because in the first person view, we will not see the character in the camera view, so there is no point in calculating the rotation of the character. - Now, click on the First Person Controller object in the Hierarchy view to bring up the Inspector view, and set up the Transform | Position of X: 0, Y: 1.16, Z: 0. Then, go to the Character Controller, and set all values as follows:
- Character Controller (Script)
- Height: 2.25
- Center
- X: -0.8, Y: 0.75, Z: 1.4
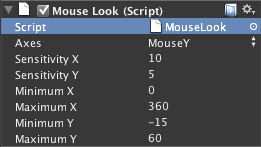
- Move down one step by clicking on Main Camera in the Hierarchy view and go to its Inspector view to set the value of Transform and Mouse Look as follows:
- Transform
- Position
- X: 0, Y: 1.6, Z: 0
- Mouse Look (Script)
- Sensitivity Y: 5
- Minimum Y: -15
We will leave all the other parameters as default and use the default values.
Then, we will go down one more step to set the Transform of the robot by clicking on it to bring up its Inspector view, and set the following:
- Transform
- Position
- X: -0.8, Y: -0.8, Z: 1.4
- Rotation
- X: 0, Y: 10, Z: 0
- Position
Now, we are done with this step. In the next step, we will adjust and add some code to control the animation and movement of our character the FPSInputController script.
Basically, what we have done here is preparing the scene ready for the next step. In this step, we added the directional light, level prefab, and the built-in First Person Controller prefab to the scene. We also adjusted the built-in First Person Controller prefab by removing the Graphics object from the prefab object and adding the robot prefab as a child of the Main Camera of the First Person Controller prefab object for the new graphics, which we will see from the Main Camera, as shown in the following screenshot:
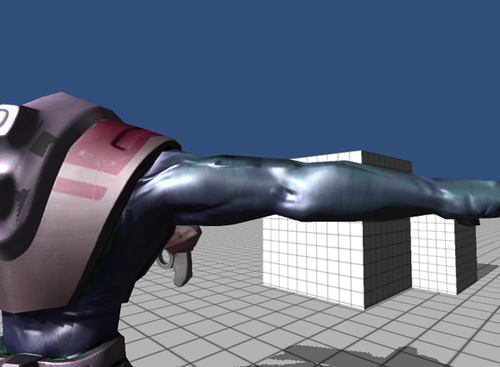
However, we will see the character's arm block half of the screen, which is because we don't have the script to control the animation, yet. We will do that in the next step.
At the beginning of this chapter, we imported the Chapter5.unityPackage file, but what about exporting?
Note
A good way to share assets between projects is by exporting them as unitypackage. A unitypackage
also saves the import settings of the assets. To make it easier to include all needed assets, the export dialog automatically checks for dependencies. To export assets as unitypackage, just select the items, right-click, and choose Export Package.
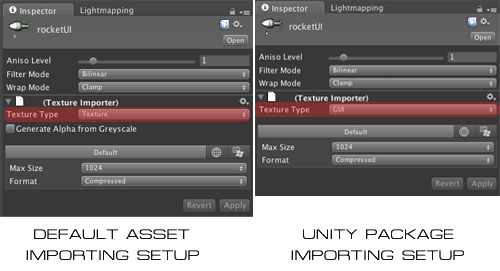
For example, if we copy the png file from another project to the Unity Assets folder or import in the Project view, the default Texture Importer | Texture Type in Unitywill always set to Texture. On the other hand, if we export this file by using unityPackage, we will be able to set the Texture Type to GUI or Normal map. Then, when we import this unityPackage to other projects, we will get the same settings we can see in the following screenshot:
We can easily create the unityPackage file by just right-clicking on the file or folder in the Project view that we want to export and choosing Export Package... to bring up the Exporting package windowas we can see in the following screenshot (we have selected
the Chapter 5 folder for the example):
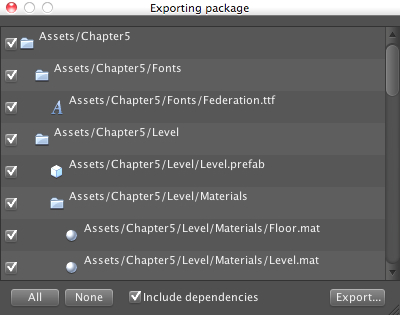
In this window, we can choose what we want to export by enabling the checkbox. Then, we can click on the Export Package... button and choose the path that we want to export.
Note
When the file is chosen in the Project window and we choose Export Package..., Unity will collect all the dependencies for that file and show them in the Exporting package window. So, selecting a scene file and exporting that will automatically export all the assets used in that scene. If an asset is only loaded from code and is not used directly in the scene or referenced from a public member variable, Unity will not know that it needs to be included. More information on the topic can be found at:
http://unity3d.com/support/documentation/Manual/HOWTO-exportpackage.html.