In this section, we will continue creating the rocket prefab, which will shoot out from the launcher. We will also create the trail smoke the follows this rocket, the smoke from the launcher barrel, and the explosion when the rocket hits something.
We will start with creating the SmokePosition, which is the position of the smoke particle when the character fires the rocket.
- Go to the Unity editor to create the smoke position by going to GameObject | Create Empty to create an empty game object and name it SmokePosition, and drag it inside the gun object, which is a child of the robot object, as shown in the following screenshot. By doing this we will break the prefab again, so we just click on continue to break it.

- Then, we set Transform as follows:
- Position: X: 1.5, Y: -0.08, Z: 0.25
- Rotation: X: 90, Y: 0, Z: 0
- Scale: X: 1, Y: 1, Z: 1
Now, we got the smoke position from the launcher barrel.
- Next, create a
smokeprefab object by going to the Project view, and click on the folder in this order: Standard Assets | Particles | Smoke, we will seeFluffy Smokeprefab, drag it to the Hierarchy view. Then, we will go to its Inspector view and start changing the parameters as follows:- Ellispsoid Particle Emitter:
- Min Size: 0.5
- Max Size: 0.75
- Min Energy: 0.75
- Max Energy: 1.5
- Min Emission: 8
- Max Emission: 12
- Local Velocity: X: 0, Y: 0.75, Z: 0
- Rnd Velocity: X: 0, Y: 0, Z: 0
- Ellispsoid:X: 0.1, Y: 0, Z: 0.1
- Particle Animator:
- Color Animation[0]: R: 162, G: 162, B: 162, A: 0
- Color Animation[1]: R: 147, G: 147, B: 147, A: 199
- Color Animation[2]: R: 114, G: 114, B: 114, A: 143
- Color Animation[3]: R: 126, G: 126, B: 126, A: 87
- Color Animation[4]: R: 59, G: 59, B: 59, A: 0
- Size Grow: -0.1
- Rnd Force: X: 0, Y: 0, Z: 0
- Create the
Smokescript by going to Assets | Create | Javascript and name itSmoke. Then, we go to the script and type the following code:public var timeOut : float = 0.5; // Destroy after 0.5 seconds. // Use this for initialization public function Start () : void { Invoke("KillObject", timeOut); } public function KillObject () : void { //Stop the emit the particle var emitter : ParticleEmitter = GetComponentInChildren(ParticleEmitter); if (emitter != null) { emitter.emit = false; // Stop Emit } //In here We set the particle to auto destruct to destroy itself after a life time (or we can setup it up in the editor) var particleAnimator : ParticleAnimator = GetComponentInChildren(ParticleAnimator); if (particleAnimator != null) { particleAnimator.autodestruct = true; } }This
Smokescript will be added to theFluffy Smokeobject that we just created. In this function, we use theInvoke()function, which will tell the script to call theKillObject()function after thetimeout(0.5 seconds). - Next, we will drag our
Smokescript which we created to thisFluffy Smokeobject (this will break the prefab again, so click on continue to break the prefab). - Now, create a new prefab for our new
Fluffy Smokeobject by going to Assets | Create | Prefab and name itShotSmoke. Then, drag theFluffy Smokeobject in the Hierarchy view to theShotSmokeprefab in the Project view. Finally, we remove theFluffy Smokeobject in the Hierarchy view by right-clicking on theFluffy Smokeobject in the Hierarchy view and choosing Delete; now we have the newShotSmokeprefab. - Create the rocket prefab by dragging the rocket (FBX) model in the Project view, inside (Chapter5/Rocket) to the Hierarchy view.
- Click on the
rocketmodel and go to its Inspector view to remove the Animation by right-clicking and choosing Remove Component. (This will bring up the losing prefab pop-up, so we just click Continue to break the prefab.) - We will now create the
Rocketscript, so go to Assets | Create | Javascript and name itRocket; double-click on it to open MonoDevelop. Then, go to the script and replace the code as follows:@script RequireComponent(ConstantForce) public var timeOut : float = 3.0; // Destroy after 3.0 seconds. public var explosionParticle : GameObject; // Use this for initialization public function Start () : void { Invoke("KillObject", timeOut); } public function OnCollisionEnter (others : Collision) : void { //Create the explosion on the first impact point of the rocket and collider var contactPoint : ContactPoint = others.contacts[0]; var rotation : Quaternion = Quaternion.FromToRotation(Vector3.up, contactPoint.normal); GameObject.Instantiate(explosionParticle, contactPoint.point, rotation); KillObject(); } public function KillObject () : void { //Stop the emit the particle var emitter : ParticleEmitter = GetComponentInChildren(ParticleEmitter); if (emitter != null) { emitter.emit = false; // Stop Emit } //In here We set the particle to auto destruct to destroy itself after a life time (or we can setup it in the editor) var particleAnimator : ParticleAnimator = GetComponentInChildren(ParticleAnimator); if (particleAnimator != null) { particleAnimator.autodestruct = true; } //Detach the trail renderer in our particles transform.DetachChildren(); //Destroy this Object GameObject.Destroy(gameObject); } - Next, add the
Rocketscript that we created by dragging the script to therocketobject in the Hierarchy. - Then, go to the object's Inspector view to add the Box Collider to the
rocketobject by going to Component | Physics | Box Collider. - Then, we go to the Inspector view and set the following:
- Transform
- Position: X: 0, Y: 0, Z: 0
- Rigidbody
- Use Gravity: Uncheck (We don't need the gravity for our rocket)
- Rocket (Script)
- Explosion Particle: explosion (Drag the explosion built-in prefab in the Standard Assets | Particles | Legacy Particles | explosion)
- Next, we will add the built-in
Smoke Trailprefab as a child of thisrocketobject. Go to the Project view, and click on Standard Assets | Particles | Smoke and drag theSmoke Trailprefab to therocketobject in the Hierarchy view. - Then, we will click on the
Smoke Trailobject in the Hierarchy view and set the following in its Inspector view:- Transform: X:0, Y: 0, Z: -0.25
- Ellispsoid Particle Emitter:
- Min Size: 0.25
- Max Size: 0.65
- Min Energy: 0.75
- Max Energy: 1
- Particle Animator
- Size Grow: 0.5
- Next, we will create a new prefab for our
rocketobject. Go to Assets | Create | Prefab and name itRocket, and then drag ourrocketobject in the Hierarchy view toRocketprefab, which we just created in the Project view. Finally, we remove therocketobject from the Hierarchy view by deleting it, and now we have the newRocketprefab. - Go back to the
RocketLauncherscript by going to the Project view, double-click on theRocketLauncherscript to go to MonoDevelop, and add the following new script at the beginning:public var smoke : GameObject; public var smokePosition : Transform; public var rocket : ConstantForce; public var speed : float = 10; public var ammoCount : int = 20; private var lastShot : float = 0.0;
- Go to the
Fire()function and add the following highlighted code:public function Fire(_reloadTime : float) : void { if (Time.time > (_reloadTime + lastShot) && ammoCount > 0) { var rocketPrefab : ConstantForce = ConstantForce.Instantiate(rocket, transform.position, transform.rotation); rocketPrefab.relativeForce = new Vector3(0, 0, speed); var smoke : GameObject = GameObject.Instantiate(smoke, smokePosition.position, smokePosition.rotation); //We ignore the collision between rocket and character Physics.IgnoreCollision(rocketPrefab.collider, transform.root.collider); //Get the last shot time lastShot = Time.time; //Decrease the bullet ammoCount--; } } - Go back to Unity and click on the
First Person Controllerobject in the Hierarchy view. Then, go down two more steps inside this object until we see theRocketLauncherobject, as shown in the following screenshot: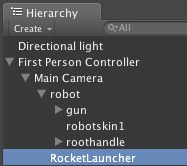
- Click on the
RocketLauncherobject to bring up its Inspector view. Then set the following:- Rocket Launcher (Script)
- Smoke: ShotSmoke (Drag the ShotSmoke prefab that we created in the Project view here)
- Smoke Position: Smoke Position (Drag the SmokePosition object inside the gun child in the Hierarchy here)
- Rocket: Rocket (drag the Rocket prefab that we created in the Project view here)
Now, we can click Play to see the result. We should be able to walk around by pressing the arrow, W, A, S, D, or Space key to jump, move the mouse to rotate around, press E to aim, press R to reload the rocket, and click on the left mouse button to fire the rocket. However, we won't be able to see the number of bullets right now, because we don't have any UI set up to show the number yet. So, in the next step, we will create a bullet count
UI by using GUITexture and OnGUI().
In this section, we just created the rocket and particle effect that will appear when the player presses fire. It seems like a lot to do in one section, but it was worth it.
First, in the Rocket script, we used @script RequireComponent(ConstantForce) to tell the script to require the ConstantForce for this rocket; this will tell Unity to basically add the ConstantForce automatically when we add this script to the object.
Note
ConstantForce is one of the Physics components in Unity that will add a constant force to the RigidBody object (the ConstantForce works with the RigidBody components, so when we add the ConstantForce to our object, Unity will automatically add the RigidBody as well), which will contain the properties that we can use to control the rocket movement. For more details please have a look at the following website:
http://unity3d.com/support/documentation/Components/class-ConstantForce.html.
Next, we have the timeout and explosion parameters. We then have the Invoke() function calling the KillObject() function after the timeout (3.0 seconds). Then, we check for the collision object—if the rocket hits something, it will get to the position where the collision occurs, add the explosion object to that position, and then the rocket object will kill itself.
The KillObject() function basically stops the particle emitter, makes sure that the particle will destroy itself by setting the autodestruct parameter to true, detaches the particle, and destroys the game object itself.
Now, we create the script for the rocket and smoke particle. Then, we use the built-in particle package and adapt to the way we want for smoke and smoke trial. Finally, we put everything together and get the result as expected.
In this section, we used the Instantiate() function to clone a new game object from the prefab object in the Project view. The Instantiate() function takes three parameters, which are the original Object, Position (Vector3), and Rotation (Quaternion). The Position and Rotation objects are the transform parameters at the start position of the object, which will be created in the scene. The Instantiate() function can take any kind of object and the result can also be returned to any kind of objects. We can also see more examples and details from the Unity document at:
http://unity3d.com/support/documentation/ScriptReference/Object.Instantiate.html
http://unity3d.com/support/documentation/Manual/Instantiating%20Prefabs.html.
Next, we will talk about the Invoke() function, which we used to call the function after the time we have set in seconds. If some of you have experience with Actionscript, this function is very similar to the setTimeOut() function. We can also use InvokeRepeating() to call the method similar to the Invoke() function, but this function will repeat calling that function every time we set in seconds. We can see more details about the Invoke() function from the Unity document at:
http://unity3d.com/support/documentation/ScriptReference/MonoBehaviour.Invoke.html.
For the InvokeRepeating() function, refer to the following website:
http://unity3d.com/support/documentation/ScriptReference/MonoBehaviour.InvokeRepeating.html.
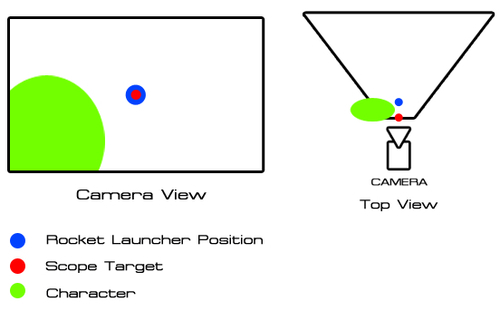
Finally, let's talk about the position of the rocket that launches from the same position of the scope target UI. This is a bit tricky because we want the player to be able to aim and shoot the rocket exactly to the same position that he/she is aiming at. So, we add the RocketLauncher object as a child of the Main Camera because we want it to move or rotate with the user view, which is the Main Camera. Then, we add the scope target UI at the center of the screen because it is easier for the player to aim than than if we put it on one side. So, we set up the positions X and Y of RocketLauncher object to 0 because it is the same position to the Main Camera and if we get the position of the Main Camera to the screen position it will be the center of the screen. Then, we set up the Z position of RocketLauncher object to 2 because it is the same depth as our character weapon graphics. This is to make the rocket not too close to the camera. We can also see it from the following diagram: