
In this step, we will create a status page for our menu, which will show all attributes of this character, including hit points, magic points, level, experience, experience needed for the next level, attack, defense, agility, intelligence, and luck. We will also show the current equipment and skill of this character.
We will start with assigning the status parameters for our character and displaying them on our menu:
- Let's go back to
MonoDevelopand add more code to ourMenu.js. Include these variables before theStartfunction:public var fullHP : int = 9999; //The current full HP public var fullMP : int = 999; //The current full MP public var currentHP : int = 9999; //The current HP public var currentMP : int = 999; //The current MP public var currentLV : int = 99; //The current LV public var currentEXP : int = 9999999; //The current EXP public var currentNEXT : int = 99999; //The current NEXT public var currentATK : int = 999; //The current ATK public var currentDEF : int = 999; //The current DEF public var currentAGI : int = 999; //The current AGI public var currentINT : int = 999; //The current INT public var currentLUC : int = 999; //The current LUC public var a_weapons : Item[]; //weapons array that the character currently has public var a_armors : Item[]; //armors array that the character currently has public var a_accessories : Item[]; //accessories array that the character currently has public var a_items : Item[]; //items array that the character currently has public var a_skills : Texture[]; //skills array that the character currently has private var currentWeapon : Item; //current weapon that character uses private var currentArmor : Item; //current armor that character uses private var currentAccessory : Item; //current accessory that character uses private var currentItem : Item; //current item that character uses private var currentSkill : Texture; //current skill that character uses private var s_unequip : String = "UNEQUIP"; private var s_none : String = "NONE"; //Status Tab private var maxHP : int = 9999; //Maximum limit of HP private var maxMP : int = 999; //Maximum limit of MP private var maxLV : int = 99; //Maximum limit of LV private var maxEXP : int = 9999999; //Maximum limit of EXP private var maxNEXT : int = 99999; //Maximum limit of NEXT private var maxATK : int = 999; //Maximum limit of ATK private var maxDEF : int = 999; //Maximum limit of DEF private var maxAGI : int = 999; //Maximum limit of AGI private var maxINT : int = 999; //Maximum limit of INT private var maxLUC : int = 999; //Maximum limit of LUC //Rect position for the GUI private var r_statTexture1 : Rect = new Rect (252, 77, 331, 125); private var r_statTexture2 : Rect = new Rect (252, 244, 331, 142); private var r_hpLabel : Rect = new Rect (313, 75, 120, 25); private var r_mpLabel : Rect = new Rect (313, 100, 120, 25); private var r_lvLabel : Rect = new Rect (313, 124, 120, 25); private var r_expLabel : Rect = new Rect (313, 150, 120, 25); private var r_nextLabel : Rect = new Rect (313, 177, 120, 25); private var r_atkLabel : Rect = new Rect (529, 75, 50, 25); private var r_defLabel : Rect = new Rect (529, 100, 50, 25); private var r_agiLabel : Rect = new Rect (529, 124, 50, 25); private var r_intLabel : Rect = new Rect (529, 150, 50, 25); private var r_lucLabel : Rect = new Rect (529, 177, 50, 25); private var r_statBox : Rect = new Rect (237, 67, 360, 147); private var r_weaponBox : Rect = new Rect (237, 230, 360, 207); private var r_weaponLabel : Rect = new Rect (252, 264, 180, 40); private var r_armorLabel : Rect = new Rect (252, 324, 180, 40); private var r_accessLabel : Rect = new Rect (252, 386, 180, 40); private var r_skillTexture : Rect = new Rect (464, 288, 119, 117); private var r_skillBox : Rect = new Rect (460, 284, 127, 125); //GUIContent private var gui_weaponCon : GUIContent; private var gui_armorCon : GUIContent; private var gui_accessCon : GUIContent; private var gui_skillCon : GUIContent;
Now we've got all the variables for our status page.
- Next, we need the
Itemclass to contain the information for our items. Let's add this to the preceding code://Items class to contain our information class Item{ public var icon : Texture; public var name : String; public var amount : int; private var itemName : String; //This function is just to put the space between name of the item and amount of the item public function setUpItemName () : void { var in_length : int = (this.name.Length + this.amount.ToString().Length); if (in_length < 25) { while (this.name.Length < 17 ) { this.name += " "; } } if(this.amount < 10) { itemName = (this.name + " " + this.amount.ToString()); } else { itemName = (this.name + this.amount.ToString()); } } public function get itemNA () : String { return itemName; } }Basically, the
Itemclass will contain the information that we need to show for every item. - Next, we go to the
Start()function and add the highlighted code:public function Start () : void { b_openMenu = false; //Set our menu disabled at the first rungui_weaponCon = GUIContent(s_unequip); gui_armorCon = GUIContent(s_unequip); gui_accessCon = GUIContent(s_unequip); gui_skillCon = GUIContent("");
- We just finished all the setup that we need for our status page in the menu window. Next, we go to
DoMyWindow (windowID : int)and uncomment the highlighted line as follows:switch (in_toolbar) { case 0 : //Status //Create a status page StatusWindow(); break; - Next, we need to create a
StatusWindow()function, as follows:private function StatusWindow() : void { GUI.Box (r_statBox, ""); GUI.Box (r_weaponBox, ""); GUI.DrawTexture(r_statTexture1, t_statusBox1); GUI.DrawTexture(r_statTexture2, t_statusBox2); GUI.DrawTexture(r_skillBox, t_skillBox); CheckMax(); GUI.Label(r_hpLabel, currentHP.ToString() + "/" + fullHP.ToString(), "Text Amount"); GUI.Label(r_mpLabel, currentMP.ToString() + "/" + fullMP.ToString(), "Text Amount"); GUI.Label(r_lvLabel, currentLV.ToString(), "Text Amount"); GUI.Label(r_expLabel, currentEXP.ToString(), "Text Amount"); GUI.Label(r_nextLabel, currentNEXT.ToString(), "Text Amount"); GUI.Label(r_atkLabel, currentATK.ToString(), "Text Amount"); GUI.Label(r_defLabel, currentDEF.ToString(), "Text Amount"); GUI.Label(r_agiLabel, currentAGI.ToString(), "Text Amount"); GUI.Label(r_intLabel, currentINT.ToString(), "Text Amount"); GUI.Label(r_lucLabel, currentLUC.ToString(), "Text Amount"); GUI.Label(r_weaponLabel, gui_weaponCon, "Text Item"); GUI.Label(r_armorLabel, gui_armorCon, "Text Item"); GUI.Label(r_accessLabel, gui_accessCon, "Text Item"); GUI.Label(r_skillTexture, gui_skillCon, "Text Item"); } - Before we finish this step, we need to add another function,
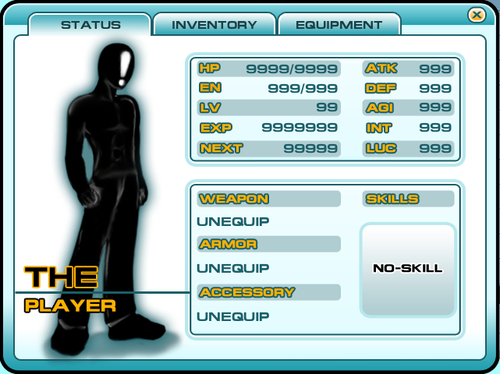
checkmax(), to the preceding code. This function will make sure that the maximum number of attributes is not over the limit. Let's add the code to create this function:private function CheckMax () : void { fullHP = Mathf.Clamp(fullHP, 0.0, maxHP); fullMP = Mathf.Clamp(fullMP, 0.0, maxMP); currentHP = Mathf.Clamp(currentHP, 0.0, fullHP); currentMP = Mathf.Clamp(currentMP, 0.0, fullMP); currentLV = Mathf.Clamp(currentLV, 0.0, maxLV); currentEXP = Mathf.Clamp(currentEXP, 0.0, maxEXP); currentNEXT = Mathf.Clamp(currentNEXT, 0.0, maxNEXT); currentATK = Mathf.Clamp(currentATK, 0.0, maxATK); currentDEF = Mathf.Clamp(currentDEF, 0.0, maxDEF); currentAGI = Mathf.Clamp(currentAGI, 0.0, maxAGI); currentINT = Mathf.Clamp(currentINT, 0.0, maxINT); currentLUC = Mathf.Clamp(currentLUC, 0.0, maxLUC); } - Now, we go back to Unity, click play, and press the M key to bring up our menu window. We will see all the attributes for our character, as shown in the following creenshot:

We just added an Item class to contain our item's information, which will be shown on the equipment box, and will use this in the next step. Then, we created a GUIContent to contain the image, name, and information of our items in the Start() function, and set it to an UNEQUIP stage. Next, we added and created the StatusWindow() function to show the status page when the player sees our menu at first click on the status tab button. We also created a CheckMax()function to make sure that the number of the character attributes is not over the limit.
In this section, we used GUIContent to contain the information of our items and pass to GUI.Label() function. Basically, if we take a look at each GUI class function, we will see that it can take many variables such as Rect, string, Texture, GUIContent, and GUIStyle. We already know what Rect, string, and Texture are. GUIStyle is the name of the style from our MenuSkin object that we created, but what is GUIContent? It is basically a class that contains the necessary variables to apply to our GUI. For example, if we want our button to have an icon, name, and information when the user rolls over it, we can add this code: GUI.Button(Rect(0,0,100,20), GUIContent("My Button Name", icon, "This is the button info"). The first parameter is the string that will be shown inside the button, and next is the graphic Texture that will also be shown inside this button. The last string is the information that will be stored in this button, which we call tooltip. We can show this tooltip when the user rolls over this button by calling GUI.tooltip. It will automatically show the current button tooltip that the user rolls over. We will use it in the next section.
Note
For more details about GUIContent and GUI.tooltip, we can check out this website:
http://unity3d.com/support/documentation/ScriptReference/GUIContent.G UIContent.html.