
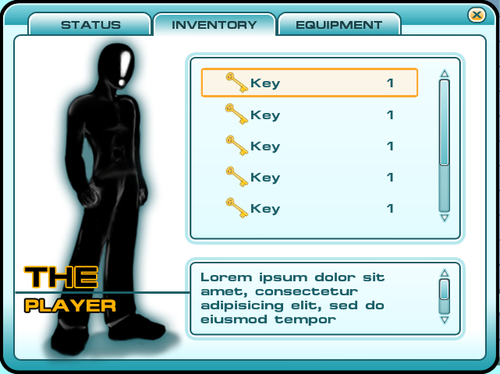
So, we are in the second page of our menu window, which is the inventory page. In this section, we will create an item scroll that the player can use to scroll up and down to select the item and see its name, amount, and information of the item.
We will start with adding the parameters, which we will use to store the data in our inventory page:
- Open
Menu.js, and add the following code to it; first the parameters://Item Tab private var r_itemsBox : Rect = new Rect (237, 67, 360, 247); private var r_tipBox : Rect = new Rect (237, 330, 360, 107); private var r_itemsButton : Rect = new Rect (257, 87, 340, 227); private var r_tipButton : Rect = new Rect (257, 350, 340, 87); private var r_verScroll : Rect = new Rect (600, 87, 20, 227); private var f_scrollPos : float = 1.0; private var scrollPosition : Vector2 = Vector2.zero; private var scrollPosition2 : Vector2 = Vector2.zero; private var in_toolItems : int = 0;
- Then, go to the
Start()function and add the following code at the end:if (a_items.Length > 0) { a_items[0].setUpItemName(); currentItem = a_items[0]; } - Next, go to
DoMyWindow (windowID : int)and uncomment the highlighted line as follows:case 1 : //Items //Create an item page ItemWindow(); break; - Then, we need to create an
ItemWindow()function to show this inventory page. Type this following function inMenu.js:private function ItemWindow() : void { var in_items : int = 8; //Create Item Information box GUI.Box (r_itemsBox, ""); GUI.Box (r_tipBox, ""); scrollPosition = GUI.BeginScrollView (new Rect (257, 87, 320, 200), scrollPosition, new Rect (0, 0, 280, 40*in_items)); // We just add a single label to go inside the scroll view. Note how the // scrollbars will work correctly with wordwrap. var itemsContent : GUIContent[] = new GUIContent[in_items]; //We create a GUIContent array of key item here (if you have more than 1 items, you can also use your item array instead of the current item) for (var i: int = 0; i < in_items; i++) { if (a_items.Length > 0) { if (i == 0) { itemsContent[i] = GUIContent(currentItem.itemNA, currentItem.icon, "Lorem ipsum dolor sit amet, consectetur adipisicing elit, sed do eiusmod tempor incididunt ut labore et dolore magna aliqua. Ut enim ad minim veniam, quis nostrud exercitation ullamco laboris nisi ut aliquip ex ea commodo consequat."); } else { itemsContent[i] = GUIContent(currentItem.itemNA, currentItem.icon, "This is key " + i); } } else { itemsContent[i] = GUIContent("NONE", ""); } } //We create the grid button here. in_toolItems = GUI.SelectionGrid (Rect (0, 0, 280, 40*in_items), in_toolItems, itemsContent, 1, GUI.skin.GetStyle("Selected Item")); GUI.EndScrollView (); //End Scroll Area //Checking if there is an item information var s_info : String = itemsContent[in_toolItems].tooltip; if (s_info == "") { s_info = "Show items information here"; } var style : GUIStyle = GUI.skin.GetStyle("Label"); if (GUI.tooltip != "") { //Get height from this style var f_height : float = style.CalcHeight(GUIContent(GUI.tooltip), 330.0); scrollPosition2 = GUI.BeginScrollView (new Rect (257, 343, 320, 75), scrollPosition2, new Rect (0, 0, 280, f_height)); GUI.Label(new Rect (0, 0, 280, f_height), GUI.tooltip); } else { //Get height from this style f_height = style.CalcHeight(GUIContent(s_info), 330.0); scrollPosition2 = GUI.BeginScrollView (new Rect (257, 343, 320, 75), scrollPosition2, new Rect (0, 0, 280, f_height)); GUI.Label(new Rect (0, 0, 280, f_height), s_info); } GUI.EndScrollView (); }In this function, first we set the maximum of our items in this container, and next we create a
GUI.Boxfor the background of the item scroll area. Then, we create the scroll by usingGUI.BeginScrollView. Next, we create aGUIContentarray to contain our items, createGUI.SelectionGrid, and apply ourGUIContentarray to show them. Then, we get the item information from theGUIContent.tooltip, calculate the height of that information, and put it in the Label, which is also a scroll view. - Now, go back to Unity and click on the Menu object in the Hierarchy view to bring up its inspector. Then, click on the A_items option to bring up the drop-down and assign the parameters as follows:
- Size: 1
- Element 0
- Icon:
key.png(located inChapter2/imagesfolder) - Name: Key
- Icon:
- Amount: 1
Now, click play, and press the M key to bring up our menu window. Click on the INVENTORY tab and we will see our item page. Isn't that cool?
We just created our inventory page that we'll be able to view by clicking the INVENTORY tab. In the Start() function, we set up our item object if there is more than one item assigned in a_items. Next, we added ItemWindow() line in the DoMyWindow() function, and created ItemWindow() function to control our item page. In this function, we created a scroll view by using GUI.BeginScrollView() and GUI.EndScrollView(), and created a scrollable area that contains all the items. We also used GUI.SelectionGrid to create our items list from which the player can select any item. Then, we get the current tooltip from GUIContent and check to see whether there is any information or not. Next we check GUI.tooltip for any stored string; if nothing is stored here we assign the current tooltip from our selected items to GUI.tooltip, which will show the result that if we roll over each item the current information will change to the rollover item. On the other hand, if we rollover from our items list, the result of the information will show the selected item information. Next, we get the Label style height from the current GUI.tooltip. Then, we created another scroll view to show this tooltip information in the box area.
In this step, we were using GUI.SelectionGrid to create the list of the items. By using GUI.SelectionGrid, we were able to create a list of buttons that have a fixed height and space in one line of code, which was very convenient. We can see more details on how to use GUI.SelectionGrid at this URL:
http://unity3d.com/support/documentation/ScriptReference/GUI.SelectionGrid.html.
We also used the GUI.tooltip parameter to be able to show our items' information when the player rolls over each item and show the selected item information if the player rolls out. So, how does GUI.tooltip work? Basically, GUI.tooltip will return the string from each button that contains a tooltip string when the player rolls over it. However, if the player rolls out or that button doesn't have any tooltip store, this parameter will automatically return a blank string, similar to the following code that we used:
   if (GUI.tooltip != "") {
    //Get height from this style
    var f_height : float = style.CalcHeight(GUIContent(GUI.tooltip), 330.0);
    scrollPosition2 = GUI.BeginScrollView (new Rect (257, 343, 320, 75), scrollPosition2, new Rect (0, 0, 280, f_height));
    GUI.Label(new Rect (0, 0, 280, f_height), GUI.tooltip);
  } else {
    //Get height from this style
    f_height = style.CalcHeight(GUIContent(s_info), 330.0);
    scrollPosition2 = GUI.BeginScrollView (new Rect (257, 343, 320, 75), scrollPosition2, new Rect (0, 0, 280, f_height));
    GUI.Label(new Rect (0, 0, 280, f_height), s_info);
  }
We basically tell GUI.tooltip that we will assign rollover tooltip information to the label when the player rolls over. And if the player rolls out, we show the selected item information, for which the default is the first item as we can see in the following screenshot:
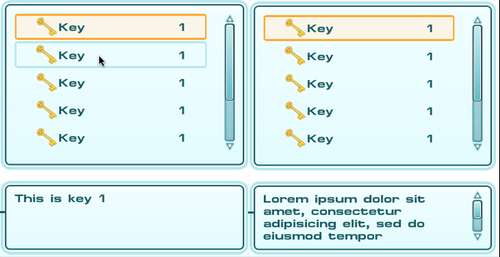
From the preceding screenshot, the left image shows that when we roll over the second key, the information box shows the tooltip of the second key. The right image shows that when we rollout from the second key, the information box shows the tooltip of the selected key, which is the first key.
Note
You can see more details about GUI.tooltip at this URL:
http://unity3d.com/support/documentation/ScriptReference/GUI-tooltip.html.