
In the last two chapters, we have learned how to create a UI by using the OnGUI function, and a 2D platform game that used the 2D sprite texture to create our 2D character, and also got to know a bit of the 3D world in the first chapter. So, in this chapter, we will be using a full 3D character. We will take a close look at how to import the next generation 3D character modeling, and how to apply the material to the model. We will also get an understanding of the shader programming in Unity, and create a custom shader by writing and adapting shader programming. We can then use the Cg/HLSL shader language to write vertex and fragment programming.
Note
"Cg (C for Graphics) is a high-level shader language developed by NVIDIA in close collaboration with Microsoft for programming vertex and pixel shader. It is similar to HLSL (High Level Shader Language or High Level Shading Language), which is a proprietary shading language developed by Microsoft for use with the Microsoft Direct3D API." References taken from:
The shader programming language is very complex and difficult, especially when we have to deal with lighting. It can be a nightmare, but Unity 3.x has come up with a new style of writing the shader program that is shorter and simpler. We still need to know the basics of Cg/HLSL programming, but we won't go too deep into how to create a shader from scratch or how Cg/HLSL works. We will use the new surface shader and create our own custom shader.
We will create a basic custom shader and apply this shader to the character model that we already have. That's it. We might say "Hey! Why is it so short?". Well, it's short to say but it takes a long time to explain the whole concept of writing a shader.
- First, we will open the character model in 3Ds Max (this is an optional step).
Note
We can get the trial version for free from this website:
http://usa.autodesk.com/adsk/servlet/download/item?siteID=123112&id=16324410.
- Then, we will set up its scale and rotation, and export it as an FBX file format to work with Unity. Then, we will import the character model to Unity and start applying a build material in Unity.
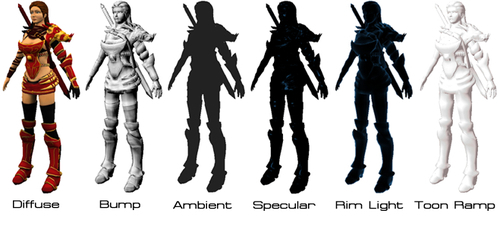
- Next, we will start creating a shader, which includes diffuse texture, bump map (normal map) texture, ambient color, specular color and glossiness, rim light (or back light) color and power, and ramp texture, as shown in the following screenshot:
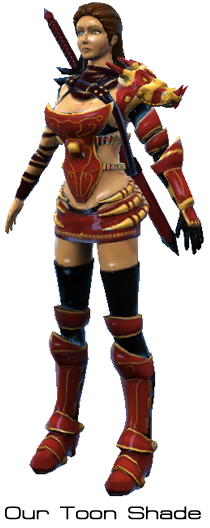
- Then, we will apply all of them together to create our custom toon shade style, as shown in the following screenshot:
In this project, we will start with opening the character model in 3D Studio Max, set up the unit scale and rotation, export it as an FBX file, and then put it in our Unity project. This will give us a basic understanding of how to export the FBX file format from 3D Studio Max.
Next, we will create our first shading language by using the surface shaders, which are included in Unity 3.0.
Note
"Surface shaders in Unity is the code generation approach that makes it much easier to write lit shaders than using low level vertex/pixel shader programs, which is much more complicated. However, there is no easy way to write the shader programming, we still have to write the code in Cg/HLSL."
Reference: http://unity3d.com/support/documentation/Components/SL-SurfaceShaders.html.
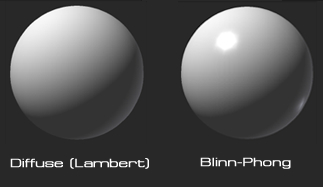
We will start creating by adding the diffuse texture and bump (normal) texture and using the built-in lighting models, which are Lambert (diffuse lighting) and BlinnPhong
(specular lighting) that are located in the Lighting.cginc file inside the Unity application. This way, we can see the structure and algorithm of the shader programming, and it will
be helpful when we adapt it to our custom shader.
Note
Lambert, or diffuse reflection,
will cause all closed polygons to reflect light equally in all directions when rendered. This algorithm is named after Johann Heinrich Lambert who invented it.
Blinn-Phong
, or Blinn-Phong reflection, is the shading model that is the modification of the Phong reflection model developed by Jim Blinn.
Phong
reflection model is the shading model that includes a model for the reflection of light from surfaces. It also has a compatible method of estimating pixel colors using interpolation surface normals across rasterized(or bitmap) polygons developed by Bui Tuong Phong.
Reference:
http://en.wikipedia.org/wiki/Lambertian_reflectance.
http://en.wikipedia.org/wiki/Phong_shading.
http://en.wikipedia.org/wiki/Blinn%E2%80%93Phong_shading_model.
Next, we will add the ambient color and specular color, and create the custom lighting model. In this step, we will learn how to create a custom lighting model in a surface shader.
Finally, we will add the rim light (back light) and the ramp texture to create the toon shader style, and see a result similar to the previous figure.
When we complete this chapter, we will know how to set up the export unit scale and rotation from 3D Studio Max to Unity, which will be the same scale from MAYA or other 3D software. We will also be able to understand the basics of how to create our custom shader and the custom lighting model by using the surface shader in Unity, which we will be able to adapt to a more advanced shader in the future.
Since we are not shader programmers, and we just want to understand how the shader programming in Unity works, we will go through four steps from exporting our character from 3D Studio Max to creating a custom shader in Unity, as follows:
- Exporting FBX from 3D Studio Max.
- Shader programming—Diffuse and bump (normal) map.
- Shader programming—Ambient and specular light.
- Shader programming—Rim light and toon ramp.
First, we need a 3D character model with all the textures included. So, browse to http://www.packtpub.com/support?nid=8267 and download the Chapter3.zip package; unzip it and we will see the 3DSMax folder and Chapter3.unitypackage file. The 3DSMax folder will contain the 3D Studio Max file that we will only use in the first step and the Chapter3.unitypackage file will contain all the assets (FBX file exported from 3D Studio Max, textures, and scene) that we will use for this chapter.
Note
If you already know how to export an FBX file from 3D Studio Max, use a Mac or other 3D software, or if you don't have 3D Studio Max installed, we can skip the Exporting FBX from 3D Studio Max step and go to the Diffuse and bump (normal) map step, right away. (The FBX file that was exported from 3D Studio Max is already included in the Chapter3.unitypackage file.)