
As we know, Unity can read .FBX, .dae, .3DS, .dxf, and .obj files, which can be exported from other 3D software (3D Studio Max, MAYA, and so on.). However, if we are running our 3D software in the same OS as Unity, we can basically save our 3D files to the Unity project. Unity will convert a lot of 3D file formats such as (.ma or .mb) MAYA, (.c4d) Cinema4D, (.blend) Blender, (.lxo) Modo, (.jas) Cheetah3D, (.max) 3D Studio Max file to .FBX file format excepting (.lwo) Lightwave file format (need to export to .FBX manually). You can find the information on how to export a 3D file at the following URL:
http://unity3d.com/support/documentation/Manual/HOWTO-importObject.html.
In most cases, this works perfectly if we are working on the same machine or the same operating system. But wait! Let's say we create a 3D model in 3D Studio Max on our PC and we want to use it on another machine, or even the same machine, but on a different operating system, such as a Mac. Here is what we are going to do in this section: we will set up the unit scale in 3D Studio Max and rotation. Then, we will export it as an FBX file format.
In this step, we will use 3D Studio Max 2010 and the FBX version 2011.3.1 for exporting the FBX format. Let's browse to the following website:
http://usa.autodesk.com/adsk/servlet/pc/item?siteID=123112&id=16126683.
Then, we click on FBX 2011.3.1 Plug-in for 3ds Max 2010 (exe - 16019Kb) to make sure that we have the same FBX version 2011.3.1 that is suitable for 3D Studio Max 2009—2011. However, if you have the older version of 3D Studio Max, the FBX exporter might not look the same as shown here. You can check the FBX exporter plugin from the following Autodesk website:
http://usa.autodesk.com/adsk/servlet/pc/item?siteID=123112&id=10775920.
Then, we install the plugin file to our 3D Studio Max. Next, we will make sure that we have our 3D Studio Max file for this chapter. Let's check the 3DSMax folder to make sure that we have the Heroine.max file.
Now, we are ready! Let's start by following these steps:
- Open up 3D Studio Max and open the character file
Heroine.max. We will see our character without any texture, as shown in the following screenshot: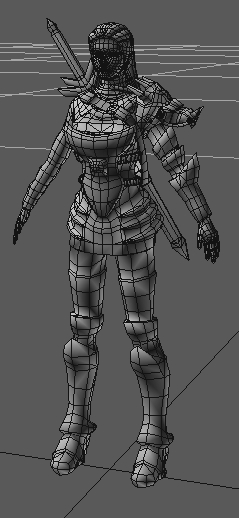
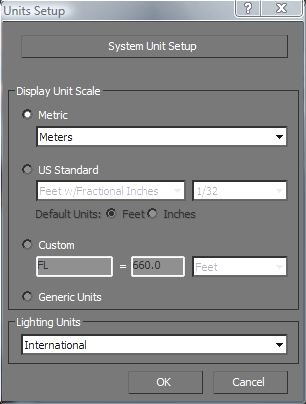
- Then, go to (Customize | Units Setup). You will see the Units Setup window pop up. Under the Display Unit Scale, choose Metric and then Meters, and you will see something similar to the following screenshot:
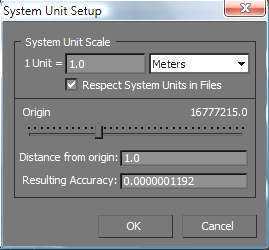
- Click on System Unit Setup to bring up the System Unit Setup window. Under the System Unit Scale, we choose Meters for the Unit, and leave the rest as it is. And now we have done the unit scale setup; click OK on both the windows to close them.
- Since 3D Studio Max uses the Z-axis to represent the vertical direction (which is very different from other 3D software such as Unity, which uses the Y-axis to do this), we need to rotate the pivot point of our model. So, we need to adjust our pivot before we export it to use in Unity; go to the Hierarchy toolbar by clicking on the Hierarchy icon on the right-hand side, as shown in the following screenshot:
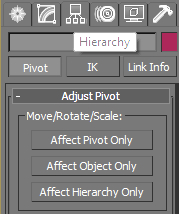
- You will see the Hierarchy window. Click on the Pivot button and then on the Affect Pivot Only button, as shown in the preceding screenshot, to bring up the pivot of our character.
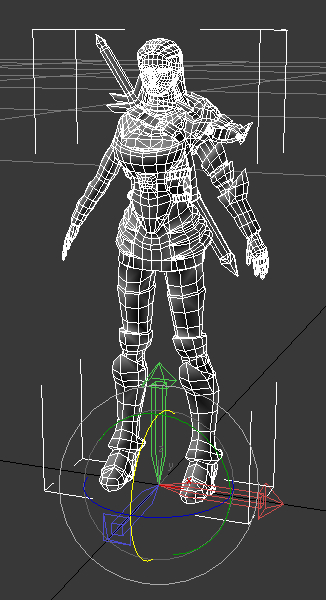
- Now, we can see the pivot of our character which is made up of the colored coordinate axes at the bottom. Press the E key to bring up the rotation gizmo and rotate it by having the Z-axis point out from the character and Y-axis point up (rotate 90 degrees on the X-axis in other words), as you can see in the following screenshot:

- Finally, we have to export our file to the FBX format. Let's go to Export, choose Autodesk(*.FBX), name it
Heroine, and put it in the3DSMaxfolder. Now we will see the FBX exporter pop up; go through each step as follows:- Include
- Animation: Uncheck the Animation toggle box. (If we have the animation included in the character we will check this box.)
- Cameras: Uncheck the Cameras toggle box. (We don't need a camera.)
- Lights: Uncheck the Lights toggle box. (We don't need a light.)
- Advanced Options
- Units
- Automatic: Uncheck the toggle box.
- Scene units converted to: Meters (make sure that you have the Scale Factor as 1.0).
- Axis Conversion
- Up Axis: Y-up
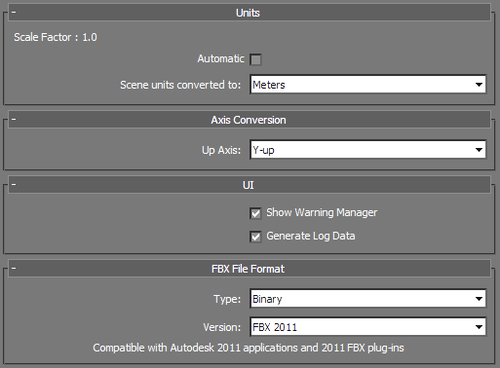
- Include
Then, click on the OK button and you have finished the first step.
Basically, what we have done here is set up the unit scale, transformed the rotation of our character, and exported it to a FBX format that will fit with Unity's world scale and space. We set up the unit scale in 3D Studio Max to have 1 unit equal to 1 meter and convert to meters. In some cases, you might want to set 1.0 unit equal to 1 inch or anything else; just make sure that when you export to the FBX format under Units, you choose the same unit that you set in 3D Studio Max and make sure that the Scale Factor equals 1.0. We also rotate the pivot of the character 90 degrees on the X-axis to create the Y-up axis that is suitable to use in Unity.
You might have a question—why do we need to do something like this to export the FBX and import it to Unity? Well, this method of setup will make sure that we won't get any wrong scale and rotation when we put our model in Unity. Since the FBX exporter from 3D Studio Max will convert the unit scale and the rotation for our character, sometimes we might get the FBX file the transformation already attached to it. For example, if we set the unit scale in 3D Studio Max to have 1 unit equal to 1 inch and export FBX to meters, it will work fine in Unity; however, the start of the XYZ scale of our character might be 0.0254 (as one inch equals 0.0254 meters) instead of 1, as you can see in the following screenshot:
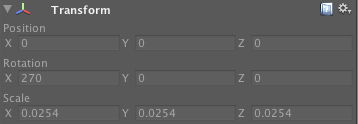
This is because the FBX exporter will convert the unit in 3D Studio Max file to the unit that we set up for export in the FBX exporter. So, we need to make sure that Scale Factor in the FBX exporter window is equal to 1.0. Also, if we didn't rotate the pivot of the character 90 degrees on the X-axis, export it to FBX, and put it in Unity, it would still work, but you would see the default rotation of the character in the X-axis as 270 degrees instead of all being 0.
Note
Why do we need the default number to be 1 (for scale) or 0 (for rotation)? The answer is that when we write the script to control our model, we will have to deal with lots of numbers. If we don't have the default setting for the model as 1 for scale or 0 for rotation, it can be really difficult to write the script to control our model.