
In this section, we will start creating the destructible wall with the multiple cube game objects in the Unity engine as well as adding some code to the rocket script to make this wall breakable when the player shoots the rocket to hit it.
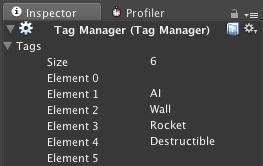
First, we will create the new Tag by going to (Edit | Project Settings | Tags) to bring out the Tags' Inspector view. In the Inspector view, we click on the triangle in front of the Tags element and at the Element 4 type Destructible, as we can see in the following screenshot:
Next, we will go to GameObject | Create Empty to create the empty game object and name it Wall and reset its transform position to X: 0, Y: 0, Z: 0.
Now we have set the Destructible tag and created an empty game object, Wall. Next, we will be creating the four cubes to represent each piece of the broken wall:
- Go to GameObject | Create Other | Cube name it
Cube1, and drag it inside theWallgame object, which we just created. - Add the Rigidbody to the Cube to make it fall realistically when it breaks by going to Component | Physics | Rigidbody and adding Rigidbody.
- Next, we will go to the cube Inspector view to set up the parameters as follows:
- Tag: Destructible
- Transform
- Position: X: 3 Y: 23.5 Z: 0
- Rotation: X: 0 Y: 0 Z: 0
- Scale: X: 6 Y: 6 Z: 1
- Box Collider
- Material: Rock (Drag Rock physics material in the
Chapter7folder to Project view here)
- Material: Rock (Drag Rock physics material in the
- Mesh Renderer
- Materials:
- Size: 1
- Element 0: Rock (Drag Rock material in the
Chapter7folder to Project view here)
- Materials:
- Rigidbody
- Mass: 100
- Is Kinematic: Check
- Now we have finished setting up the first cube. Let's duplicate three more cubes by pressing Command + D (for Mac), or Control + D (for Windows) and name all three
Cube2,Cube3, andCube4, as shown in the following screenshot: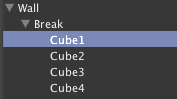
- Then, we go to each new cube's Inspector view and set up its transform position as follows:
- Transform (Cube2)
- Position: X: 3 Y: 29.5 Z: 0
- Transform (Cube3)
- Position: X: -3 Y: 29.5 Z: 0
- Transform (Cube4)
- Position: X: -3 Y: 23.5 Z: 0
- Transform (Cube2)
- We will click on the
Wallgame object in the Hierarchy view and go to the Inspector view and set up its Transform as follows:- Transform
- Position: X: 1037.5 Y: -16.5 Z: 693
- Rotation: X: 0 Y: 36 Z: 0
- Scale: X: 1 Y: 1 Z: 1
- Transform
- Now, we will create the script that makes this wall object break apart when the character shoots at it. Let's go to the
Chapter7/Scriptsfolder and double-click therocketscript to open this script in the script editor. - Inside the
rocketscript, we will add two parameters at the beginning of the script, as highlighted in the following code:@script RequireComponent(ConstantForce) //Add the explosion force and radius public var explosionRadius : float = 50; public var explosionForce : float = 1000;
- Next, we will go to the
OnCollisionEnter (others : Collision)function and add the following highlighted script:public function OnCollisionEnter (others : Collision) : void { //Create the explosion on the first impact point of the rocket and collider var contactPoint : ContactPoint = others.contacts[0]; var rotation : Quaternion = Quaternion.FromToRotation(Vector3.up, contactPoint.normal); GameObject.Instantiate(explosionParticle, contactPoint.point, rotation); //Get the transform position of the rocket var v3_position : Vector3 = transform.position; //Get all colliders that touches or insides the explosion radius var a_hits : Collider[] = Physics.OverlapSphere(v3_position, explosionRadius); for (var c : Collider in a_hits) { // Check tag if (c.tag == "Destructible") { //Get all rigidbody of the colliders var r : Rigidbody = c.rigidbody; if (r != null) { //Explosion r.isKinematic = false; r.AddExplosionForce(explosionForce, v3_position, explosionRadius); } } } KillObject(); } - Save and click on the Play button; if we go to the right path in the scene, we will see the
Wallobject that we have just created. We can shoot at it and it will break, as shown in the following screenshot: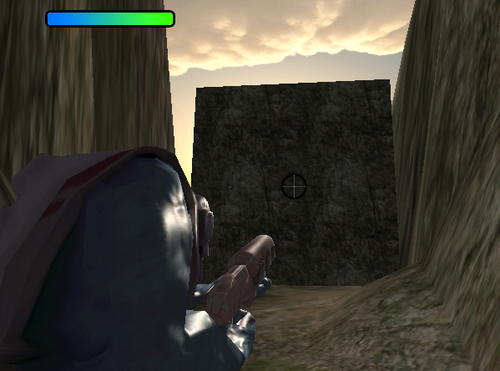
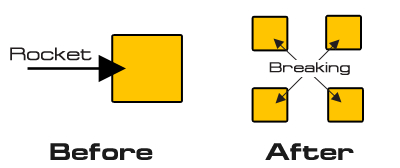
In this step, we basically just created the four cube objects, and each one will have its own collider and rigidbody
, which will make them have their direction when we apply the explosion force from the rocket that was fired at them. This will create a realistic behavior for the wall when it's breaking apart, as shown in the following diagram:
We also use the Physics.OverlapSphere() function to check for all the colliders that touch or get inside the explosion radius.
Note
For more information about the Physics.OverlapSphere() function, you can go to the following Unity scripting document:
http://unity3d.com/support/documentation/ScriptReference/Physics.OverlapSphere.html?from=Rigidbody.
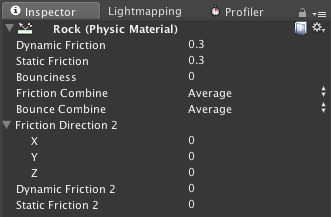
In this step, we have used the Rock Physics Material apply to the Box Collider material in the cube, to which we can apply the friction and bounciness value for each object to get a realistic reaction when calculating the physics.
For the Rock Physics Material, we set the Dynamic Friction to 0.3 and Static Friction to 0.3, which will make each piece have some small friction when it collides with another, because we don't want the rock too slippery or too hard to move. Since we don't want each piece of wall bouncing, we set the Bounciness to 0, as shown in the following screenshot:
Note
For more details, you can go to the Unity website at:
http://unity3d.com/support/documentation/Components/class-PhysicMaterial.html.