
In this section, we will create three menu pages.
First is the game over menu, which will contain the following:
- The final score of the player
- The text field for the player to enter his/her name
- The SUBMIT button to save the player's score
- The LOCAL HI-SCORE button to see the scores from the player's local machine
- The SERVER HI-SCORE button to see the scores from the database server
- The RESTART button to replay the game
Second is the local high score table menu, which will contain the high score data in the scrolled area that loads the local high score data from the player machine when the player clicks on the LOCAL HI-SCORE button on the first page.
Also, the server high score table page will be similar to the local high score page except that the score data in this table will load from the database on the server, which allows the duplicate names.
Double-click the HiScore script to open MonoDevelop and start adapting in HiScore script. Now we are ready to roll.
We will start creating the GAMEOVER menu by using the OnGUI() function, similar to what we did in Project 2, Creating a Menu in an RPG:
- At the beginning of this script, type the highlighted code in the
HiScore.jsafter the linepublic var customSkin : GUISkin;, as shown next:public var customSkin : GUISkin; //Setting the default string on the submit text field public static var userName : String = "Player 1"; //Setting the maximum number of users displayed on the scoreboard public var maxUsers : int = 10; //Creating the enum parameter for the menu page enum Page { GAMEOVER, LOCALSCORE, SERVERSCORE }; //Creating the enum parameter for the menu page private var e_page : Page = Page.GAMEOVER; //Creating the scroll position for the local high score scroller area private var scrollPositionL : Vector2 = Vector2.zero; //Creating the scroll position for the server high score scroller area private var scrollPositionS : Vector2 = Vector2.zero; //Checking if the restart button is clicked by the user private var b_isClickRestart : boolean = false; //Checking if the submit button is clicked by the user private var b_isClickSubmit : boolean = false;
- Next, set up the default value for our parameters by adding the following script to the
Start()function:public function Start() : void { //Initializing e_page = Page.GAMEOVER; scrollPosition = Vector2.zero; b_isClickRestart = false; b_isClickSubmit = false; } - Continue to the next function
OnGUI(); we will add more script here to create our GAMEOVER menu page. So let us add the highlighted script as follows:public function OnGUI() : void { if (StaticVars.b_isGameOver) { GUI.skin = customSkin; //Checking if we didn't click on the restart button if (b_isClickRestart == false) { //Checking for the current page switch (e_page) { case Page.GAMEOVER: GameoverPage(); //Creating game over page break; case Page.LOCALSCORE: LocalScorePage(); //Creating local score page break; case Page.SERVERSCORE: ServerScorePage(); //Creating server score page break; } //Creating the Restart Button if (GUI.Button(new Rect((Screen.width - 240)*0.5, (Screen.height*0.1) + 320, 240, 30), "RESTART")) { b_isClickRestart = true; Restart(); } } else { //If we clicked on the restart button - just put the Loading... text here GUI.Box(new Rect(Screen.width*0.1, Screen.height*0.1, Screen.width * 0.8, Screen.height * 0.8), "", GUI.skin.GetStyle("Box2")); GUI.Label(new Rect((Screen.width-150)*0.5, (Screen.height-50)*0.5, 150, 50), "LOADING...", GUI.skin.GetStyle("Text1")); } } } - Then, create the new
GameoverPage()function://Creating Gameover Page GUI private function GameoverPage() : void { //Creating the background box GUI.Box(new Rect(Screen.width*0.1, Screen.height*0.1, Screen.width * 0.8, Screen.height * 0.8), "GAMEOVER", GUI.skin.GetStyle("Box2")); //Creating Text Label to show the final score of the player GUI.Label(new Rect((Screen.width - 400)*0.5, (Screen.height*0.1) + 50, 400, 25), "Final Score: " + TimeScoreUI.int_currentScore.ToString(), GUI.skin.GetStyle("Text1")); //If the user didn't click submit, we create the submit button and text field for the player to submit the score if (b_isClickSubmit == false) { GUI.Label(new Rect((Screen.width - 300)*0.5, (Screen.height*0.1) + 80, 300, 25), "Enter Your Name", GUI.skin.GetStyle("Text1")); //Creating the input text field to get the player name userName = GUI.TextField(new Rect((Screen.width - 240)*0.5, (Screen.height*0.1) + 120, 240, 40), userName, 8); //Submit button if (GUI.Button(new Rect((Screen.width - 240)*0.5, (Screen.height*0.1) + 200, 240, 30), "SUBMIT")) { b_isClickSubmit = true; //TODO: Submitting both local and server high score here } } //Creating the Local Hi-Score page button if (GUI.Button(new Rect((Screen.width - 240)*0.5, (Screen.height*0.1) + 240, 240, 30), "LOCAL HI-SCORE")) { e_page = Page.LOCALSCORE; } //Creating the Server Hi-Score page button if (GUI.Button(new Rect((Screen.width - 240)*0.5, (Screen.height*0.1) + 280, 240, 30), "SERVER HI-SCORE")) { //TODO: Loading the score data from server here e_page = Page.SERVERSCORE; } } - Next, we will create the
LocalScorePage()function. This function will load the high score from the player's local machine and display it on the menu. This menu will include the scrolled area and scroll bar to show the player's score data. Let's create theLocalScorePage()function as follows://Loading the local scores private function LocalScorePage() : void { //Creating the background box GUI.Box(new Rect(Screen.width*0.1, Screen.height*0.1, Screen.width * 0.8, Screen.height * 0.8), "LOCAL HI-SCORE", GUI.skin.GetStyle("Box2")); //Creating the scrolled area and scrollbar to view the player scores scrollPositionL = GUI.BeginScrollView (new Rect ((Screen.width - 320)*0.5, (Screen.height*0.1) + 80, 320, 180), scrollPositionL, new Rect (0, 0, 300, 30*maxUsers)); for (var i: int = 0; i < maxUsers; i++) { //Setting the number of the user GUI.Label(new Rect(0, i * 30, 35, 30), (i+1).ToString() + "."); //TODO: Showing the user name and score here } GUI.EndScrollView (); //End Scroll Area if (GUI.Button(new Rect((Screen.width - 240)*0.5, (Screen.height*0.1) + 280, 240, 30), "BACK")) { e_page = Page.GAMEOVER; } } - This function will create the LOCAL HI-SCORE menu that includes the background box, the scrolled area to display the user's scores, and the Back button to go back to the GAMEOVER page.
- Finally, we will create the last function for the
HiScorescript, theServerScorePage()function. This function is very similar to theLocalScorePage()function that we created earlier, except that this function will load the score data from the server (we will have to wait until it is loaded). We will talk about this in a later step. So right now, we will create theServerScorePage()function as follows://Loading score from server private function ServerScorePage() : void { //Creating the background box GUI.Box(new Rect(Screen.width*0.1, Screen.height*0.1, Screen.width * 0.8, Screen.height * 0.8), "SERVER HI-SCORE", GUI.skin.GetStyle("Box2")); //TODO: Checking is the loader completed scrollPositionS = GUI.BeginScrollView (new Rect ((Screen.width - 320)*0.5, (Screen.height*0.1) + 80, 320, 180), scrollPositionS, new Rect (0, 0, 300, 30*maxUsers)); for (var i: int = 0; i < maxUsers; i++) { //Setting the number of the user GUI.Label(new Rect(0, i * 30, 35, 30), (i+1).ToString() + "."); //TODO: Showing the user name and score here } GUI.EndScrollView (); //End Scroll Area //TODO: If the loader doesn't complete display Loading... text if (GUI.Button(new Rect((Screen.width - 240)*0.5, (Screen.height*0.1) + 280, 240, 30), "BACK")) { e_page = Page.GAMEOVER; } } - Now, we can go back to Unity and click Play to see our result by letting the character die or killing all enemies in the scene. We will see something similar to the following screenshot:

We can click on the LOCAL HI-SCORE button or SERVER HI-SCORE button to go to another page, click on the RESTART button to replay the game, enter the name or the text field and click on the SUBMIT button, even though it won't save or send any score right now. At the LOCAL HI-SCORE or SERVER HI-SCORE page, you can also see the BACK button to go back to the GAMAEOVER menu, and the RESTART button to restart the game.
In the next step, we will be creating the script to save the local high score for the user, which will check whether the player's final score is saved or not. This script will automatically sort the score order from the maximum to minimum, and display it to the scoreboard.
We just finished creating the GAMEOVER menu that will display the player's final score, has the option for the player to submit his/her score, and a button to see the local scoreboard as well as the server scoreboard.
First, we created the userName parameter to set the default username on the Submit text field, and maxUsers to limit the maximum number of users that will display on our scoreboard.
Then, we created the enum variable to check for the current page of our menu, which contains the GAMEOVER page, local score page, and server score page. We also have the scrollPosition parameter to create the scrolled area for the high score table. Then, we have two boolean parameters to check whether the RESTART and SUBMIT buttons have been clicked by the user or not.
In the OnGui() function
, we first checked if the RESTART button is clicked by using the if statement to check it. If the RESTART button has been clicked, the Restart() function will be called and the loading menu will be displayed for the user to wait for the game to restart. On the other hand, if the player doesn't click on the RESTART button, the game will show that the menu page depends on the current stage of the page by using the switch statement to check for the e_page parameters
, which are Page.GAMEOVER, Page.LOCALSCORE and Page.SERVERSCORE. Each case will call the function to draw the UI of its menu, which are the GameoverPage(), LocalScorePage(), and ServerScorePage().
Next, we created the GameoverPage() function
, which we can divide into three sections. First, we created the background, then the label for our menu, and then we displayed the final score, which is TimeScoreUI.int_currentScore. Then, we checked if the player clicked the SUBMIT button. If not, we will have the SUBMIT button and the text field for the players to enter their names and post their scores. In the last step, we created the LOCAL HI-SCORE and SERVER HI-SCORE button, which will set the e_page parameter to Page.LOCALSCORE and Page.SERVERSCORE.
Finally, we created the other two functions. The LocalScorePage() function
will show the result of the high-score table from the local machine, and ServerScorePage() will show the result of the high-score table from the server.
In this chapter, we created the enum parameter to check for the menu page.
The enum parameter
is very similar to the object class that only contains the Integer type or we can say that only int type in the Unityscript. In Unity JavaScript or C#, we create enum by using the same syntax, which is enum Page { OBJECT1, OBJECT2, OBJECT3 }; or enum Page { OBJECT1=1, OBJECT2, OBJECT3 };.
From those scripts, if we don't assign the integer value to any object, the value of each object will automatically be assigned, starting from 0 and so on. If we assign the integer 1 to the first value, then that object value will be 1 instead of 0 and the rest will continue from 1 and so on. We can also assign the number for each object manually, such as enum Page { OBJECT1=2, OBJECT2=7, OBJECT3=0 };. This will assign each object to have its own value.
For more details on enum, we can go to the following website:
http://msdn.microsoft.com/en-us/library/sbbt4032%28v=vs.80%29.aspx.
What is the advantage of using enum in Unity? If we take a look at our code at the line private var e_page : Page = Page.GAMEOVER; and change the word private to public, then go back to the Unity and click on the HiScore game object to see the Inspector view, we will see the new editable parameter names E_page, which is the drop-down button. If we click on it, we will see that we can choose only three values, which are GAMEOVER, LOCALSCORE, and SERVERSCORE:
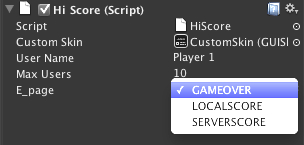
Those names are from the enum objects
that we assigned in the HiScore.js script. The advantage of using enum parameter is that we will be able to create the editable value that limits the number of choices and protects an invalid input data, which will save us from having to write an extra code to check for the invalid input data. For example, if we were using integers, having a page value of 500—which is an invalid page number—would not make any sense.
This is very useful when we work with other people or when we are testing the game because we can make it readable for everyone; they can just basically set up the enum parameter and then adjust it in the editor while they are testing the game.