 Time for action—installing MySQL on Ubuntu
by María Carina Roldán
Pentaho 3.2 Data Integration Beginner's Guide
Time for action—installing MySQL on Ubuntu
by María Carina Roldán
Pentaho 3.2 Data Integration Beginner's Guide
- Pentaho 3.2 Data Integration Beginner's Guide
- Pentaho 3.2 Data Integration
- Credits
- Foreword
- The Kettle Project
- About the Author
- About the Reviewers
- Preface
- 1. Getting Started with Pentaho Data Integration
- Pentaho Data Integration and Pentaho BI Suite
- Pentaho Data Integration
- Installing PDI
- Time for action—installing PDI
- Launching the PDI graphical designer: Spoon
- Time for action—starting and customizing Spoon
- Time for action—creating a hello world transformation
- Time for action—running and previewing the hello_world transformation
- Installing MySQL
- Time for action—installing MySQL on Windows
- Time for action—installing MySQL on Ubuntu
- Summary
- 2. Getting Started with Transformations
- Reading data from files
- Time for action—reading results of football matches from files
- Time for action—reading all your files at a time using a single Text file input step
- Time for action reading all your files at a time using a single Text file input step and regular expressions
- Sending data to files
- Time for action—sending the results of matches to a plain file
- Getting system information
- Time for action—updating a file with news about examinations
- Time for action—running the examination transformation from a terminal window
- XML files
- Time for action—getting data from an XML file with information about countries
- Summary
- 3. Basic Data Manipulation
- Basic calculations
- Time for action—reviewing examinations by using the Calculator step
- Time for action—reviewing examinations by using the Formula step
- Calculations on groups of rows
- Time for action—calculating World Cup statistics by grouping data
- Filtering
- Time for action—counting frequent words by filtering
- Looking up data
- Time for action—finding out which language people speak
- Summary
- 4. Controlling the Flow of Data
- Splitting streams
- Time for action—browsing new PDI features by copying a dataset
- Time for action—assigning tasks by distributing
- Splitting the stream based on conditions
- Time for action - assigning tasks by filtering priorities with the Filter rows step
- Time for action—assigning tasks by filtering priorities with the Switch/ Case step
- Merging streams
- Time for action—gathering progress and merging all together
- Time for action—giving priority to Bouchard by using Append Stream
- Summary
- 5. Transforming Your Data with JavaScript Code and the JavaScript Step
- Doing simple tasks with the JavaScript step
- Time for action—calculating scores with JavaScript
- Time for action—testing the calculation of averages
- Enriching the code
- Time for action calculating flexible scores by using variables
- Reading and parsing unstructured files
- Time for action—changing a list of house descriptions with JavaScript
- Avoiding coding by using purpose-built steps
- Summary
- 6. Transforming the Row Set
- Converting rows to columns
- Time for action—enhancing a films file by converting rows to columns
- Time for action—calculating total scores by performances by country
- Normalizing data
- Time for action—enhancing the matches file by normalizing the dataset
- Generating a custom time dimension dataset by using Kettle variables
- Time for action—creating the time dimension dataset
- Time for action—getting variables for setting the default starting date
- Summary
- 7. Validating Data and Handling Errors
- Capturing errors
- Time for action—capturing errors while calculating the age of a film
- Time for action—aborting when there are too many errors
- Time for action—treating errors that may appear
- Avoiding unexpected errors by validating data
- Time for action validating genres with a Regex Evaluation step
- Time for action—checking films file with the Data Validator
- Summary
- 8. Working with Databases
- Introducing the Steel Wheels sample database
- Time for action—creating a connection with the Steel Wheels database
- Time for action—exploring the sample database
- Querying a database
- Time for action—getting data about shipped orders
- Time for action—getting orders in a range of dates by using parameters
- Time for action—getting orders in a range of dates by using variables
- Sending data to a database
- Time for action—loading a table with a list of manufacturers
- Time for action—inserting new products or updating existent ones
- Time for action—testing the update of existing products
- Eliminating data from a database
- Time for action—deleting data about discontinued items
- Summary
- 9. Performing Advanced Operations with Databases
- Preparing the environment
- Time for action—populating the Jigsaw database
- Looking up data in a database
- Time for action—using a Database lookup step to create a list of products to buy
- Time for action using a Database join step to create a list of suggested products to buy
- Introducing dimensional modeling
- Loading dimensions with data
- Time for action loading a region dimension with a Combination lookup/update step
- Time for action—testing the transformation that loads the region dimension
- Time for action—keeping a history of product changes with the Dimension lookup/update step
- Time for action—testing the transformation that keeps a history of product changes
- Summary
- 10. Creating Basic Task Flows
- Introducing PDI jobs
- Time for action—creating a simple hello world job
- Receiving arguments and parameters in a job
- Time for action—customizing the hello world file with arguments and parameters
- Running jobs from a terminal window
- Time for action—executing the hello world job from a terminal window
- Using named parameters and command-line arguments in transformations
- Time for action—calling the hello world transformation with fixed arguments and parameters
- Deciding between the use of a command-line argument and a named parameter
- Running job entries under conditions
- Time for action—sending a sales report and warning the administrator if something is wrong
- Summary
- 11. Creating Advanced Transformations and Jobs
- Enhancing your processes with the use of variables
- Time for action—updating a file with news about examinations by setting a variable with the name of the file
- Enhancing the design of your processes
- Time for action—generating files with top scores
- Time for action—calculating the top scores with a subtransformation
- Time for action—splitting the generation of top scores by copying and getting rows
- Time for action—generating the files with top scores by nesting jobs
- Iterating jobs and transformations
- Time for action—generating custom files by executing a transformation for every input row
- Summary
- 12. Developing and Implementing a Simple Datamart
- Exploring the sales datamart
- Loading the dimensions
- Time for action—loading dimensions for the sales datamart
- Extending the sales datamart model
- Loading a fact table with aggregated data
- Time for action—loading the sales fact table by looking up dimensions
- Getting facts and dimensions together
- Time for action—loading the fact table using a range of dates obtained from the command line
- Time for action—loading the sales star
- Getting rid of administrative tasks
- Time for action—automating the loading of the sales datamart
- Summary
- 13. Taking it Further
- A. Working with Repositories
- Creating a repository
- Time for action—creating a PDI repository
- Working with the repository storage system
- Time for action—logging into a repository
- Examining and modifying the contents of a repository with the Repository explorer
- Migrating from a file-based system to a repository-based system and vice-versa
- Summary
- B. Pan and Kitchen: Launching Transformations and Jobs from the Command Line
- C. Quick Reference: Steps and Job Entries
- D. Spoon Shortcuts
- E. Introducing PDI 4 Features
- F. Pop quiz—Answers
This tutorial shows you the procedure to install MySQL on Ubuntu.
Please follow these instructions:
- Check that you have access to the Internet.
- Open the Synaptic package manager from System | Administration | SynapticPackage Manager.
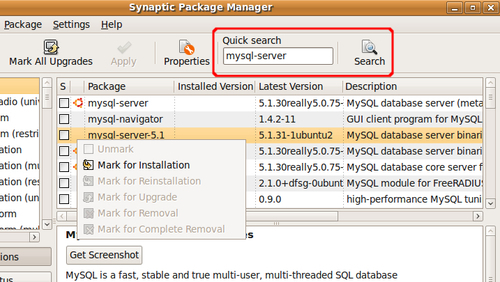
- Under Quick search type
mysql-serverand click on the Search button. - Among the results, locate
mysql-server-5.1, click in the tiny square to the left,and select Mark for Installation - You'll be prompted for confirmation. Click on Mark.
- Now search for a package named
mysql-admin. - When found, mark it for installation in the same way.
- Click on Apply on the main toolbar.

- A window shows up asking for confirmation. Click on Mark again. What follows is the download process followed by the installation process.
- At a particular moment a window appears asking you for a password for the root user—the administrator of the database. Enter a password of your choice. You'll have to enter it twice.
- When the process ends, you will see the changes applied.
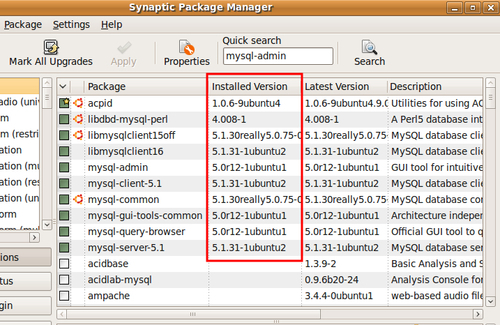
- Under Applications a new menu will also be added to access the GUI tools.
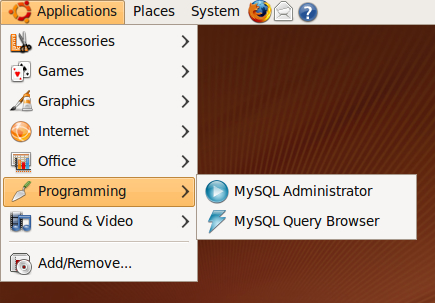
You installed MySQL server and GUI Tools in your Ubuntu system.
Note
The previous directions are for standard installations. For custom installations, instructions related to other operating systems, or for troubleshooting, please check the MySQL documentation at— http://dev.mysql.com/doc/refman/5.1/en/installing.html.
-
No Comment
..................Content has been hidden....................
You can't read the all page of ebook, please click here login for view all page.