
The International Musical Contest mentioned in Chapter 4 has already taken place. Each duet performed twice. The first time technical skills were evaluated, while in the second, the focus was on artistic performance.
Each performance was assessed by a panel of five judges who awarded a mark out of a possible 10.
The following is the detailed list of scores:
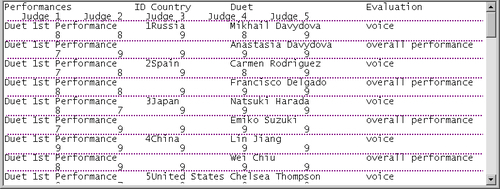
Note that the fields don't fit in the screen, so the lines are wrapped and dotted lines are added for you to distinguish each line.
Now you have to calculate, for each evaluated skill, the overall score as well as an average score.
- Download the sample file from the Packt website.
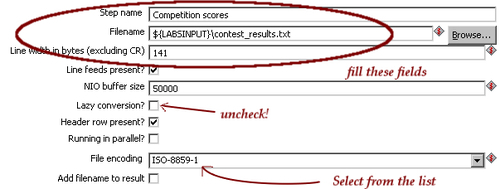
- Create a transformation and drag a Fixed file input step to the canvas to read the file.
- Fill the configuration window as follows:
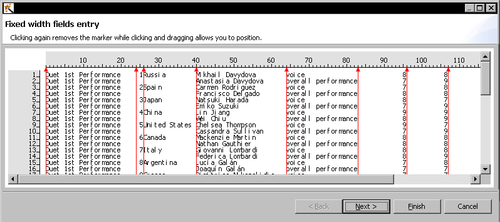
- Press the Get Fields button. A window appears to help you define the columns.
- Click between the fields to add markers that define the limits. The window will look like this:
- Click on Next >. A new window appears for you to configure the fields.
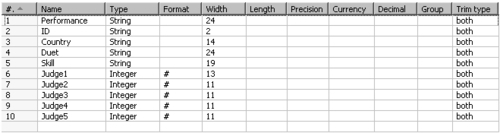
- Click on the first field at the left of the window and change the name to
Performance. Verify that the type is set toString. - To the right, you will see a preview of the data for the field.
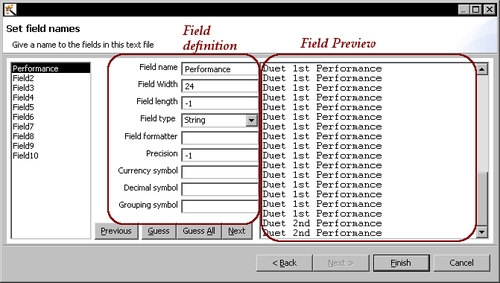
- Select each field to the left of the window, change the names, and adjust the types. Set
ID, Country, Duet, andSkillfields asString, and fields fromJudge 1toJudge 5asInteger. - Go back and forth between these two windows as many times as you need until you are done with the definitions of the fields.
- Click on Finish.
- The grid at the bottom is now filled.
- Set the column Trim type to both for every field.
- The window should look like the following:
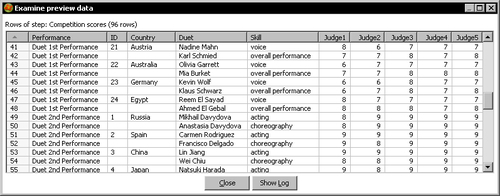
- Click on Preview the transformation. You should see this:
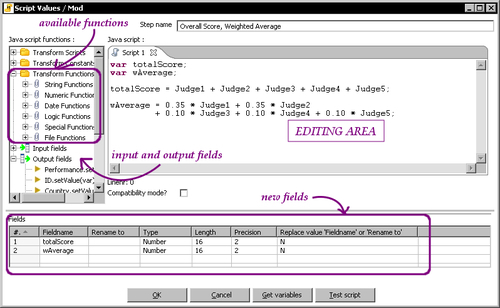
- From the Scripting category of steps, select a Modified JavaScript Value step and drag it to the canvas.
- Link the step to the Fixed file input step, and double-click it to configure it.
- Most of the configuration window is blank, which is the editing area. Type the following text in it:
var totalScore;
var wAverage;
totalScore = Judge1 + Judge2 + Judge3 + Judge4 + Judge5;
wAverage = 0.35 * Judge1 + 0.35 * Judge2
+ 0.10 * Judge3 + 0.10 * Judge4 + 0.10 * Judge5;
- Click on the Get variables button.
- The grid under the editing area gets filled with the two variables defined in the code. The window looks like this:
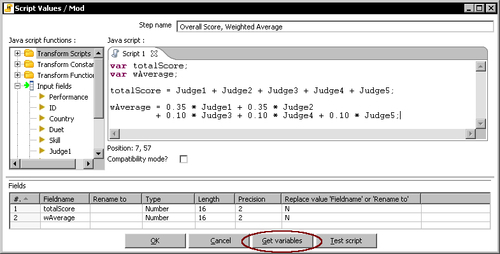
- Click on OK.
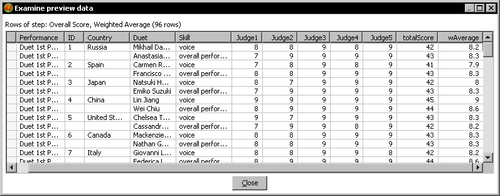
- Keep the JavaScript step selected and do a preview.
- This is how the final data looks like:
You read the detailed list of scores and added two fields with the overall score and an average score for each evaluated skill.
In order to read the file, you used a step you hadn't used before—the Fixed file input step. You configured the step with the help of a wizard. You could have also filled the field grid manually if you wanted to.
After reading the file, you used a JavaScript step to create new fields. The code you typed was pure JavaScript code. In this case, you typed a simple code to calculate the total score and a weighted average combining the fields from Judge 1 to Judge 5.
Note that the average was defined by giving more weight, that is, more importance, to the scores coming from Judge 1 and Judge 2.
For example, consider the first line of the file. This is how the new fields were calculated:
totalScore = Judge1 + Judge2 + Judge3 + Judge4 + Judge5 = 8+8+9+8+9
= 42
wAverage = 0.35*Judge1 + 0.35*Judge2+ 0.10*Judge3 + 0.10*Judge4 + 0.10*Judge5 = 0.35*8 + 0.35*8+ 0.10*8 + 0.10*8 + 0.10*8 = 8.2
In order to add these new fields to your dataset, you brought them to the grid at the bottom of the window.
Note that this is not the only way to do calculations in PDI. All you did with the JavaScript step can also be done with other steps.
JavaScript is a scripting language primarily used in website development. However, inside PDI you use just the core language; you neither run a web browser nor do you care about HTML. There are many available JavaScript engines. PDI uses the Rhino engine, from Mozilla. Rhino is an open source implementation of the core JavaScript language; it doesn't contain objects or methods related to manipulation of web pages. If you are interested in knowing more about Rhino, you can visit https://developer.mozilla.org/en/Rhino_Overview.
The core language is not too different from other languages you might know. It has basic statements, block statements (statements enclosed by curly brackets), conditional statements (if..else and switch case), and loop statements ( for, do..while, and while). If you are interested in the language itself, you can access a good JavaScript guide following this link: https://developer.mozilla.org/En/Core_JavaScript_1.5_Guide.
Besides the basics, an interesting feature included in the PDI implementation is E4X, a programming language extension that allows you to manipulate XML objects inside JavaScript. You can find an E4X tutorial as well as a reference manual at https://developer.mozilla.org/En/E4X/Processing_XML_with_E4X.
Finally, there is a complete tutorial and reference at http://www.w3schools.com/js/. Despite being quite oriented to web development, which is not your concern, it is clear, complete, and has plenty of examples.
The Modified Java Script Value step (JavaScript step in short) allows you to insert JavaScript code inside your transformation. The code you type here is executed once per row coming to the step.
Let's explore its dialog window.
Most of the window is occupied by the editing area. It's there that you write JavaScript code using the standard syntax of the language and the functions and fields from the tree to the left of the window.
The Transform Functions branch of the tree contains a rich list of functions, ready to use. The functions are grouped by category.
The functions are grouped by category.
- String, Numeric, Date, and Logic categories contain usual JavaScript functions.
- The Special category contains a mix of utility functions. Most of them are not JavaScript functions but Kettle functions. You will use some of them later in this chapter.
- Finally, the File category, as its name suggests, contains a list of functions that do simple verifications or actions related to files and folders—for example,
fileExist()orcreateFolder().
To add a function to your script, simply double-click on it, and drag it to the location in your script where you wish to use it, or just type it.
Tip
If you are not sure about how to use a particular function or what a function does, just right-click on the function and select Sample. A new script window appears with a description of the function and sample code showing how to use it.
The Input fields branch contains the list of the fields coming from previous steps. To see and use the value of a field for the current row, you need to double-click on it or drag it to the code area. You can also type it by hand as you did in the tutorial.
When you use one of these fields in the code, it is treated as a JavaScript variable. As such, the name of the field has to follow the conventions for a variable name—for example, it cannot contain dots, nor can it start with non-character symbols.
As Kettle is quite permissive with names, you can have fields in your stream whose names are not valid to be used inside JavaScript code.
Note
If you intend to use a field with a name that doesn't follow the name rules, rename it just before the JavaScript step with a Select values step. If you use that field without renaming it, you will not be warned when coding, but you'll get an error or unexpected results when you execute the transformation.
The Output fields is a list of the fields that will leave the step.
At the bottom of the window, there is a grid where you put the fields you created in the code. This is how you add a new field:
- Define the field as a variable in the code—for example,
var totalScore. - Fill the grid manually or by clicking the Get variables button. A new row will be filled for every variable you defined in the code.
That was exactly what you did for the new fields,
totalScoreandwAverage.In the JavaScript code you can create and use all variables you need without declaring them. However, if you intend to add a variable as a field in your stream, the declaration with the
varsentence is mandatory.
Instead of adding a field, you may want to change the value and eventually the data type of an existent field. You can do that but not directly in the code.
Imagine that you wanted to change the field Skill, converting it to uppercase. To accomplish this, double-click the JavaScript step and add the following two lines:
var uSkill;
uSkill = upper(Skill);
Add the new field to the grid at the bottom:

By renaming uSkill to Skill and setting the Replace value 'Fieldname' or 'Rename to' to Y, the uSkill field is renamed to Skill and replaces the old Skill field.
In the JavaScript window, you might have seen the Compatibility mode checkbox. This checkbox, unchecked by default, causes JavaScript to work like it did in version 2.5 of the JavaScript engine. With that version, you could modify the values and their types directly in the code, which allows mixing data types, thus causing many problems.
Old JavaScript programs run in compatibility mode. However, when creating new code, you should make use of the new engine; that is, you should leave the compatibility mode turned off.
Take the contest file as source and do the following:
- Add a field named
average. For the first performance, calculate the average as a weighted average, just like you did in the tutorial. For the second performance, calculate the field as a regular average, that is, the sum of the five scores divided by five. - Modify the
Performancefield. ReplaceDuet 1st PerformanceandDuet 2nd Performanceby1stand2nd.
There is no single way to code this, but here you have a list of functions or sentences you can use: if..then...else, indexOf(), substr()