Now you will build a sales report and send it by e-mail. In order to follow the tutorial, you will need two simple prerequisites:
- As the report will be based on the Jigsaw database you created in Chapter 8, you will need the MySQL server running.
- In order to send e-mails, you will need at least one valid Gmail account. Sign up for an account. Alternatively, if you are familiar with you own SMTP configuration, you could use it instead.
Once you've checked these prerequisites, you are ready to start.
- Create a new transformation.
- Add a Get System Info step. Use it to add a field named
today. As Type, selectToday 00:00:00. - Now add a Table input step.
- Double-click the step.
- As Connection, select
js—the name of the connection to the jigsaw puzzles database. - In the SQL frame, type the following statement:
SELECT pay_code
, COUNT(*) quantity
, SUM(inv_price) amount
FROM invoices
WHERE inv_date = ?
GROUP BY pay_code
- In the drop-down list to the right of Insert data from step, select the name of the Get System Info step.
- Finally, add an Excel Output step.
- Double-click the step.
- Enter type
${LABSOUTPUT}/sales_as Filename. - Check the Specify Date time format option. In the Date time format drop-down list, select yyyyMMdd.
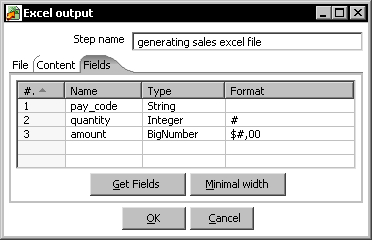
- Make sure you don't uncheck the Add filenames to result option. Click on OK. Fill the Fields tab as here:
- Save the transformation under the
transformationsfolder you created in a previous tutorial, with the namesales_report.ktr. - Create a new job by pressing Ctrl+Alt+N.
- Add a START job entry.
- After the START entry, add a Transformation entry.
- Double-click the Transformation entry.
- Enter
${Internal.Job.Filename.Directory}/transformations/sales_report.ktras the transformation filename, either by hand or by browsing the folder and selecting the file. - Click on OK.
- Expand the Mail category of entries and drag a Mail entry to the canvas.
- Create a hop from the transformation entry to the Mail entry.
- Double-click the Mail entry.
- Fill the main tab Addresses with the destination and the sender e-mail addresses, that is, provide values for the Destination address, Sender name, and Sender address textboxes. If you have two accounts to play with, put one of them as destination and the other as sender. If not, use the same e-mail twice.
- Select the Server tab and fill the SMTP Server frame as follows—enter smtp.gmail.com as SMTP Server and 465 as Port.
- Fill the Authentication frame. Check the Use authentication? checkbox. Fill the Authentication user and Authentication password textboxes. For example, if your account is
[email protected], then as user enterpdi_accountand as password provide your e-mail password. - Check the Use secure authentication? option. In Secure connection type, leave the default to SSL. Select the Email Message tab. In the Message Settings frame, check the Only send comment in mail body? option.
- Fill the Message frame, providing a subject and a comment for the e-mail—enter Sales report as Subject and Please check the attachment as Comment. Select the Attached Files tab and check the Attach file(s) to message? option.
- In the Select file type list, select the type General.
- Click OK.
- Drag another Mail job entry to the canvas.
- Create a hop from the transformation entry to this new entry. This hop will appear in red.
- Double-click the new entry.
- Fill the Destination and Sender frames with destination and sender e-mail addresses. If you have another account to use as destination, use it here. Select the Server tab and fill it exactly as you did in the other Mail entry.
- Select the Email Message tab. In the Subject textbox, type
Error generating sales report. - Click on OK.
- Save the job and run it.
- Once the job finished, log into your account. You should have received a mail!
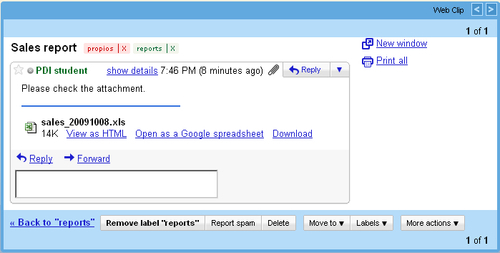
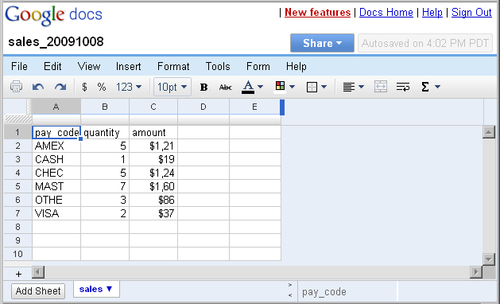
- Open the e-mail. This is what you should see:
- Click on the Open as a Google spreadsheet option. You will see the following:
- Simulate being an intruder and do something that makes your transformation fail. You could, for example, stop MySQL or add some strange characters in the SQL statement.
- Run the job again.
- Check the administrator e-mail—the mail you put as destination in the second Mail job entry.
- The following is the e-mail you received this time:
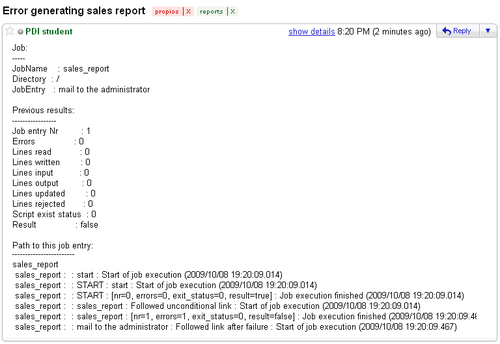
You generated an Excel file with a crosstab report of sales on a particular day. If the file is generated successfully, an e-mail is sent with the Excel file attached. If some error occurs, an e-mail reporting the problem is sent to the administrator.
Tip
If you skipped Chapter 8 and still know nothing about databases with PDI, don't miss this exercise. Instead of the proposed sales report, create a transformation that generates any Excel file. The contents of the sheet is not the key here. Just make sure you leave the Add filenames to result option checked in the Excel output configuration window. Then proceed as explained.
The execution of any job entry either succeeds or fails.
In particular, the job entries under the category Conditions just evaluates something and success or failure depends upon the result of the evaluation.
For example, the job entry File Exists succeeds if the file you put in its window exists. Otherwise, it fails.
Whichever the job entry, you can use the result of its execution to decide which of the entries following it execute and which don't.
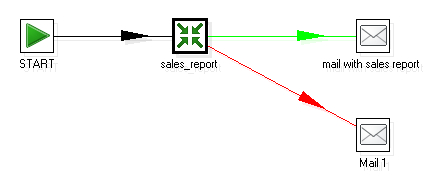
In the tutorial, you included a transformation job entry. If the transformation runs without problem, this entry succeeds. Then the execution follows the green hop to the first Mail job entry.
If, while running the transformation, some error occurs, the transformation entry fails. Then the execution follows the red path toward the e-mail to the administrator.
So, when you create a job, you not only arrange the entries and hops according to the expected order of execution, you also specify under which condition each job entry runs.
You can define the conditions in the hops. The following table lists the possibilities:
|
Color of the hop |
What the color represents |
The interpretation |
|---|---|---|
|
Black |
Unconditional execution |
The destination entry executes no matter the result of the previous entry. |
|
Green |
Execution upon success |
The destination entry executes only if the previous job entry is successful. |
|
Red |
Execution upon failure |
The destination entry executes only if the previous job entry failed. |
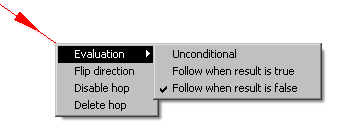
At any hop, you can define the condition under which the destination job entry will execute. By default, the first hop that leaves an entry is created green, whereas the second hop is created red. You can change the color, that is, the behavior of the hop. Just right-click on the hop, select Evaluation, and then the condition.
One exception is the hop or hops that leave the START step. You cannot edit them. The destination job entries execute unconditionally, that is, always.
Another exception is the special entry Dummy that does nothing, not even allowing you to decide if the job entries after it run or not. They always run.
Here we will modify the job that sends the e-mail containing the sales report.
- Modify the transformation so that the file is generated in the temporary folder
${java.io.tmpdir}. If there is no sale for today, don't generate the file. You do this by checking the Do not create file at start option in the Excel output step. - Send the e-mail only if there were sales, that is, only if the file exists.
- After sending the e-mail with the report attached, delete the file.
In the tutorial you configured two Mail job entries. In the mail that follows the green hop, you attached the Excel file generated by the transformation. However, you didn't explicitly specify the name of the file to attach. How could PDI realize that you wanted to attach that file? it could because of the Add filenames to result checkbox in the Excel output configuration window. By checking that option, you added the name of the Excel file to a special list named File result.
When PDI hits an e-mail entry where Attach file(s) to message? is checked, it attaches to the e-mail all files in the File result list.
Most of the transformation steps that read or write files have this checkbox, and it is checked by default. The following sample belongs to a Text file input step:
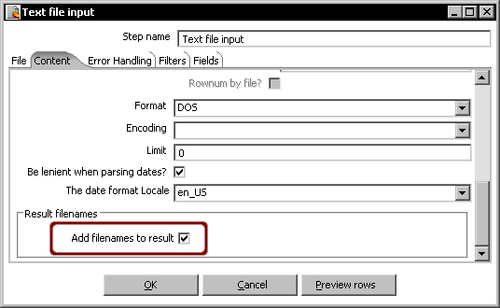
Each time you use one of these steps you are adding names of files to this list, unless you uncheck the checkbox.
There are also several job entries in the File management and the File transfer categories that add one or more files to the File result list. Consider the following Copy Files... entry screen:
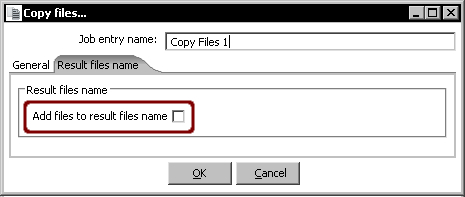
As with the Mail entry, there are some other entries that use the File result list. One example is Copy or Move result filenames. This entry copies or moves the files whose names are in this special list named File result.