
One of the easiest ways to adopt Windows Server 2016 in an existing environment is via an in-place upgrade mechanism. You might have a scenario with a relatively fresh installation of Windows Server 2012 R2 with Hyper-V, where you want to update to Windows Server 2016 Hyper-V on the same hardware. In cases where you have Hyper-V running with all the applications, drivers, and hardware on the host computer being supported on a Windows Server 2016 platform, you can use the in-place upgrade option for upgrading. This will guarantee that your host computer will be easily upgraded to Windows Server 2016 with all the configuration and files preserved.
However, in cases where applications, drivers, or even hardware might not work on Windows Server 2016, or the old installation of Windows Server 2012 R2 has had lots of modifications caused by uninstalled applications, the best way would be via migration to a new operating system.
It does not matter what your decision is, you need to make sure that you have a test and a rollback plan in place to check whether everything will work fine.
In-place upgrades offer an easy process to turn your Windows Server 2012 R2 installation into a Windows Server 2016 server with all the settings, configuration, files, and applications working as they were in the previous version.
Note
Windows Server 2016 does not attempt to preserve NIC teaming during an in-place upgrade. You will need to fully document your NIC teaming configuration prior to executing an in-place upgrade. For more information on NIC teaming, see Enabling and adding NIC teaming recipe from Chapter 3, Managing Disk and Network Settings.
In this recipe, you will see how to run an in-place installation of Windows Server 2016.
In-place upgrades require at least a Windows Server 2012 R2 installation option that is compatible with the installation option of choice being installed under Windows Server 2016.
Windows Server Core Server Core Installation in Windows Server 2012 R2, cannot be upgraded to Windows Server 2016 Server with Desktop Experience and vice versa. It should also be noted that after the upgrade, you can't switch from one installation option to another like you could in Windows 2012 R2.
Also, in Windows 2012 R2, Microsoft supported a third installation state, Minimal Server Interface, which is an installation option that sits between Windows Server Core and Full Server, Server with a GUI in terms of functionality. This installation option has been deprecated in Windows Server 2016. So before carrying out an in-place upgrade, you will need to switch from Minimal Server Interface to one of the two other supported installation options in Windows Server 2012 R2.
You can also install Windows Server 2016 as a Nano Server. This installation option is not available as an in-place upgrade option and needs to be installed via a fresh install.
The setup wizard should be executed from the current Windows installation media. Make sure that you are logged in as an administrator on the host computer.
All the virtual machines must be turned off before running the setup wizard. Open Hyper-V Manager and double check whether all the VMs are in the off state.
Check whether you have the installation files on a folder or a DVD with the proper product key to hand, before you begin.
In the following steps, you will see how to upgrade your Windows Server 2012 R2 installation to Windows Server 2016, using the Windows installation process:
- From the Windows Server 2012 R2 server, run the
Setup.exefrom the Windows Server 2016 installation folder. - In the Get important updates for Windows Server 2016 Setup window, select the update option you want to use. Select Download and install updates (recommended), if your system is not up-to-date or Not right now to continue the update process and click Next.
- In the Select image window, select the corresponding image that you are installing and click Next.
- In the License Terms windows, check Accept the license terms option and click on Next.
- In the Choose what to keep windows, select the Keep personal files and apps option, as shown in the following screenshot, and click on Next:

Windows Server 2016 Setup—Choose what to keep
- In the What needs your attention window, check and solve all the dependencies and identify the potential errors that the installation might have found before you continue, as shown in the next screenshot and click Confirm:
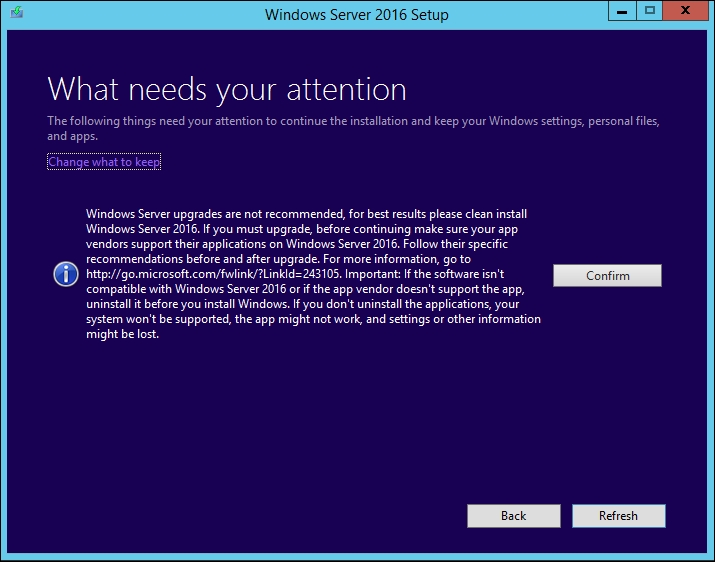
Windows Server 2016 Setup—What needs your attention
- In the Ready to install window, click Install to start the upgrade process and wait for it to be finished. It will take about 10 to 30 minutes, based on the number of roles, applications, and settings that will be upgraded.
- When the upgrade is finished, log in with an administrator account, and consider running Windows Update.
In-place upgrades are an easier way to migrate your current Windows Server 2012 R2 server to Windows Server 2016, but it is also the riskiest option. It is important to verify whether all the applications, roles, features, and configurations will work on Windows Server 2016.
In some scenarios where an old server installation is present, administrators prefer to install a fresh Windows installation and move the roles using tools such as Windows Server Migration Tools or for Hyper-V, using either the Import option or Cross Version Shared Nothing Live Migration for virtual machines. The benefit of these options is that you will make sure that the old configuration or settings that could be a problem for both old and new installations, will not be inherited on the new servers.
If you are comfortable with running an in-place upgrade after checking all the compatibility issues and running a backup, you will need to run the installation setup from the running server and walk through the wizard. For the Choose what to keep option, you just need to select Keep personal files and apps and the wizard will start to determine what issues you need to check, and if everything will work fine with the new Windows installation. After checking and addressing any problems that you may have, just click on Install and wait for the upgrade to be completed.
With seven or eight easy steps, your current server running Hyper-V will be upgraded with the new Windows version.
After the upgrade, you may need to upgrade the Integration Services on every existing virtual machine via Windows Update.
Microsoft has decided on a different strategy for updating Integration Services in Windows Server 2016. Updates to Integration Services will no longer be contained within the VMGUEST.ISO file, which is normally located in the WindowsSystem32 directory. Instead, updated Integration Services will come directly from Windows Update, much like any other update you would apply to a virtual machine.
For VMs that run in an isolated environment, their updates will have to be obtained from Windows Update as hotfixes and placed within easy reach of the VM, either via WSUS or installed manually, on demand.
Also see:
- The Exporting and importing virtual machines recipe in this chapter
- The Migrating virtual machines and updating their Integration Services recipe in this chapter
- The Migrating virtual machine using Cross Version Shared Nothing Live Migration recipe in this chapter
For more information about the Windows Server Migration tools, visit the following link: http://technet.microsoft.com/en-us/library/jj134202.
For more information about migrating a Failover Cluster environment, read Chapter 7, Configuring High Availability in Hyper-V of this book or visit the following link: https://technet.microsoft.com/en-GB/library/dn850430.aspx.