
Fibre Channel (FC) is one of the most common network technologies used primarily for storage connections. It's the perfect choice for high-speed connections between the servers and the storage, and its common place in physical server scenarios.
Since Windows Server 2012 Hyper-V, it has been possible to add Fibre Channel network adapters to virtual machines, providing the same capabilities and high performance as a physical server, allowing the guest operating system to be used in clustered environments, for example, this recipe will show how to create the Fibre Channel SANs and add them to a VM.
Before you create the Fibre Channel SANs, make sure that a Fibre Channel HBA is installed and that the HBA ports are enabled on the physical computer. Plus, it is important to ensure that the Fibre Channel HBA is running an up to date version of firmware and that the HBA itself provides support for Virtual Fibre Channel via N_Port ID Virtualization (NPIV).
In the following steps, you will see how to add and configure a new Fibre Channel SAN for a virtual machine.
- To create a new Fibre Channel SAN, open the Hyper-V Manager and click on Virtual SAN Manager in the pane on the right-hand side.
- In the Virtual SAN Manager window, click on New Fibre Channel SAN in the pane on the left-hand side and click Create.
- Specify the virtual SAN name and write the additional notes in the pane. Select the checkbox for the physical HBAs you want to link to your virtual SAN and click on OK to create your virtual SAN, as shown in the following screenshot:

Creating a New Virtual Fibre Channel SAN
- Open the settings of the virtual machine you want to add the Fibre Channel adapter to, click on Add Hardware in the left, select Fibre Channel Adapter, and then Add.
- In the new Fibre Channel adapter, select the virtual SAN from the drop-down list that you want to add to your VM.
- If you want to edit the port addresses, click on Edit Addresses, as shown in the following screenshot:
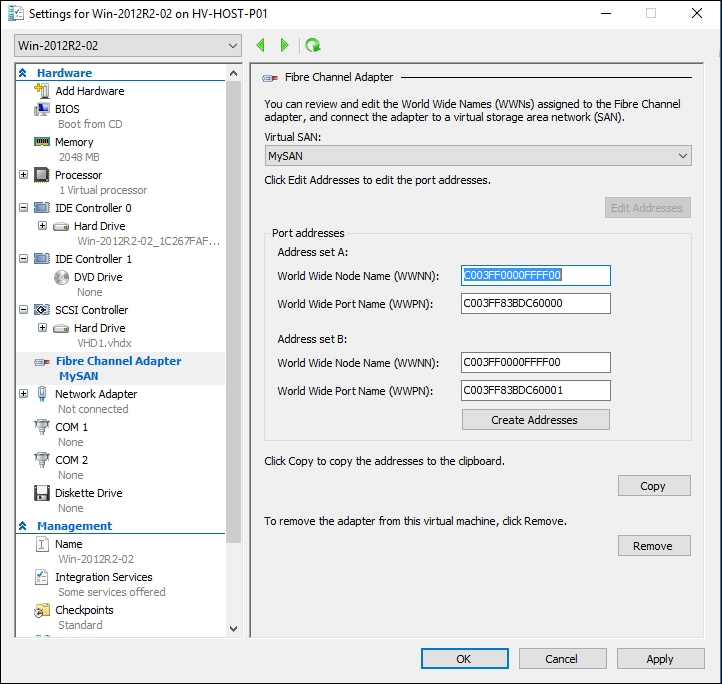
Adding a Fibre Channel Adapter
- Click on Copy if you want to copy the edited port addresses to the clipboard to make it easier if you need to use it for reference to change the storage configuration.
- Click on OK to confirm and create the new Fibre Channel adapter.
Since Windows Server 2012 Hyper-V, it's been easy to connect a virtual machine to storage that connects using a Fibre Channel fabric. All you need to do is create a virtual SAN. After that, you need to add a new Fibre Channel adapter to the VM and change the World Wide Names (WWNs) if necessary. You can add up to four Fibre Channel adapters per virtual machine. Every Fibre Channel adapter has a set WWN and they are used to identify storage targets and initiators. These addresses are generated automatically based on the configuration in the Global Fibre Channel Settings, which can be changed via the virtual storage manager. Also, you can change the auto-generated addresses by clicking on Edit Addresses.
Finally, you can open the virtual machine disk configuration and initiate the storage disks within the VM.