
Every day we can see companies implementing virtual servers to explore virtualization benefits such as cost reduction, flexibility, automation, and so on. That's why physical to virtual migration is still very common and it's important to make sure that the existing servers running under old and unnecessary hardware can be converted into virtual machines. In this recipe, you will see how to convert a physical server into a virtual machine using the tool Disk2vhd.
Disk2vhd is not a default Windows tool and it has to be downloaded from the following link: http://technet.microsoft.com/en-us/sysinternals/ee656415. The minimal operating system for client conversions is Windows Vista and for server versions is Windows Server 2008. Also, you need to pay attention to the implications caused by licensed software applications such as OEM operating systems.
In order to convert physical computers to virtual machines, carry out the following steps:
- Download and extract the Disk2vhd tool to a temporary folder on the computer you want to convert.
- Double-click on the
disk2vhd.exefile and click on Yes if you receive a message from User Account Control. Click on OK on the EULA page. - After opening Disk2vhd, select the path in which you want to save the virtual hard drive in VHD File name, as shown in the following screenshot:
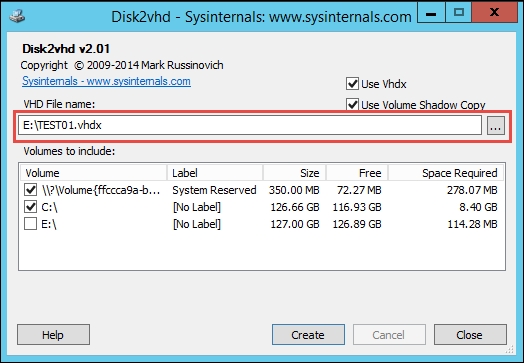
Disk2vhd
- Under Volumes to include, select the volumes you want to convert, optionally check Use
Vhdxto create a VHDX disk, and click on Create. - Disk2vhd will start to convert the online system, without the need for a shutdown or restart. The time to complete this is based on the disk performance and the volume size you selected.
- After the conversion, copy the output
vhdfile to the Hyper-V server you want to import the virtual machine to. - In Hyper-V, create a virtual machine with the configuration you want and, under Connect Virtual Hard Disk, select the VHD file created from the previous steps.
- After you've finished creating the virtual machine using the converted virtual hard disk, start the virtual machine through the Hyper-V management console.
- Start the converted virtual machine. After the virtual machine has booted, click on Action, then click the Ctrl + Alt + Delete option.
- After completing your logon, run Windows Update, to ensure that the virtual machine is up to date. See the Migrating virtual machines and updating their Integration Services recipe in this chapter.
Disk2vhd is a free Microsoft tool that creates a virtual hard disk file from a physical computer. After specifying the destination path and the volumes you want to convert, as shown in the third and the fourth step, the tool uses the Windows Volume Snapshot functionality to create a point-in-time snapshot of the volumes you included in the third step. One of the benefits of Disk2vhd is the ability to convert the physical computer while it's running.
The seventh step showed a virtual machine being created using the output file from the conversion. After that, it is also important to update the Hyper-V Integration Services. By completing the installation, you have finished the conversion, allowing you to start your physical computer decommission.
Disk2vhd is very handy for simple conversions, but if you want to convert lots of physical computers, the best solution is to use is Microsoft Virtual Machine Converter.
Disk2vhd also supports the command-line interface, allowing you to create scripts to automate both tasks and the conversion.
The command line usage is as follows:
disk2vhd <drive:> <vhdfile>
To convert the C partition into a VHD file in the D partition, the command is as follows:
Disk2vhd C: D:ConvertedVM.vhdx