
Hyper-V Replica introduces the ability to replicate a virtual machine asynchronously to a secondary Hyper-V host, such as a remote disaster recovery site server, using a single network connection.
In Windows Server 2012 R2, Microsoft introduced extended replication that makes it possible for multiple copies of data to be protected from different outage scenarios.
With Hyper-V Extend Replication feature, you can have multiple copies of your data to protect them from different outage scenarios. For example, you might choose to keep the second DR site in the same campus or in the same city while you want to keep the third copy of data across continents to give added protection for your workloads.
In Windows Server 2012, the replication for virtual machines was preset at 5minutes' replication frequency only. However, in Windows Server 2012 R2, Microsoft enhanced Hyper-V Replica and you can now asynchronously replicate your virtual machines at either 30 seconds, 5 minutes, or 15 minutes frequency which allowed the flexibility to set different replication frequencies to different virtual machines based on your Recovery Point Objective (RPO). Access to recovery points in Windows Server 2012 R2 was also changed from 15 hours to 24 hours.
Another enhancement in Hyper-V Replica in Windows Server 2012 R2, besides performance improvements and Linux guest support, was the ability to resize Hyper-V Replica virtual disks on running VMs. This means that the changes can be tracked and synchronized without taking the primary VM offline. However, if you add a virtual hard disk to a machine that was being replicated, then the replication would fail and the replica will go into a critical state.
In Windows Server 2016 Hyper-V, you can add/remove a new VHD(X) while the replication is going on. You can update the included disk set via Windows PowerShell only and the new disk will automatically get included or excluded to the secondary site without impacting the ongoing replication.
Hyper-V Replica is designed to give all sized companies a full-disaster recovery infrastructure solution for their virtualized environments with few requirements in terms of cost and components.
While allowing you to have replicas on the same network, the idea of Hyper-V Replica is to have a replica on a different network where you can run your VMs in case of a disaster, making it fully compliant with almost all the disaster recovery policies in place today.
In this recipe, you will see how to create a single Hyper-V Replica infrastructure with a primary replica server and extended replica server using an HTTP-based replication. This is not everything about Hyper-V Replica. The following recipes will show advanced configurations, such as certificate-based replication and integration between Hyper-V Replica and Failover Clustering.
Hyper-V Replica requires only two or three servers with the Hyper-V role installed and a network connection. You will need Windows Server 2016 that has the Hyper-V role enabled. However, when working with Hyper-V Replica you need to think about a few requirements:
- Hyper-V capable hardware.
- Storage, you need to make sure that you have enough storage, both on the primary and the replica server, including the extending replica site.
- Network connectivity.
- Firewall rules in place.
- A certificate, if encryption is required (see the certificate recipe in this chapter).
- Windows Server 2016 Full Server, Server Core or Nano Server Hyper-V.
- Hyper-V role enabled on the primary and replica host(s).
In the following tasks, you will see how to prepare and configure three servers to work with Hyper-V Replica and how to enable replication of a virtual machine. The tasks will illustrate setting up the primary server (HVHost01), the replica server (HVHost02), and the extended replica server (HVHost03). At the end of the tasks, you will see how to fail the virtual machine over to in the replica server in case of a disaster.
- Open the Hyper-V Manager on the server that will be used as replica server.
- In the Hyper-V Manager, click on Hyper-V Settings in the pane on the right-hand side.
- In the Hyper-V Settings window, select Replication Configuration.
- Click on Enable this computer as a Replica server.
- Under Authentication and ports, select Use Kerberos (HTTP) and specify the port to be used.
- Under Authorization and storage, select Allow replication from any authenticated server and specify the default location to store the replica files; or, you can select Allow replication from the specified servers. If you select the second option, specify the Primary Server, Storage Location, and Trust Group.
- In the following screenshot, the port 80 has been used to replicate with HTTP. The primary server
*.demo.localhas been added to allow replication from any server from thedemo.localdomain, and a trust group called HVServers has also been created. Click on OK when finished.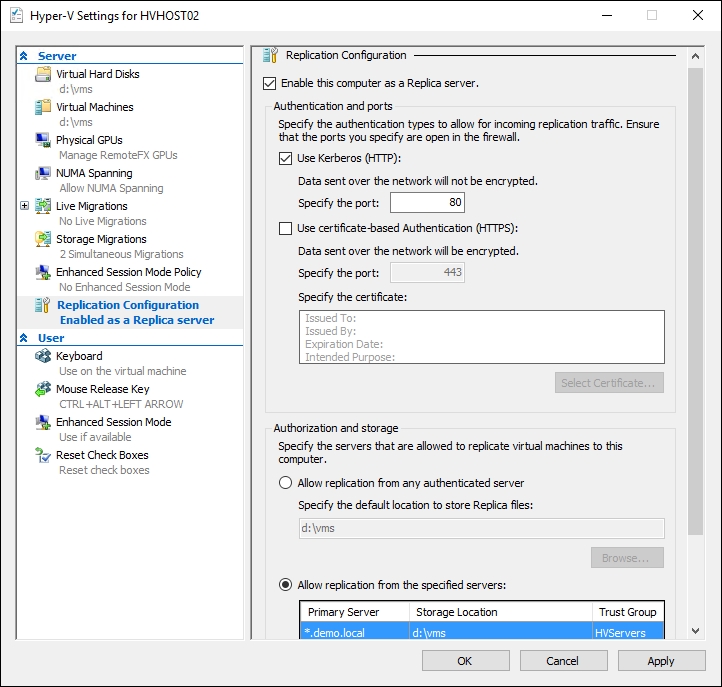
- Repeat steps 1 through 7 for the primary server and extended replica server as well.

- To enable a Windows Firewall exception for Hyper-V Replica, open PowerShell console from the Taskbar and type the following command on all the servers that are a part of the replication process:
Enable-Netfirewallrule -displayname "Hyper-V Replica HTTP Listener (TCP-In)" - Now, with the replica server up and running, right-click on the virtual machine that you want to replicate in the primary server, in the Hyper-V Manager, and then select Enable Replication.
- In the Enable Replication Wizard, click on Next.
- In the Specify Replica Server, type the Hyper-V Replica server name in Replica Server and click on Next.
- In Specify Connections Parameters, verify that Use Kerberos authentication (HTTP) is selected. In case of slow network connections, verify that the Compress the data that is transmitted over the network option is checked, as shown in the following screenshot and then click on Next.

- Under Choose Replication VHDs, deselect the virtual hard disk file that you don't want to replicate and click on Next.
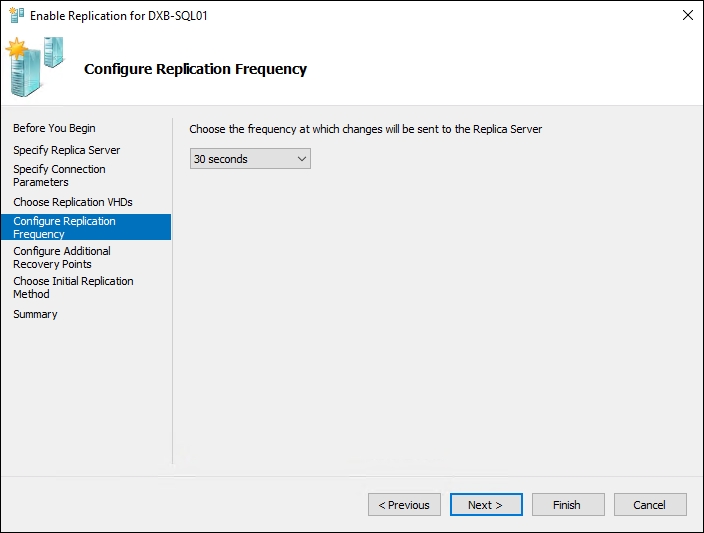
- In Configure Replication Frequency, choose the frequency at which changes will be sent to the Replica Server, as shown in the next screenshot.
- In Configure Additional Recovery Points, select Maintain only the latest recovery point to have only the last recovery point in the replica server, as shown in the following screenshot. You can select Create additional hourly recovery points if you want to allow the replica server to receive additional recovery points. If you select this option, specify the number of recovery points in Coverage provided by additional recovery points (in hours) for up to 24 hours; to ensure application consistency using the Volume Shadow Copy Service (VSS), select the Volume Shadow Copy Service (VSS) snapshot frequency (in hours): checkbox and specify the frequency at which the snapshots are taken for up to 12 hours.

Note
When using Hyper-V Replica, you can store the latest received replication data, but you can also store one or more additional recovery points up to a maximum of 24. By default, replication automatically ensures consistency in the state of the operating system and in many cases in the state of the application as well. But not every application will remain consistent. If those applications need to be consistent, such as SQL Server, make sure you use VSS on a set schedule for up to a maximum of 12 hours.
- To use the network connection to copy the VM files, select Send initial copy over the network under Initial Replication Method, in the Choose Initial Replication Method window. Select Send initial copy using external media to export the VM data and locally import it in the replica server. You can select the Use an existing virtual machine on the Replica server as the initial copy option if you have a restored copy of the virtual machine on the replica server.
- Select Start replication immediately under Schedule Initial Replication, as shown in the following screenshot, to send the virtual machine data after the wizard is completed. Alternatively, you can select Start replication on and set the time and date for scheduled replication to schedule the initial replication. Once done, click on Next.

- In the Completing the Enable Replication wizard, check the settings, as shown in the following screenshot, and click on Finish. The virtual machine data will be transferred to the replica server on the scheduled time and date.
- Now, with the protected VM replicating to the replica server, we can extend the replication to a third host. Right-click on the virtual machine that you want to replicate in the replica server; in the Hyper-V Manager, select Replication and select Extend Replication.
- In the Extend Replication Wizard, click on Next.
- In the Specify Replica Server, type the Hyper-V Replica server name in Replica Server and click on Next.
- In Specify Connections Parameters, verify that Use Kerberos authentication (HTTP) is selected. In case of slow network connections, verify that the Compress the data that is transmitted over the network option is checked, as shown in the following screenshot and click on Next.

- In Configure Replication Frequency, choose the frequency at which changes will be sent to the Replica Server, as shown in the next screenshot. The only options now are five minutes and 15 minutes. Also note that if your first replication is done every 15 minutes, your extended replication cannot be at five minutes.
- In Configure Additional Recovery Points, select Maintain only the latest recovery point to have, only, the last recovery point in the replica server, as shown in the next screenshot. You can select Create additional hourly recovery points if you want to allow the replica server to receive additional recovery points. If you select this option, specify the number of recovery points in Coverage provided by additional recovery points (in hours) for up to 24 hours.
- In the Choose Initial Replication Method window, under Initial Replication Method, select Send initial copy over the network, to use the network connection to copy the VM files. Select Send initial copy using external media to export the VM data and locally import it in the replica server. You may select the Use an existing virtual machine on the Replica server as the initial copy option if you have a restored copy of the virtual machine on the replica server.
- Select Start replication immediately under Schedule Initial Replication, as shown in the following screenshot, to send the virtual machine data after the wizard is completed. You may alternatively select Start replication on and set the time and date for scheduled replication to schedule the initial replication. Once done, click on Next.

- In the Completing the Extended Replication wizard, check the settings and click on Finish. The virtual machine data will be transferred to the extended replica server on the scheduled time and date.
- In case of a disaster or if the primary server is offline (unplanned failover), right-click on the virtual machine either in the replica server or in the extended replica server. If the replica server is also offline, select Replication and click on Failover.
- In the Failover window, select the recovery point to use in the drop-down list and click on FailOver, as shown in the following screenshot:

In Windows Server 2016 Hyper-V, Microsoft has enhanced Hyper-V Replica and added various new features. A brief overview of the enhancements is as follows:
For many applications, there is a need to add more disks to scale the application after every few months. In some scenarios, you want to exclude disks as well (for example page file, temp DB, and so on.) sometime after the replication is enabled and you do not want those disks to be replicated anymore.
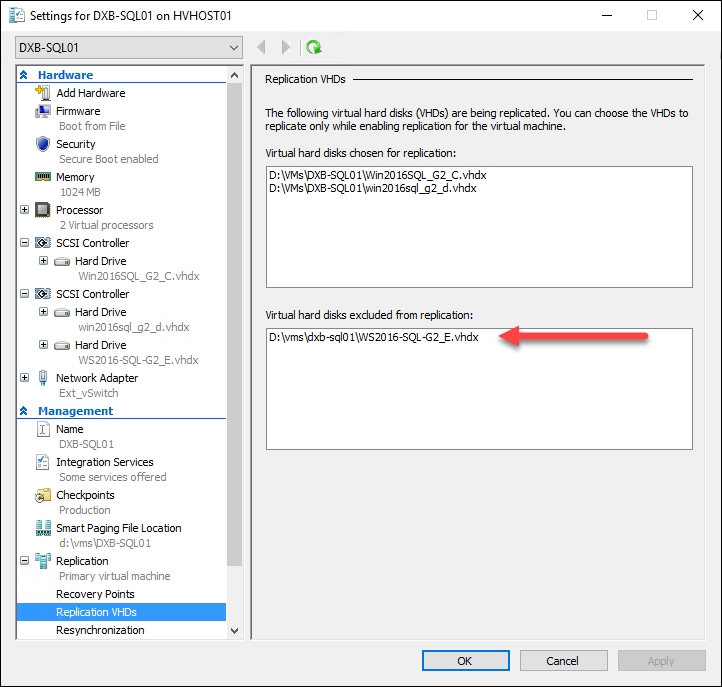
In the following example, we have added a new virtual hard disk to the VM that was being replicated.
At this point, the VM is still replicating without any error. However, the new disk is not included in the Replica Disks Set as shown in the following screenshot:
In order to add the disk, you need to open Windows PowerShell and run the following command on the primary Hyper-V server:
Please make sure to update $HVHost and $VM variables accordingly.
# Hot Add Disk Hyper-V Replica
$HVHost='HVHost01.demo.local'
$VM='DXB-SQL01'

Set-VMReplication-ComputerName$HVHost-ReplicatedDisks(Get-VMHardDiskDrive-ComputerName$HVHost-VMName$VM) -VMName$VM
This script will get all the virtual hard disks for the virtual machine and update the Replicated Disks Set to include the new disk as shown in the following screenshot:

As shown in the next screenshot, the checkpoint is marked as Disk Update Replica.
The VM will resynchronize automatically across the replica host, based on the replication frequency set(30secs, 5min or 15min), and it will resynchronize across the extended replica host as well, based on the replication frequency set (5min or 15min).

Now, if you want to remove a virtual-hard disk from the Replica Disks Set, you have to use the same command discussed earlier, but instead of passing all disks into ReplicatedDisks, you pass in just the disks you want to replicate and leave out the ones you want to remove.
First, you need to find the controller number and controller location before you remove the virtual hard disk by running the following command:
Get-VMReplication-ComputerName$HVHost-VMName$VM-PrimaryServerName$HVHost|select-ExpandPropertyReplicatedDisks
In this example, we need to remove the virtual hard disk that is connected on controller number 1 and controller location 1, as shown in the following screenshot:

To do so, open Windows PowerShell and run the following command on the primary server:
Set-VMReplication-ComputerName$HVHost-ReplicatedDisks(Get-VMHardDiskDrive-ComputerName$HVHost-VMName$VM|Where{$_.ControllerLocation -ne1}) -VMName$VM
This command will get all the disks that are not connected on controller location 1 and update the Replication Disks Set to include only the first two disks.
If you have virtual machines enabled for protection in Windows Server 2012 R2 Hyper-V cluster using Hyper-V replica, the virtual machines will continue to be protected post rolling cluster upgrade to Windows Server 2016 without any user intervention and the replication also remains intact.
In Windows Server 2016 Hyper-V, Hyper-V replica supports protection of multi VM applications with write order guarantee across VMs and Guest Clustered VMs, with shared VHDXs. You can create a 'Replication Group' with all the VMs that are part of the application and enable protection on the group.
The following are the key capabilities of the "Multi VM Guest cluster application protection" support.
- Replicate and failover the whole group, but not each VM
- Write order guarantee across VMs including Shared VHDX for guest cluster
- Recovery Point that is consistent across multiple virtual machines
- Crash consistency and Application consistency support
- Shared SLA for the group i.e. the complete application
Hyper-V replica supports protection of shielded VMs in Windows server 2016 Hyper-V and any security key changes will be replicated to the secondary site to enable seamless failover.
Hyper-V Replica needs two or three servers to replicate the virtual machine data. The principal server that runs the virtual machines is known as primary server. The secondary server, called replica server is used in case of a failover, and the third server called extended replica server is used in case of a failover as well. The first thing is to enable the replica server in the Hyper-V Settings. The settings are divided in two classes—authentication and authorization. In authentication, there are two options to transfer the virtual machine files over the network—HTTP, which does not encrypt the data and doesn't require any additional configuration and HTTPS, which encrypts the content using digital certificates for authentication. You must request and install an authentication certificate in order to use HTTPS. This option will be covered in the following recipe.
The replica server also needs to be configured to receive data from other servers. That's the role of the authorization part of the window. You can select the option to Allow replication from any authenticated server or specify a list of servers and the path to store the virtual machine files. In the server list, you can also use wildcards, such as *.demo.local to allow any server from the demo.local domain to replicate data to the server. You can use Trusted Groups to separate different areas or customers, creating a sort of tagging. This is an interesting option if you have different customers and want to make sure that their data will be in different storage locations.
Although the primary server does not need these replica server options, it would be a best practice to enable it in the primary servers so that you can use the Planned Failover feature and transfer the VM back to the primary server after an outage.
After this, a firewall exception must be configured to allow Windows Firewall to receive the HTTP (or HTTPS, if you are using the certificates) requests from the primary server. If you configured the primary server as a replica server, you need to run the PowerShell command.
That's basically all you need to set up the host computers with Hyper-V Replica. The next step is to enable the replication on the virtual machine that you want. This is done by selecting the option Enable Replication on the VM.
The first step of the wizard is to select the replica server. After that, you can select the protocol to send the VM files. You can use either HTTP or HTTPS. On the same screen, you can uncheck the option to compress the data over the network. As the primary and replica servers are intended to run on different sites, this option is checked by default. The next option is to select the VHD that needs to be replicated. In case the VM has more than one VHDX, you can select the one VHD that will be present in the replica server. For better performance and to reduce the amount of data that's being replicated, it's recommended to use a different VHDX for the page file within the VM and exclude it from being replicated.
In the Configure Additional Recovery Points window, you can choose to have only the last recovery point of a VM or additional recovery points. You can select the number of recovery points and the interval to create additional recovery points for up to 24 hours. If the applications need to be consistent, then make sure that you use VSS on a set schedule. The last step is to select the initial replication method and schedule for up to a maximum of 12. The default method is to send the initial copy over the network. In case of large virtual machines over slow networks, you can export the VM data to an external media and import in the replica server. In case the VM that you want to replicate already exists in the replica server, you can use it for the initial copy. Then, you can start the replication immediately or schedule the initial replication. It is important to say that the schedule is only applicable during the initial replication. The log replication occurs every 30 seconds, 5 minutes, and 15 minutes and cannot be changed.
When a virtual machine is enabled to replicate, the Hyper-V Replica modules start to monitor the changes in the VHDX and create a log to be replicated. This is done by the change tracking module in the Hyper-V Virtual Storage Stack. The replication starts using an asynchronous method, replaying the log files in reverse order.
Then, the unexpected happens, a disaster occurs. No need to panic (at least with your VMs). Failover isn't automatic. To do so, you must select the virtual machine and fail it over.
In summary, it is extremely important to monitor the health of the replicating VMs. Check the See also section for more details. Hyper-V has inbuilt retry semantics to address transient issues (such as network outage) but there are certain events that require your intervention (for example disk issues). Analyzing the replication health from time to time will help you identify and fix these issues.
When you start designing a Hyper-V Replica deployment, you want to look at the server, storage and network infrastructure which is required to successfully deploy Hyper-V Replica. For this reason, Microsoft released a capacity planning tool to help you fulfill the deployment. The Capacity Planner for Hyper-V Replica provides guidance for server, storage and network provisioning which allow you to successfully plan a Hyper-V Replica deployment. This tool be downloaded from Microsoft download center here: http://www.microsoft.com/download/details.aspx?id=39057
You might be wondering what happens when a virtual machine with a static IP address fails over onto another datacenter with a different subnet and network configuration. For example, on datacenter A, where the primary server sits, you have a VM with IP address, default gateway, DNS settings, and so on. On datacenter B, where the replica server is, there are different network configurations. On datacenter C, where the extended replica server is, there are different network configurations as well, causing problems on all the VMs that failover to access the network.
When the VM starts on the replica or extended replica server, it will lose the network settings. Even if you keep the same network configuration, it will not work because the VM is running on a different network.
Hyper-V Replica allows you to add failover network configuration settings, which can be used when the VM failover onto the replica server. It is also important to note that this requires a synthetic virtual network adapter on the VM and doesn't work with legacy virtual network adapters.
To configure these settings, open the virtual machine settings on the replica or extended replica server, expand the attached network adapter, and click on Failover TCP/IP, as shown in the next screenshot:

You can check the Use the following IPv4 address scheme for the virtual machine option and add the network configuration that you want your VM to use when it fails over the other network.
Please note the same rule for Linux guest OS applies as well. Starting with Windows Server 2012 R2 onwards, Microsoft are tightly integrated with non-Windows OS to provide file-system consistent snapshots and inject IP addresses as part of the failover workflow.
Hyper-V does not have any built in functionality to control bandwidth for replication traffic. Fortunately, starting in Windows Server 2012, Microsoft has added quality of service (QoS) functionality built into the operating system.
The New-NetQosPolicy cmdlet creates a new network QoS policy to throttle the traffic. You can use Windows PowerShell or of course via Group Policy as well.
You can get more information about the New-NetQosPolicy cmdlet here.
PowerShell is also present as a secondary configuration option for Hyper-V Replica and sometimes it makes things very handy, easy and faster, as shown in the next examples.
You can use the commands Set-VMReplicationServer and New-VMReplicationAuthorizationEntry to configure your server as a replica server. The next example shows a server being enabled using Kerberos as authentication type, with the storage location point to D:VMs and with the option to receive replication from wildcards *.demo.local to allow any server from the demo.local domain to replicate data to the server with a trusted group named HVServers.
Set-VMReplicationServer -ComputerName HVHost02 -ReplicationEnabled $true -AllowedAuthenticationType Kerberos -ReplicationAllowedFromAnyServer $false -Verbose
New-VMReplicationAuthorizationEntry -ComputerName HVHost02 -AllowedPrimaryServer *.demo.local -ReplicaStorageLocation D:VMs -TrustGroup HVServers -Verbose
To enable replication to a VM you can use the command Enable-VMReplication. The next example shows how to enable replication to all the virtual machines at the same time (5 minutes) using port 80 on server HVHost02 with network compression and auto resynchronization enabled.
Enable-VMReplication -VMName * -ReplicaServerName HVHost02 -ReplicaServerPort 80 -AuthenticationType Kerberos -CompressionEnabled 1 -ReplicationFrequencySec 300 -AutoResynchronizeEnabled 1
The Start-VMInitialReplication command starts the initial replication for your virtual machines. The next example shows how to start it on every virtual machine which is ready for initial replication.
Get-VM * -ComputerName HVHost01| ?{$_.ReplicationState -eq "ReadyForInitialReplication"} | Start-VMInitialReplication
To list all the Hyper-V Replica 19 commandlets on PowerShell, type the following command:
Get-Command -Module Hyper-V *Replica*
Monitoring Hyper-V replica environment is crucial, for this reason, we have created a nifty PowerShell tool which will notify the Hyper-V administrator when something goes wrong with VM replication.
This tool will check first the HTTP connectivity on the Primary, Replica and Extended Replica hosts. If all nodes are reachable, then it will look for primary VMs that are in Warning and Critical states. If any of the virtual machine is in Warning or Critical states, the replication will resume automatically without any intervention from the administrator to restore the replication and bringing the disks back into sync.
This tool can be downloaded for your convenience from TechNet gallery here. https://gallery.technet.microsoft.com/Advanced-Hyper-V-Replica-e1c6e491
- The Configuring Hyper-V Replica Broker for a Failover Cluster recipe in this chapter
- The Configuring Hyper-V Replica to use certificate-based authentication using an Enterprise CA recipe in this chapter
- The Installing and configuring the Windows Failover Clustering feature in Chapter 7, Configuring High Availability in Hyper-V
- The Tuning your Hyper-V server recipe in Chapter 10, Monitoring, Tuning, and Troubleshooting Hyper-V
- For the detailed report on how to interpret Hyper-V Replica health, please check the following links:
- For the different types of failover for a virtual machine, please check the following link: