
During Windows development, Microsoft tries to find every risk and vulnerability to security breaches that can cause problems or downtime, such as external access, buffer overflows, blue screens, and system crashes. Even after the final version release, it is common to find these errors and bad functions in Windows. That's why Microsoft has a service named Windows Update, which provides update packages for all these problems that may arise in Hyper-V or any other component of Windows. It is also important to note that Microsoft has security teams that try to find security breaches before someone with bad intentions does. To make sure your servers are safe against all these threats, you need to make sure that they are up-to-date, with all updates installed.
The Nano Server installation option is a good option to reduce the number of updates to be installed once only the core components are used, but this doesn't mean that you don't need to install updates for it. Some of these updates are designed to modify or improve the core components of Windows, whether Nano Server, Windows Server 2016 Server Core, or Windows Server 2016 Server with Desktop Experience.
Note
Configuring Windows Updates should not be confused with the servicing models Current Branch for Business (CBB) or Long Term Servicing Branch (LTSB), although there is a correlation.
For example, if you choose the Nano Server installation option, you will be opting for a more active servicing model and the operating system will be actively updated along the lines of Windows 10, with new features and functionality. This update experience is known as CBB and supports the fact that having the current features within the operating system are important to your business. If you're looking for a low-change servicing model, it is likely you will opt for LTSB.
The following recipe will show you how to configure Windows Update settings in Windows Server 2016 Server with Desktop experience, Windows Server 2016 Server Core, and Nano Server installations.
The Microsoft software update services can be accessed via the Internet or through an internal server named Windows Server Update Services (WSUS). Make sure you have your internal WSUS server up and running; you can also download the updates directly from the Internet onto your server or copy downloaded updates from another computer.
The following steps will show you how to configure Windows Update for both Windows Server 2016 Server with Desktop Experience, Server Core, and Nano Server installation options:
- To enable and configure Windows Update with Windows Server 2016 Server with Desktop Experience, launch the Start menu, and click Settings.
- Click on Update & Security, and then click on Advanced Options under Update Settings.
- In the ADVANCED OPTION window, under Choose how updates are installed, click on the drop-down list to see the available options, as shown in the following screenshot:

Windows Updates – Configuring how Updates are installed
- To use the recommended setting, ensure Automatic (recommended) is selected. However, given that this is a Windows Server 2016 Hyper-V server, with running VMs, you may feel it is more appropriate to select Notify to schedule restart. You can then further select an advanced upgrade option. Optionally, consider enabling Defer upgrades.
- To view the history of installed updates, click on View your update history.
- To verify and install available updates, return to the main Update & Security windows and click on Check for updates in the right-hand pane.
- To enable automatic update settings using the Server Core installation of Windows, log in to the server as an administrator and type
sconfigin the command prompt. - In the Server Configuration window, type
5to select the option Windows Update Settings, as shown in the following screenshot: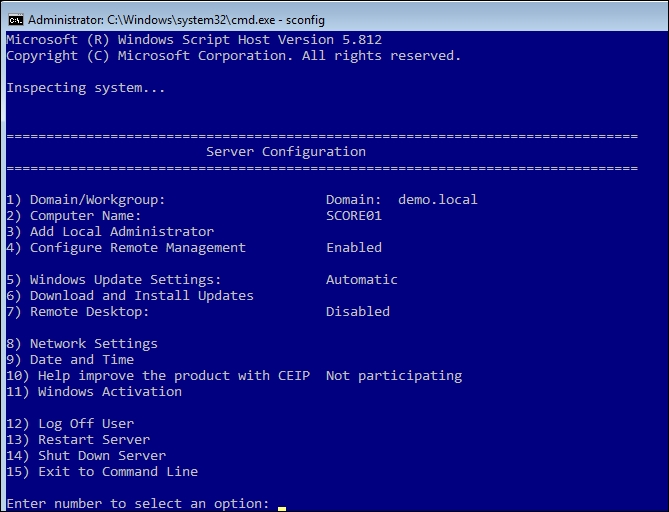
Windows Updates – Server Core Configuration
- Type
Afor automatic orMfor manual updates. If you choose manual updates, the system will never check for updates, and they will have to be installed manually, but if you choose automatic updates, the system will check for updates at 3:00 A.M. every day, by default; you can change this later by using Group Policy. Click on OK in the Update Settings pop-up. - To check, download, and install updates, type
6in the Server Configuration window to select Download and Install Updates. - Type
Ato search for all updates, or typeRfor recommended updates only. - After checking for updates, available updates will be listed. Type
Ato install all updates,Nto quit without installing, orSto select a single update. If you elect to update the system, click on Yes to restart the computer and apply the updates. - When finished, type
16to quit sconfig.Tip
You can alternatively use Group Policy to configure Windows Update. To use Local Group Policy Editor to set Windows Update configuration, type
gpedit.mscin the Start menu or at the command prompt. Nano Server will also apply Local Group Policies, but these policies are ingested via policy files (.polfiles) using the PowerShell commandletImport-GPRegistryPolicy. The policy file itself can be generated from either a GPO backup, or it can be generated withExport-GPRegistryPolicyPowerShell commandlet. - In the Local Group Policy Editor window, under Computer Configuration, navigate through Administrative Templates | Windows Components | Windows Update.
- On the right-hand panel, double-click on the Configure Automatic Updates policy
- In the Configure Automatic Updates window, select Enabled.
- Under Options in Configure Automatic Updating, select the option you want and enable Install during automatic maintenance.
- In Scheduled install day, select the option for the day(s) on which you want to install the updates.
- In Scheduled install time, select the time at which you want to install the updates. When finished, your configuration screen should look as shown in the following screenshot:
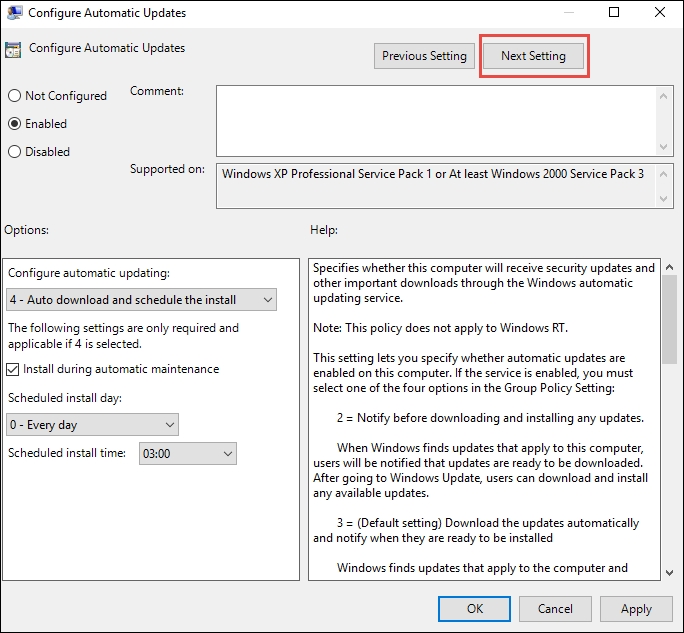
Windows Updates – Server Core Configuring Automatic Updates
- If you have a WSUS server, click on Next Setting. Otherwise, click on OK.
- To specify a WSUS server, select Enabled under Specify intranet Microsoft update service location.
- Under Options, specify your WSUS server URL in both options.
- In the following screenshot, a server named
WSUS01has been used. Click on OK when finished:
Windows Updates – Server Core Configuring WSUS
- To enable Windows Updates using the Nano Server installation option of Windows Server 2016, establish a remote PowerShell session to your Nano Server virtual machine by opening an elevated PowerShell command prompt, and use the following PowerShell command:
Enter-PSSession -VMName <VMName> - Enter your credentials for the virtual machine and run the following commands to receive a list of available updates:
$session = New-CimInstance –Namespace root/Microsoft/Windows/WindowsUpdate -ClassName MSFT_WUOperationsSession
Invoke-CimMethod -InputObject $session -MethodName         ScanForUpdates -Arguments @{SearchCriteria="IsInstalled=0";OnlineScan=$true}
- Run the following commands to detect, download, and install all applicable updates:
$session = New-CimInstance -Namespace root/Microsoft/Windows/WindowsUpdate -ClassName MSFT_WUOperationsSession
$scanResults = Invoke-CimMethod -InputObject $session -MethodName ApplyApplicableUpdates
- Run the following command to restart the computer:
Restart-Computer - Re-establish a remote PowerShell session to your Nano Server virtual machine by opening an elevated PowerShell command prompt, and use the following PowerShell command:
Enter-PSSession -VMName <VMName>. - Run the following command to verify what patches are installed:
$session = New-CimInstance -Namespace root/Microsoft/Windows/WindowsUpdate -ClassName MSFT_WUOperationsSession
$scanResults = Invoke-CimMethod -InputObject $session -MethodName ScanForUpdates -Arguments @{SearchCriteria="IsInstalled=1";OnlineScan=$true}
$scanResults | select -expand updates
The Windows Update service can be configured using the Settings, Update & Security option for Windows Server 2016 Server with the Desktop Experience, via CIM for Nano Server, or via the command line and sconfig for Server Core scenarios.
For a single server installation or standalone servers, the Settings, Update & Security option is the most effective, although this assumes Windows Server 2016 Server with Desktop Experience is being used. For Nano Server, you simply need to establish a remote PowerShell session, and with sconfig, you don't even need to know how to use the configuration commands to set up Windows Updates on Server Core.
For domain-joined servers or standalone servers that require WSUS configuration, you have to use group policies, with the exception here being Nano Server, as Nano Server does not process group policies "only local policies". For Windows Server 2016 with Desktop Experience and for Server Core scenarios, you saw how to use the group policy option. However, using Active Directory, you can also apply policies using Group Policy Objects (GPOs), which can be linked to an organizational unit with multiple servers.
It is important to remember that Windows updates have to be applied to every computer; it doesn't matter whether they are physical or virtual, clients or servers. Make sure that the Windows Update policy for the Hyper-V servers is aligned to your business requirements, as some updates require a reboot. Also, for production environments, the use of WSUS is strongly recommended.
With this configuration on every computer, you will make sure your servers are protected with the latest updates.