
Cross Version Shared Nothing Live Migration provides you with the capability to migrate your VMs to a Windows Server 2016 Hyper-V host, via nothing more than a shared network, without the VMs experiencing any downtime. The nice thing about Cross Version Shared Nothing Live Migration, is that it provides a mechanism to non-disruptively upgrade your Hyper-V host.
Note
You should know that under certain circumstances, that this is a one-way migration path, when migrating directly from a Windows 2012 host to Windows 2016 or when the VM configuration version has been upgraded from version 5.0 to version 7.0, using Update-VMVersion as a post Windows 2016 migration activity. Cross Version Shared Nothing Live Migration only allows for live migration in the opposite direction if the Hyper-V host is running Windows 2012 R2.
Given the increased cadence around the Windows operating system, Microsoft introduced features like Cross Version Shared Nothing Live Migration in Windows 2012 R2 to provide an easy way to upgrade to future versions. This feature is also critically important for cloud service providers who need to keep their customers' workloads up and running, while still maintaining the underlying fabric.
This recipe will walk through all the details and steps to show you how to migrate your VMs from either a Windows 2012 or Windows 2012 R2 host to Windows 2016.
Cross Version Shared Nothing Live Migration is a way to move your VMs from a Hyper-V host that is running Windows Server 2012 R2 to a Hyper-V host that is running Windows Server 2016. By leveraging Cross Version Shared Nothing Live Migration, you can take a rolling upgrade approach to your domain-joined, standalone Hyper-V hosts. Your upgrade sequence would take the following approach:
- Live migrate all your VMs off host A to host B
- Upgrade or reinstall host A to Windows Server 2016
- Live Migrate all your VMs back to host A
- Upgrade or reinstall host B to Windows Server 2016
- Rebalance your VMs between hosts A and B
Make sure that you have enough disk space on the destination server to move your VMs. Also, make sure that the network configuration for, and the communication between the host servers is working properly.
The following steps will demonstrate how to migrate a VM using Cross Version Shared Nothing Live Migration between Windows 2012 R2 and Windows 2016. We will not actually be carrying out a full rolling upgrade:
- To enable Live Migrations on the host server, open Hyper-V Manager and click on Hyper-V Settings on the right column.
- In Hyper-V Settings, click on Live Migrations and check the Enable incoming and outgoing live migrations option.
- For the Simultaneous live migrations option, specify the number of concurrent live migrations that will be allowed. The default value is
2. - In Incoming live migrations, specify a particular network for live migration by selecting Use these IP addresses for live migration or select Use any available network for live migration to use any local network adapter available to move the VMs. The following screenshot shows an example of the existing options described in the previous steps:
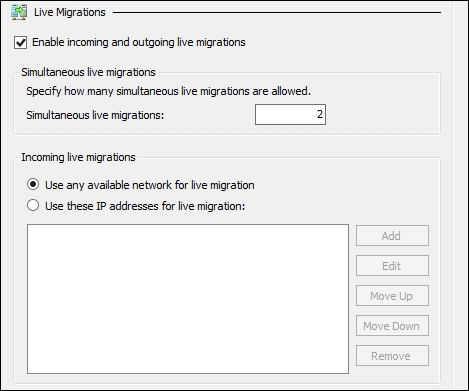
Live migration options
- When finished, click Advanced features under Live migration, on the left column. In Authentication protocol, select how you would like to authenticate live migrations. In the Performance options, select your performance configurations options and click OK. The following screenshot shows an example of the options described in the previous steps:

Live migration advanced options
- From the Start screen, select Server Manager from the Tools menu in Server manager, select Hyper-V Manager.
- Select the virtual machine you want to migrate, right-click on it, and select Move, as you can see in the following screenshot:
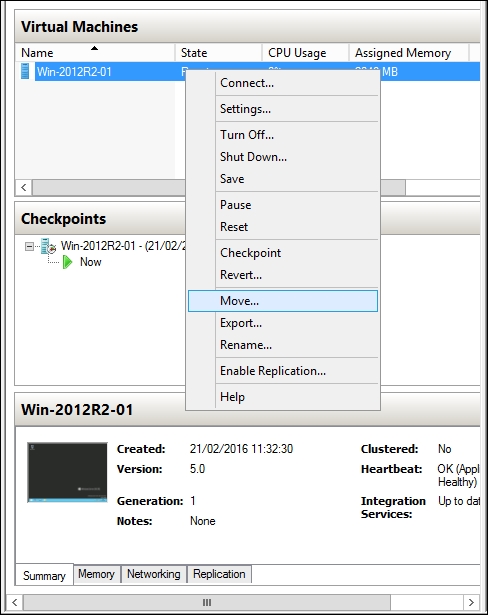
Live move
- In the Before You Begin window, click on Next.
- In the Choose Move Type window, select Move the virtual machine, as shown in the following screenshot, and click Next.
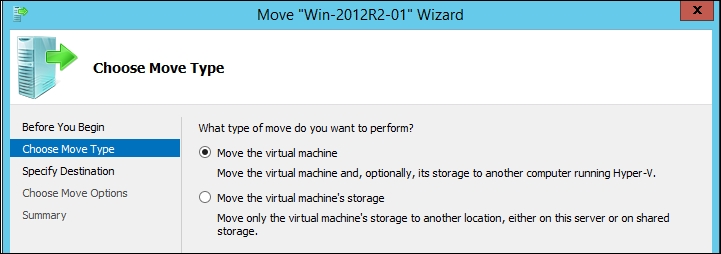
Live move type
- In the Specify Destination window, type the destination server where you want to move your VM to and click on Next.
- In the Choose Move Options window, select Move the virtual machine's data to a single location to move all configuration files and virtual disks to the same location. Select Move the virtual machine's data by selecting where to move the items to select the location of each item to be moved, or select Move only the virtual machine to move the VM only and keep the VHD files on the same location and click on Next, as shown in the following screenshot:

Live move options
- In the Choose a new location for virtual machine window, select the destination folder that the VM will be moved to and click on Next.
- In the Summary page, verify the selected options and click on Finish to start the moving process. Wait until completion and check the virtual machine on the destination host.
Cross Version Shared Nothing Live Migration has an easy and intuitive wizard to move your VMs across your host servers. Different to Live exports, by default, live migrations are disabled on Hyper-V. To enable live migrations, you must specify some options such as simultaneous live migration, incoming live migration, and authentication protocol.
- Simultaneous live migrations: This is the first configuration option that provides a field to specify the number of simultaneous live migrations that Hyper-V will support. In this option, the only limit is the hardware and the network connection between the servers.
- Incoming live migrations: This second option allows you to configure the network that will be used for live migrations. For better performance and resilience, it is recommended to use a specific network for live migration, but if you have only one network adapter on the host computer, or it doesn't have a particular adapter for live migration, you can use any available network.
- Authentication protocol: This is the last option that lets you choose two options to specify the way Hyper-V will authenticate to start the live migrations. By selecting Credential Security Support Provider (CredSSP) you can live migrate virtual machines only if you are logged on to the source computer to start it, so that CredSSP can be used to authenticate the migration. This option does not require any prerequisites, but you will not be allowed to perform a live migration using other remote management tools such as Hyper-V Manager from another server or PowerShell sessions. The migration will be initiated only when you are logged on the source server.
If you also want to start live migrations using these remote management tools, you can select Kerberos for authentication. When starting a live migration, either locally on the server or remotely, a constrained delegation will be used to authenticate and start the migration. This is the best option due to the flexibility to start the migration from remote tools. It requires pre-configuration on Active Directory. Kerberos authentication will be demonstrated in the There's more section.
After enabling live migrations and setting up these three options, you are ready to move your VMs.
The wizard is launched with a right-click on the VM. Cross Version Shared Nothing Live Migration uses a simple wizard, which improves the user experience. The first window, Choose Move Type, has the Shared Nothing Live Migration option (Move the virtual Machine).
After selecting to move the VM and specifying the destination server where the VM will be moved, you can select one of the three move options to move the VMs to a single location, select different locations per VM item, or move only the VM. The option to move only the VM works when you are storing the VM in a shared folder on the network or any other type of shared storage.
When the migration starts, Hyper-V authenticates the connection on the destination host and starts the process by migrating the VM disks. After moving all the disk data, it migrates the virtual machine memory.
When finished, your VM will be up and running on the destination host. The entire migration process happens with no downtime.
The PowerShell cmdlet to move a VM can be considered one of the easiest options on Hyper-V because the entire process happens with just one line of commands. The whole configuration and migration process described in this recipe can be automated using PowerShell.
To enable live migrations of virtual machines, type the following at the command line:
Enable-VMMigration | Set-VMMigrationNetwork Any | Set-VMHost –
VirtualMachineMigrationAuthenticationType CredSSP
You can also change the migration network from any to a specific network by adding the IP address or the authentication type by changing CredSSP to Kerberos.
After the live migration is enabled, type the following cmdlet to move VMs. In this example, a VM called Win-2012R2-02 will be moved to the server HV-Host-P01 and the storage will be located at D:VMs. For more information about Move-VM, type Help Move-VM:
Move-VM Win-2012R2-02 HV-Host-P01 –IncludeStorage –DestinationStoragePath D:VMs
Constrained delegation allows live migrations to be started using any remote management tool and might help in providing more flexibility to move your VMs.
To enable it, open Active Directory Users and Computers from one of the Domain Controllers where the host servers sit, right-click on the host computer account, and click on Properties. In the Properties window, click on the Delegation tab, select Trust this computer for delegation to the specified services only and select Use Kerberos, as shown in the next screenshot:

Constrained delegation
Click on Add and then Users or Computers. In the Select Users or Computers box, type the destination host server name and click OK.
In the Add Services dialog box, select cifs and Microsoft Virtual System Migration Service and click on OK. The two services will be listed in the service type, as shown in the next screenshot:

Figure 14: Advanced constrained delegation
Click on OK to close the computer properties window and repeat the same process on the destination server computer account.
After that, you can change the live migration authentication type to use Kerberos.
- The Migrating virtual machines storage using Storage Migration recipe in this chapter
- The Upgrading the VM configuration version recipe in this chapter
- The Using Live Migration in a cluster environment recipe in Chapter 7, Configuring High Availability in Hyper-V