
Sometimes, it is hard to know how much memory and CPU a VM needs. Even when capacity planning is performed, the VM will never use the full memory and CPU specification, resulting in poor memory utilization and a loss of CPU resources.
Windows Server 2008 R2 SP1 introduced a new feature, called Dynamic Memory (DM), which allows the memory on the host server to be shared with the VMs using a method called Ballooning. Ballooning ensures that the VMs use only the memory that they need, and releases it back to the host if another VM requires more memory. This allows the memory in the parent partition to be reallocated automatically through the VMs, increasing or decreasing it based on the current workload.
Let's use an example of a VM that was installed and configured to use 16 GB of memory. That is the value that you got from the planning phase. The problem is that the VM will only use 16 GB when a huge workload is created. This stipulation represents less than 10 percent of the server lifetime. What if you could use the unused memory from its 16 GB, let's say, 4 GB, for another VM that requires more memory? In the case of an unexpected workload on that particular VM, Hyper-V could automatically reallocate the memory back to that VM. Likewise, it could borrow more memory from other unused VMs as well.
As discussed previously, Microsoft introduced Dynamic Memory in Windows Server 2008 R2 SP1. However, Dynamic Memory is not applicable for all workloads, such as SQL or Exchange Server. In Windows Server 2016, Microsoft introduced a new feature called Runtime Memory Resize, which allows you to hot add and remove memory for static (running) VMs.
In Windows Server 2012, Microsoft introduced support for projecting a virtual NUMA topology into Hyper-V VMs by leveraging the existing physical NUMA nodes on the system. This capability can help improve the performance of workloads running on VMs that are configured with large amounts of memory.
For more information about Hyper-V Virtual NUMA, please refer to the following article:
https://technet.microsoft.com/en-us/library/dn282282%28v=ws.11%29.aspx
In this recipe, you will see all the settings and necessary configurations to use Dynamic Memory, Runtime Memory Resize, and virtual NUMA among your VMs.
To make sure that the Dynamic Memory (DM) will work on your VMs, check if the latest version of integration services has been installed. To use DM, the VM needs to be installed with any of the following OSes:
- Windows Vista Enterprise and Ultimate editions installed with SP1
- Windows 7 Enterprise and Ultimate editions
- Windows 8
- Windows 8.1
- Windows 10
- Windows Server 2008 with SP2 and 2008 R2 Enterprise or Datacenter with SP1
- Windows Server 2012
- Windows Server 2012 R2
- Windows Server 2016
As for Runtime Memory Resize, the host must be running Windows Server 2016 Hyper-V, and the VM needs to be installed with any of the following OSes:
- Windows 10
- Windows Server 2016
The following steps will demonstrate how to enable and monitor Dynamic Memory for your VMs:
- Open Hyper-V Manager and select the VM you want to configure the Dynamic Memory for.
- Right-click on the VM and click on Settings.
- In the Virtual Machine Settings window, click on Memory in the pane on the left-hand side.
- In the RAM field, specify the capacity of the memory to be used when the VM is started.
- To enable Dynamic Memory, select the checkbox Enable Dynamic Memory.
- Specify the limits for maximum and minimum memory to be used by the VM under Minimum RAM and Maximum RAM.
- Specify the percentage value of the memory that will be reserved for the buffer in Memory buffer.
- In Memory weight, you can change the way that Hyper-V prioritizes the availability of memory for this VM compared with the other local VMs. The following screenshot shows all the DM settings, which were explained previously:

- Click on OK and close the VM Settings window.
- To monitor the Dynamic Memory settings being used by your started VMs, select the VM and click on the Memory tab at the bottom of the Hyper-V Manager console, as shown in the following screenshot:

Always monitor your guest memory usage when using Dynamic Memory; you can automate this task with Windows PowerShell, which will help you to keep an eye on the memory demand and assignment values for your VMs.
Open the Windows PowerShell console and run the following cmdlet:
Get-VM | where DynamicMemoryEnabled -eq $true | select Name, MemoryAssigned, MemoryMinimum, MemoryMaximum, MemoryDemand | ConvertTo-Csv -NoTypeInformation | Add-Content -Path C:PerfLogsDynamicMemoryReport.csv
The following steps will demonstrate how to hot add and remove memory for running VMs:
- Open Hyper-V Manager and select the VM you want to configure the Dynamic Memory for.
- Right-click on the VM and click on Settings.
- In the Virtual Machine Settings window, click on Memory in the pane on the left-hand side.
- In the RAM field, specify the capacity of the memory to be used when the VM is started.
- Ensure that the checkbox for Enable Dynamic Memory is not selected.
- The following screenshot shows all the static memory settings, which were explained previously:
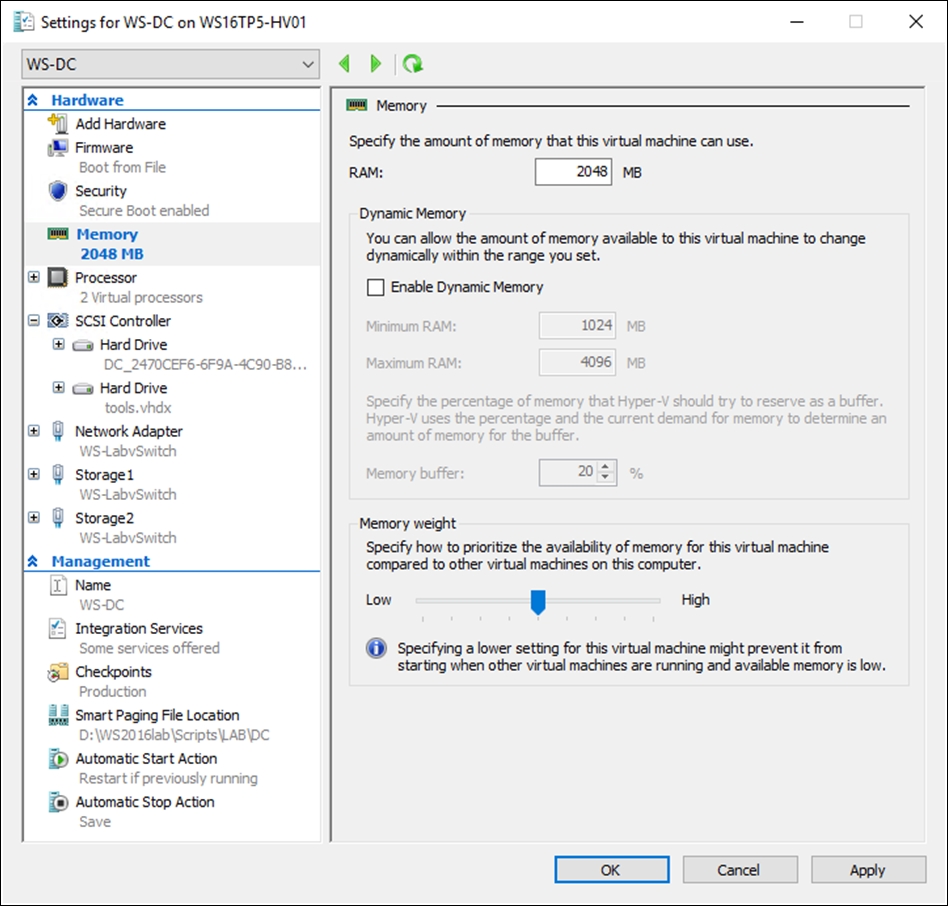
- Click on OK and close the VM Settings window.
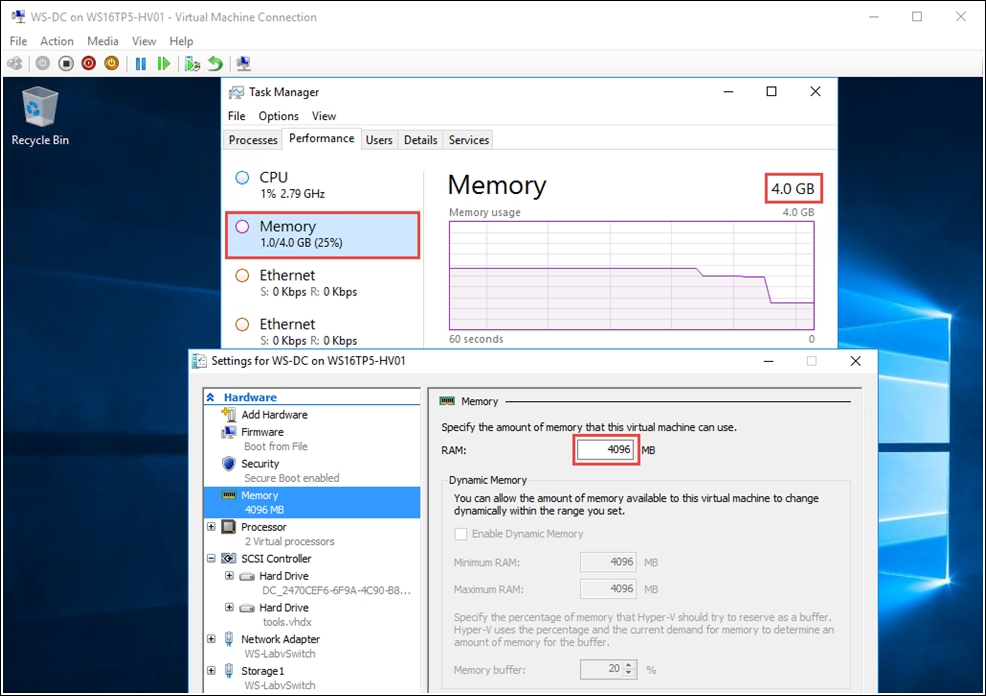
- Start and log into your VM; as shown in the following screenshot, the VM is running and has 2 GB of static memory assigned:

- Right-click on the VM and click on Settings.
- In the Virtual Machine Settings window, click on Memory in the pane on the left-hand side.
- In the RAM field, increase or decrease the capacity of the memory to be added or removed.
- Click on Apply.
- The following screenshot shows we have added 2 GB RAM. The total amount of memory is now 4 GB:
- You can decrease the amount of memory using the same method.
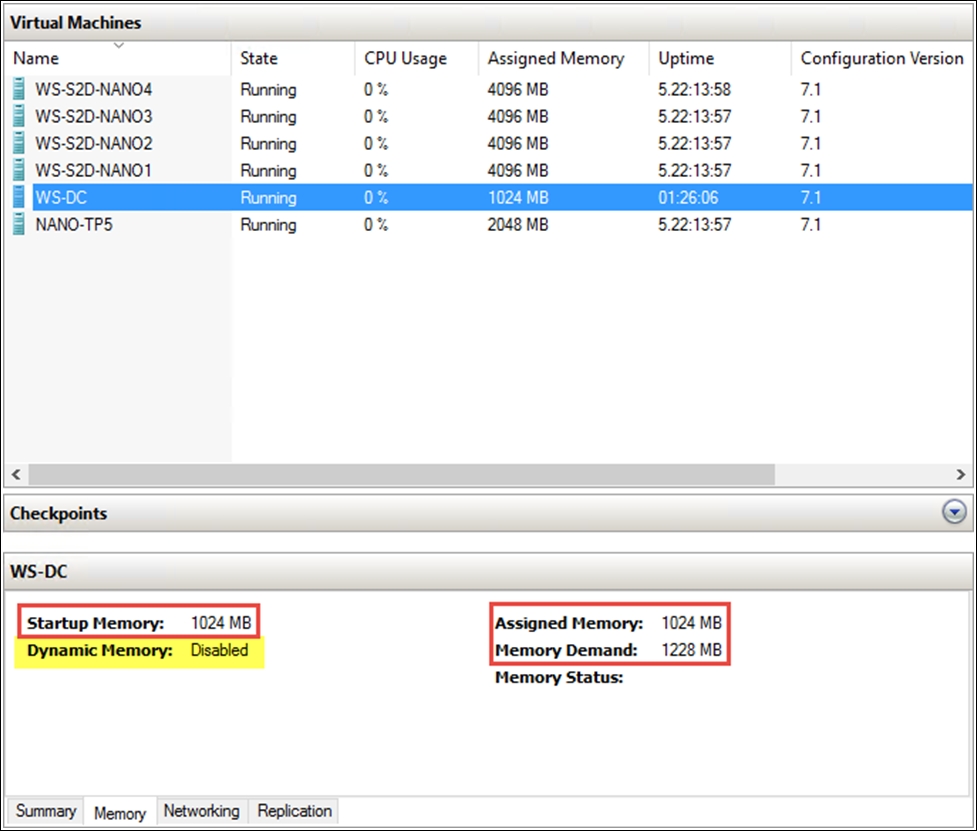
- On top of this, to make sure you're not adding memory unnecessarily, you can now see the memory demand in the GUI, both in Hyper-V Manager and in the Failover Cluster Manager GUI. To monitor the static memory settings and the memory demand being used by your VMs, select the VM and click on the Memory tab at the bottom of the Hyper-V Manager console, as shown in the following screenshot:
The following information will demonstrate how to configure Virtual NUMA and NUMA Spanning for VMs.
The following screenshot shows the NUMA configuration options available for the processor configuration of a VM. These options are hidden away for good reason. In nearly all scenarios, you should not mess with these settings. Hyper-V will do the best job of setting the right NUMA topology based on the physical Hyper-V host. However, there are a few scenarios where you may need to change these values.
These settings are related to the number of processors (cores), memory, and the number of nodes on a single CPU socket:

Let's consider the following two scenarios.
Scenario 1: You have two hosts with different hardware NUMA topologies and where VMs may be live-migrated between servers. In this case, the NUMA configuration should be changed to match the smallest NUMA topology among all the hosts in your environment to which the VM may be migrated. Additionally, in most clusters, the hosts all have the same NUMA topology, this also means that keeping your cluster nodes specifications the same helps a lot here.
Let's suppose we have two Hyper-V hosts with the following specs:
If a VM was created on Host 1, that is the NUMA topology that would be configured for that VM. If the same VM was then moved to Host 2, the VM would have incorrect NUMA configuration and will not have optimal resource assignments, because what it believes is a single NUMA node would actually span multiple NUMA boundaries. It would therefore make sense to manually set the NUMA topology of the VM to match that of Host 2.
In the preceding screenshot, note that there is the Use Hardware Topology button. If you change the settings and realize you don't know what the values were originally, you can click this button and the values will be reset back to the Hyper-V recommended values for that particular host. For most scenarios, this is best done using the Use Hardware Topology button. Microsoft made it easy for you to revert to the host's physical NUMA topology. Also, on Hyper-V clusters with lots of live migration, you need to make sure to keep the NUMA layout on the nodes the same, for consistent performance.
Scenario 2: Let's suppose you have an application that requires a minimum of 2 CPUs in order to run, which is a very rare case, that application does a check for CPU count, which actually only counts as "sockets"; you have been asked to move that application to a VM.
If this is the case and the app requires more than one socket, then it's possible to expose two or more CPUs (vNUMA) to a VM if the following conditions are true:
- Dynamic Memory is disabled, because Dynamic Memory and virtual NUMA are mutually exclusive; you always have one vNUMA with dynamic memory.
- Configure more memory than a single NUMA node can provide.
Or
- Add more vCPUs than a single NUMA node can provide.
In this scenario, the VM gets configured with two virtual NUMA nodes. It also gets two sockets, as shown in the following screenshot:

How does that compute? Well, it's the virtualization of the underlying physical CPUs. The vCPUs are just scheduled time slices of compute time on the physical cores. Please remember that vCPU and vNUMA are logical concepts, with time slices of interrupts on a processor, and the Hypervisor always does its best to use the best possible NUMA layout. In nearly all scenarios, you do not need to have two sockets in the guest, because software should not worry about the number of physical CPUs. That's about logical cores, and one socket with more logical cores can do parallelism (multithreading) perfectly.
In general, virtual NUMA works well and delivers the best possible results for all use cases, provided you choose the best option for your needs.
As discussed earlier in this section, the best performance for a multi-NUMA nodes system comes from processes running on processor cores using local memory within the NUMA node rather than having to span NUMA nodes, which means the memory required is connected to another processor; this is known as remote memory, and has a higher latency than local memory.
There are two types of NUMA spanning configurations: configuration at a host level and configuration at a VM level.
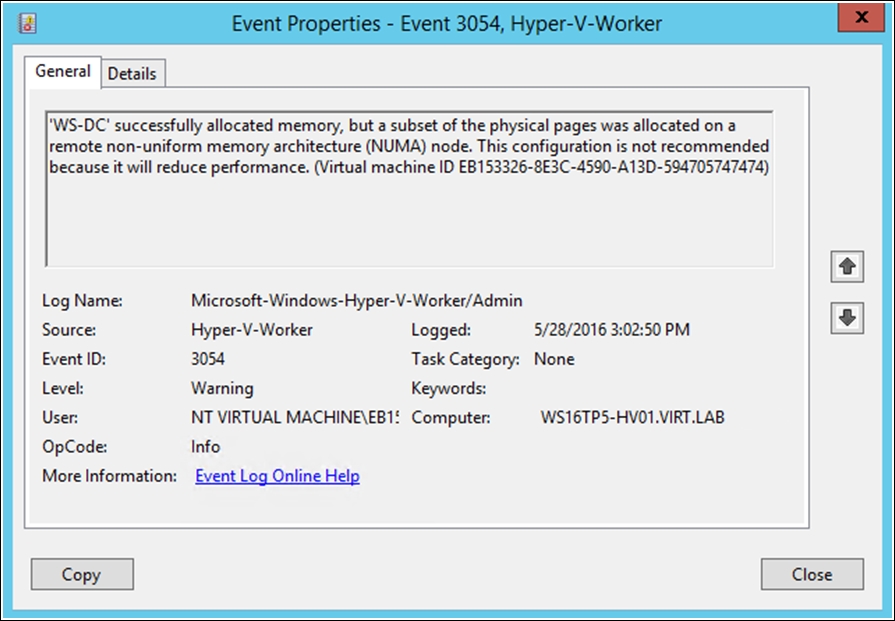
Host Settings: By default, starting with Windows Server 2012 onwards, Hyper-V enables NUMA spanning, which enables a VM to be allocated memory across the boundary of the NUMA node of the processor cores being used. This not only allows more VMs to run, it also might lead to an overall performance hit, because using memory outside of the same NUMA node of the processor increases latency.
The Hyper-V-Worker event log reflects this and you'll find a warning event ID 3054:
If you disable NUMA spanning under Hyper-V Settings, NUMA Spanning, deselect Allow virtual machines to span physical NUMA nodes, as shown in the following screenshot. Then, a VM can't be allocated memory from remote NUMA nodes and would be limited to using memory on its local NUMA node only:

Disabling or enabling NUMA spanning requires the Hyper-V Virtual Machine Management service (vmms.exe) to be restarted:

NUMA spanning allows for a less optimized layout, if resources are not available within the NUMA nodes, at the cost of performance, but it enhances density and flexibility. When you disable NUMA spanning, you demand consistent best performance at the cost of resources, as it will not span NUMA nodes.
Mr. Ben Armstrong (Principal Program Manager lead on the Hyper-V team), provides us with a more detailed and accurate statement about NUMA spanning:
"When NUMA spanning is disabled, each virtual NUMA node of a virtual machine will be restricted to a single physical NUMA node. So, for a virtual machine with virtual NUMA disabled (or with virtual NUMA node enabled – but a single virtual NUMA node configured) it will be constrained to a single physical NUMA node. For a virtual machine with virtual NUMA enabled, and multiple virtual NUMA nodes, each virtual NUMA node may be placed on separate physical NUMA nodes – as long as each virtual NUMA node is fully contained in any given physical NUMA node." | ||
| --Mr. Ben Armstrong | ||
By disabling NUMA spanning at the host level, you disable it for all VMs on the host and you ensure that the VMs' virtual NUMA nodes are served from one NUMA node, giving the best performance.
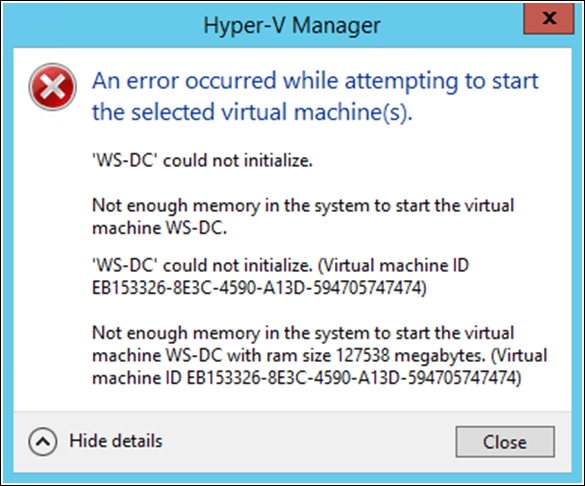
If a VM is configured with Dynamic Memory, there is a potential that this VM may not be able to start if the required amount of memory for the VM is not available on a single NUMA node. It also means you may not be able to live-migrate VMs to other nodes if the target node cannot satisfy the NUMA requirements.
The following screenshot reflects this, thus, the VM will not start:
However, if a VM is configured with static memory, the VM will fail to start if any single virtual NUMA node cannot be placed entirely within any single physical NUMA node.
The Get-VMHostNumaNode PowerShell cmdlet gets the NUMA topology of a Hyper-V host and returns an object for each of the host's NUMA nodes. If the results return more than one NUMA node, as shown in the following screenshot, your host is NUMA-based. However, if the results return one node, your host is not NUMA-based:

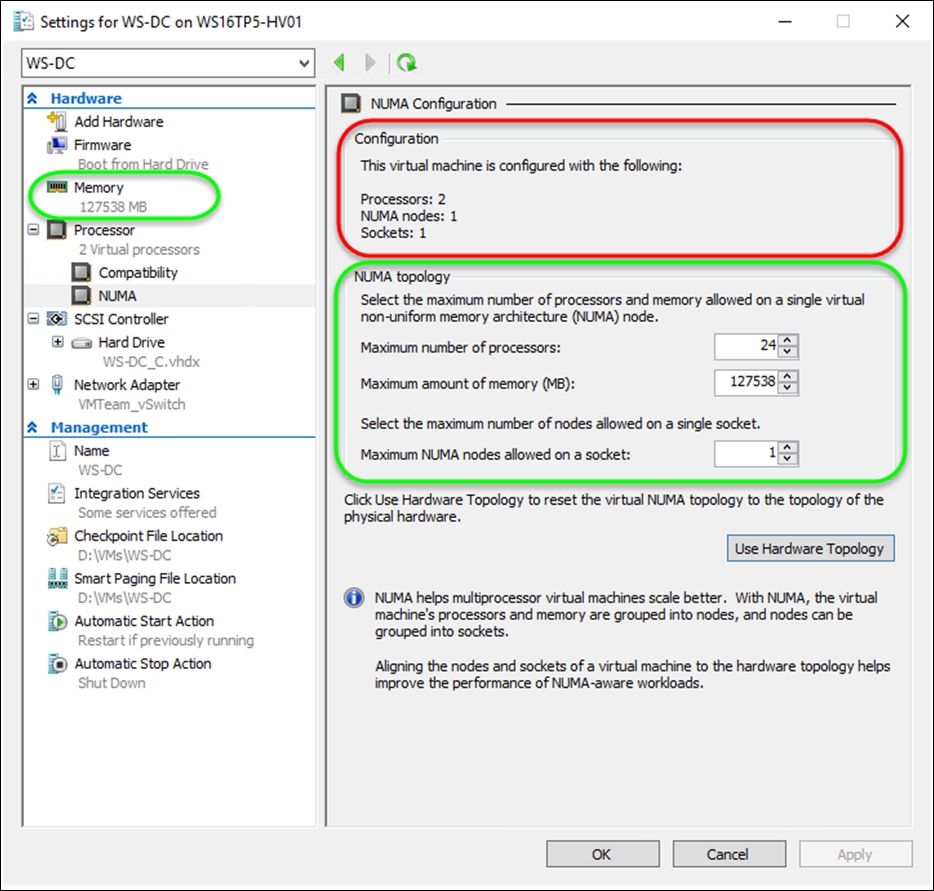
As shown in the following screenshot, the virtual NUMA topology can be configured for each individual VM as well. The maximum amount of memory and the maximum number of virtual processors in each virtual NUMA node can be configured, in addition to the maximum number of virtual NUMA nodes presented in each virtualized socket. By default, these values are set to align with the host's physical NUMA topology, and it's strongly recommended not to change these settings:
As described in Scenario 1 above, if a VM will be imported or migrated between multiple hosts with different physical NUMA topologies, and NUMA spanning has been disabled, it's required to configure the virtual NUMA setting for each VM to the lowest default value that is available across the potential hosts. This ensures the virtual NUMA topology for the VM will fit within the physical NUMA topology on each host that it could be migrated to.
However, if NUMA spanning has been enabled, it's advisable to set the virtual NUMA setting for each VM as well. This ensures if the VM is moved to a host with different physical NUMA topologies, the VM resource assignments will not be impacted.
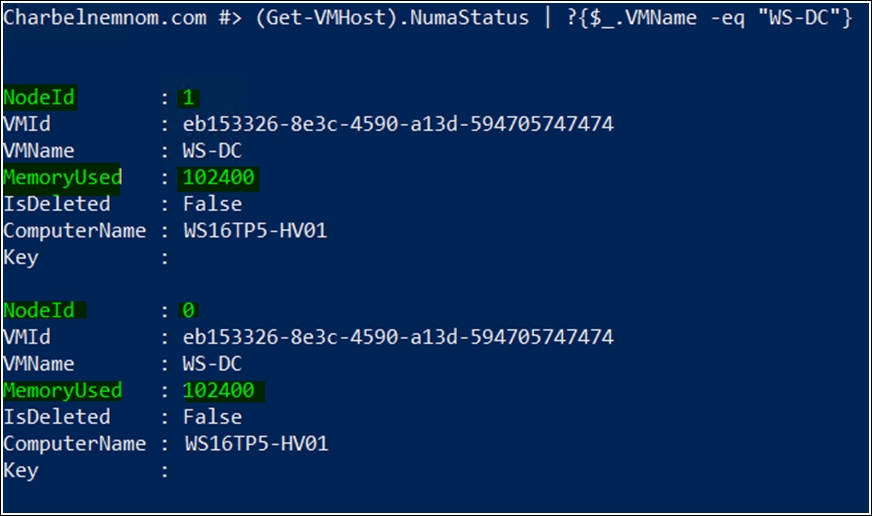
When NUMA spanning is disabled on the host, you can use (Get-VMHost).NumaStatus or Get-VMHostNumaNodeStatus cmdlets; those cmdlets will show you the memory distribution for all VMs across all NUMA nodes.
The following screenshot reflects this. The VM named WS-DC has obtained 50% (100 GB) of its memory from NUMA NodeId 1 and 50% (100 GB) from NUMA NodeId 0:
If performance is needed at all times, meaning consistent best possible performance, then you can disable NUMA Spanning, but you must make sure that all VMs with their vCPU/vNUMA topology can get all the memory within a single NUMA node (per vNUMA node).
Remember that if a VM uses Dynamic Memory, the Virtual NUMA is disabled for that VM.
I encourage you to read more on Virtual NUMA and NUMA Spanning on TechNet at the following link: Hyper-V Virtual NUMA Overview (https://technet.microsoft.com/en-us/library/dn282282.aspx).
By default, the Dynamic Memory configuration is disabled on every VM. It can be enabled and configured as shown in the preceding steps by using the GUI or through PowerShell, or when the VM is created.
The three most important settings for Dynamic Memory are Minimum, Maximum, and the new option, RAM. In earlier Hyper-V versions, this option was called Startup RAM. Every time the VM starts, the value in the RAM field will be allocated only for that VM. Once Windows and the integration services are loaded, Hyper-V begins to change the VM memory based on its workload, the configured settings, and the other VMs.
A problem that can arise with the RAM setting is when you need to restart a VM that has less memory than what is specified in the RAM field and there is no available memory from other VMs. Hyper-V introduces Smart Paging, which allows the missing value per VM—necessary for the VM memory—to be written in the page file on the host server, providing a reliable restart process and therefore not causing errors during the VM restart. If the VM needs 1 GB of memory to be started, Hyper-V can use the paging file on the host computer to allow the VM to start up. The Smart Paging option can only be used when the VM is restarted, when the physical memory is not available, or when the memory cannot be reclaimed from other VMs running on the host. Having said that, it is a best practice to add the page file onto a fast hard drive, to avoid performance issues.
The Memory buffer option allows you to specify the percentage of memory that will be available for buffer when moving memory to other VMs. This value is reserved if no other VM has a higher priority and if there is physical memory available on the host. For example, if a VM has 10 GB of memory and the buffer is configured to 20 percent, the host computer will allocate an additional 20 percent, which in this case is 2 GB of physical memory to the VM. The end result will mean that the VM will have 12 GB of physical memory allocated to it on the host computer. The default value is 20 percent, but it can be changed based on the VM's priority.
Another new feature that has been added in the new Hyper-V version is that the Maximum RAM value can be increased, and the Minimum RAM value decreased, while the VM is running.
The last option—Memory weight—lets you prioritize the availability of memory for the selected VM compared to other VMs. If you have one VM with a low value and one VM with a high value and both need more memory, Hyper-V will prioritize the VM with the higher value, except if the memory was already allocated to the VM. In this case, Hyper-V will not reclaim the allocated memory, as this could cause a problem on the running VM.
For monitoring purposes, to see the DM utilization currently being used, you can also use the Memory tab in the Hyper-V Manager. Hyper-V Manager offers information such as:
- Startup Memory
- Dynamic Memory
- Minimum Memory
- Maximum Memory
- Assigned Memory
- Memory Demand
- Memory Status
Hyper-V extracts the memory details from the VM using the integration services and shows them using the Memory tab, allowing the administrator to check the memory information in real time.
After enabling Dynamic Memory for your VMs, you can save hardware resources, use memory more efficiently, and ensure that each VM will get the necessary memory depending on its workload. However, using Dynamic Memory correctly is a bit of an art. You can certainly use your monitoring system to design very precise values, but you're going to invest a lot of time in doing so, and it is highly likely that something will change before your task is complete.
Runtime Memory Resize is the evolution of Dynamic Memory in Windows Server 2016. The interesting part of static memory is that, if you go to the Hyper-V Manager console even though the VM is configured with static memory, you can actually see the Memory Demand; thus, you can use memory more efficiently by increasing or decreasing the amount of memory needed while the VM is running.
Please note that the increase in Runtime Memory Resize for static VMs does not attempt to squeeze running Dynamic Memory VMs on the same host. It relies purely on available memory on the root subject to Dynamic Host Memory Management (DHMM) reserves.
However, a decrease/shrink of the VMs static memory is more challenging.
The following example shows a partially completed error message for a VM while decreasing the static memory:
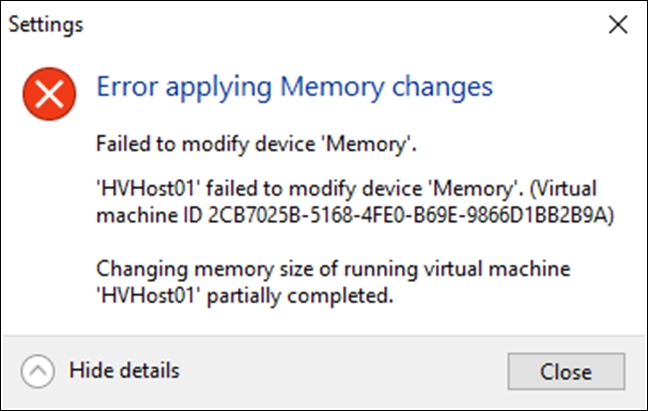
Partial shrink operations can happen anytime the guest is using the memory you are trying to remove. This is the most common case. It can also happen if the OS SKU has some memory limitation, for example, on x86 or if the SKU is only licensed up to a maximum limit. In this case, the VM is configured with some amount of memory, but the guest OS only "sees" up to its limit. Asking the guest OS to give back memory that it doesn't have access to will result in a partial memory resize.
If you enabled nested virtualization in a VM, Runtime Memory Resize will not work. In other words, Runtime Memory Resize will not work when the VM has Hyper-V enabled, because the nested instance has full control of the VM's memory.
For monitoring purposes, to see the memory on-demand for static VMs, you can use the Memory tab in the Hyper-V Manager. Hyper-V Manager offers information such as:
- Startup Memory
- Dynamic Memory: Disabled
- Assigned Memory
- Memory Demand
- Memory Status
When you want to manage the memory for a large number of VMs, Hyper-V Manager console is not so efficient at accomplishing this task as quickly as possible.
The Hyper-V PowerShell module in Windows Server 2016 has two cmdlets for adjusting the memory configuration of virtual machines. One is Set-VM and another one is Set-VMMemory. While the first one is used to modify any configuration of Virtual Memory, the second one is explicitly designed to change memory configuration.
For bulk configuration and automation, you can also use a cmdlet—Set-VMMemory—that is designed only to manage the Dynamic Memory settings. All the configurations, such as maximum bytes, minimum bytes, and startup bytes, can be specified using this command line. In the following example, all the VMs starting with SP had the Dynamic Memory option enabled, with the other values configured as well.
A new, helpful PowerShell feature is that you can use abbreviations such as MB for megabytes, GB for gigabytes, and TB for terabytes:
Set-VMMemory -VMName SP* -DynamicMemoryEnabled $true -MaximumBytes 6GB -MinimumBytes 4GB -StartupBytes 5GB
Also, you can use the Set-VM cmdlet to change the same settings, as shown in the following example:
Set-VM -Name SP* -DynamicMemory -MemoryMinimumBytes 4GB -MemoryMaximumBytes 6GB -MemoryStartupBytes 5GB
Runtime Memory Resize is configurable via PowerShell as well: you can use the Set-VM cmdlet to change the static memory settings for a running VM, as shown in the following example:
Set-VM -Name SP* -MemoryStartupBytes 4GB
You can also start creating scripts to query memory assignment and memory demand, and use that output to redistribute memory available on the host among the VMs.
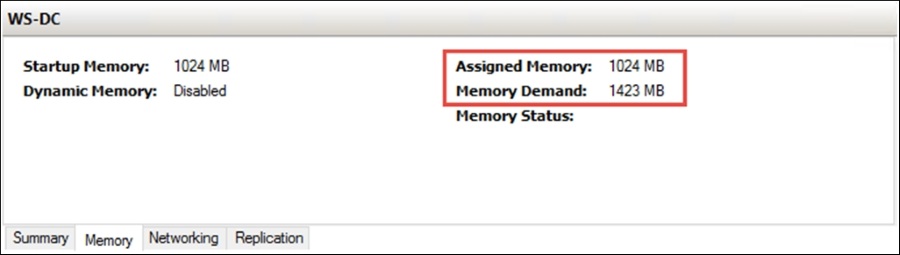
Here is an example of this scenario: the following screenshot shows we have a VM that has a memory demand of 1,423 MB, which is higher than the assigned memory of 1,024 MB. If this is case, we will add the memory demand on top of the assigned memory and increase the static memory on the fly:
You can use the following script to change the static memory settings for a running VM when the workload arises:
$VMs = Get-VM * | Where-Object {$_.DynamicMemoryEnabled -eq $false}

Foreach ($VM in $VMs) {
# Memory Demand Before
$VMMemory = Get-VM -Name $VM.Name | `
        Select Name, State,@{Label="CPU Usage %";Expression={$_.CPUUsage}}, `
        @{Label="Assigned Memory MB";Expression={$_.MemoryAssigned/1048576}}, `
        @{Label="Memory Demand MB";Expression={$_.MemoryDemand/1048576}}, MemoryStatus

Write-Output "Current Memory Demand" $VMMemory

If ($VMMemory.'Memory Demand MB' -gt $VMMemory.'Assigned Memory MB') {
   [int64]$RAM = 1MB*($VMMemory.'Assigned Memory MB'+$VMMemory.'Memory Demand MB'+1)
   Set-VM -Name $VMName -MemoryStartupBytes $RAM

   # Memory Demand After
    $VMMemory = Get-VM -Name $VM.Name | `
        Select Name, State,@{Label="CPU Usage %";Expression={$_.CPUUsage}}, `
        @{Label="Assigned Memory MB";Expression={$_.MemoryAssigned/1048576}}, `
        @{Label="Memory Demand MB";Expression={$_.MemoryDemand/1048576}}, MemoryStatus

    Write-Output "Updated Memory Demand" $VMMemory
    }

}
As you can see in the following screenshot, the static memory has been increased according to the memory demand:
