
In the IT field, it is easy to have problems, errors, mistakes, and other issue that might need a deep troubleshooting process or even worse, such as a system restore. With virtual machines, the administrators have a very interesting option that is not available in physical servers. What if you could rollback a VM before the error occurred? What if you could prepare the VM for some change that can cause an issue. That's what checkpoints are made for. You can take a VM checkpoint on the fly, do whatever you need to do, and roll it back in case of errors.
This comes very handy and can save our lives, making the problem prevention two clicks away.
To illustrate some scenarios to use checkpoints, consider the following examples:
- System upgrades or migration
- Software updates
- Software installation and configuration
- Registry changes
- Troubleshooting problems
This list can go on and on, but the idea of checkpoints is to give you the opportunity to recover the virtual machine in a fast and an easy way. With them, you can reset the virtual machine to a previous point-in-time before the error. That's why checkpoints are very common in developing, staging, and testing environments.
Checkpoints were referred to as snapshots prior the release of Windows Server 2012 R2, starting with Windows Server 2016 and Windows 10, Microsoft introduced a new type of checkpoints called "Production checkpoints", which gives you the exact same user experience that we have with checkpoints prior Windows Server 2016. The traditional checkpoints model still exists and is renamed to "Standard checkpoints".
A question you might ask, so what is the difference between Production Checkpoints and Standard Checkpoints?
Standard checkpoints are the classical way of checkpoints since Hyper-V version 1 in 2008; standard checkpoints capture the state, data, and hardware configuration of a running virtual machine and are intended for use in development and test scenarios. Standard checkpoints can be very useful if you need to recreate a specific state or condition of a running virtual machine so that you can troubleshoot a problem.
However, Production checkpoints are "point-in-time" images of a virtual machine, which can be restored later on in a way that is completely supported for all production workloads such SQL, Exchange and file servers. This is achieved by using backup VSS technology inside the guest to create the checkpoint, instead of using saved state technology.
This recipe will show the different ways to create and manage standard and production checkpoints using Hyper-V Manager and Windows PowerShell, as well as its tricks and best practices.
Checkpoints can be created on any existing virtual machine. The only prerequisite in this recipe is to have Hyper-V with at least one virtual machine.
The following steps will show how to create and manage virtual machine checkpoints.
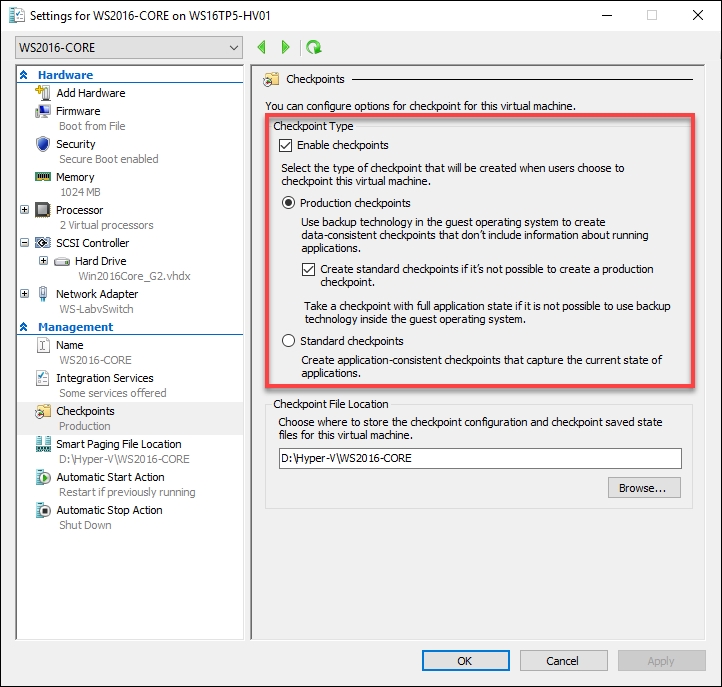
- To change the checkpoint type of a virtual machine, open Hyper-V Manager, right-click on the virtual machine settings and click on Checkpoint, select the desired checkpoint type as shown in the following screenshot:
- To take a checkpoint of a virtual machine, open Hyper-V Manager, right-click on the virtual machine and click on Checkpoint or click on Checkpoint in the pane on the right-hand side.
- To take a checkpoint and add a name during its creation, double-click on a virtual machine to open the Virtual Machine Connection window, click on Action in the menu, and then click on Checkpoint.
- On the Checkpoint Name window, type the checkpoint name, as shown in the next screenshot, and click on Yes.

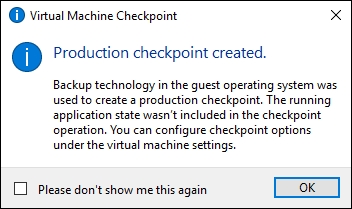
- If the production checkpoint succeeds, you will see the following message; if not, a standard checkpoint is being created without informational message.
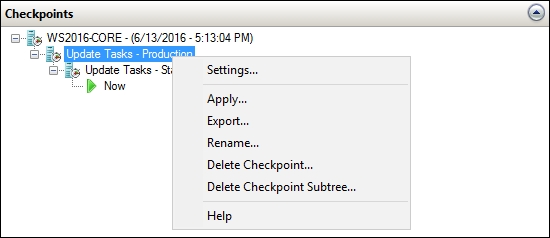
- To apply, export, rename, delete, and see the checkpoint settings, open Hyper-V Manager, select any virtual machine, select the checkpoint to be managed, and right-click on it, as shown in the following screenshot:
- To disable or enable checkpoints for virtual machines, open Hyper-V Manager, right-click on the virtual machine settings, click on Checkpoint, and then select the desired checkpoint type.
- To configure checkpoints location virtual machines, open Hyper-V Manager, right-click on the virtual machine settings, click on Checkpoint, and then select the desired checkpoint type.
Behind the scenes, when you create a checkpoint, Hyper-V will do the following:
- VMCX file: Creates a copy of the VMCX file that contains the information of the files and VM configuration associated with the checkpoint.
- VMRS file: Creates a copy of the Virtual Machine Runtime State (VMRS) file that contains the state of devices associated with the virtual machine. This file stores the virtual machine's runtime state (example saved state, memory content, UEFI variables, TPM state).
- AVHDX file: Generating a differencing disk to capture the state of the virtual hard disks, the differencing VHDX capability is used. This is used even if the source virtual disk is a fixed which means additional space.
For more information about a new VM binary configuration format in Windows Server 2016 Hyper-V, please refer to Chapter 2, Migrating and Upgrading Physical and Virtual Servers.
- The new VMCX format, which is binary replacing the XML format previously used
- VMCX cannot be manually edited
- The new binary format increases read and write efficiency of VM configuration data
- The new binary format will also reduce the chance of corruption in unplanned and storage failures
- New VMRS file (Virtual Machine Runtime State) is used to store runtime state data
As shown in the simple tasks in the recipe, Hyper-V offers several ways to create checkpoints. When a new one is created, a differencing disk is created which captures the virtual machine state, configuration, and all its content, and stores them within the virtual machine folder. The Automatic Virtual Hard Disk (AVHDX) file will be stored in the same location as the VHDX files of the virtual machine, and the configuration files will be stored in the default Snapshots directory.
When a virtual machine has a checkpoint taken, an AVHDX file is created and a link between the new file and the current VHDX is created. All the "writes" start getting stored in the AVHDX file, while the "reads" happen in both files. When you delete the checkpoint, Hyper-V merges the AVHDX file with the VHDX file. The AVHDX file is then deleted along with the link with the VHDX file. However, because of the differencing disks that increases the I/O operations and the possibility to create checkpoint trees, you can have poor disk performance in the virtual machine. That's why checkpoints are intended to be used temporarily.
In previous versions of Hyper-V, checkpoint merges happened only with the virtual machine is in offline state. The AVHDX file was deleted only when the VM was turned off. One of the principal improvements in Windows Server 2012 onwards is the ability to have a real-time merge between AVHDX and VHDX files, in other words, the merge process will take place while the virtual machine is running.
And by introducing the new ReFS file system in Windows Server 2016; we can take the advantage of an intelligent file system for instant fixed VHDX disk creation and instant disk (checkpoint) merge operations. If you compare the merge process of a checkpoint on NTFS volume versus ReFS volume, you will notice a big difference in merge operations.
Deleting checkpoints can help create space on your Hyper-V host.
Please note that you should never delete the (.avhdx) files.
For more details, please check the following article on when to use production checkpoint versus standard checkpoint.
https://charbelnemnom.com/2015/04/hyperv-vnext-demo03-production-checkpoints/
When you apply (revert) a production checkpoint, the VM will be in an offline state as it is restored from a backup, this is by design.
However, when you apply a standard checkpoint, the VM will start automatically.
In some situations, people might think that checkpoints can replace a VM backup at times. They can also create lots of checkpoints for a single VM. As a Hyper-V administrator, you must know that checkpoints are temporary actions that can never replace any backup of your virtual machines.
Virtual machines checkpoints can be fully managed using Windows Powershell.
Using checkpoints via PowerShell can be tricky. In Windows Server 2012 and 2012 R2 PowerShell, checkpoints are known by a different name, snapshots. You can use Remove-VMSnapshot, Restore-VMSnapshot, Get-VMSnapshot, and Rename-VMSnapshot respectively. The command Checkpoint-VM is used to take a checkpoint for a virtual machine.
In Windows Server 2016, Microsoft added Checkpoint cmdlets as aliases for the Snapshot cmdlets. At first sight this might be confusing but it provides backward compatibility for existing scripts. The new syntax works, the old one as well (as long as parameters etc. remain unchanged).
The new aliases are: Remove-VMCheckpoint, Restore-VMCheckpoint, Get-VMCheckpoint, and Rename-VMCheckpoint.
To disable or enable checkpoints for virtual machines, you can run the following command:
Set-VM -Name <VMName>-CheckpointType Disabled
To configure checkpoints location for virtual machines, you can run the following command:
Set-VM -Name <VMName> -SnapshotFileLocation "Checkpoint Location"
To Set Standard Checkpoint, you can run the following command:
Set-VM -Name <VMName> -CheckpointType Standard
To Set Production Checkpoint, you can run the following command:
If the production checkpoint fails, a standard checkpoint is being created.
Set-VM -Name <VMName> -CheckpointType Production
To Set Persistent Production Checkpoint, if the production checkpoint fails a standard checkpoint is not being created. Open PowerShell console and run the following command:
Set-VM -Name <VMName> -CheckpointType Production Only
To take a checkpoint of a virtual machine, you can run the following command:
Checkpoint-VM -Name <VMName> -SnapshotName <String>
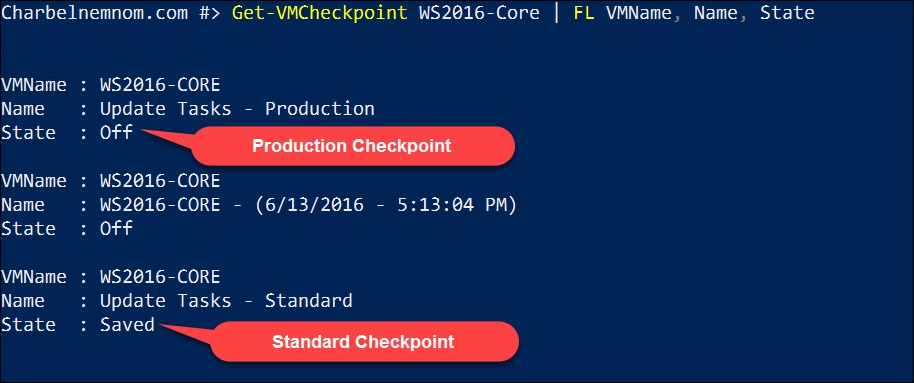
You can view the checkpoints state (Standard or Production checkpoint) for a virtual machine as shown in the following screenshot by using the Get-VMCheckpoint command.
Get-VMCheckpoint -VMName <VMName> | FL VMName, Name, State
To revert your virtual machine to a previous point-in-time, you can run the following command:
Restore-VMCheckpoint -Name <Checkpoint Name> -VMName <VMName> -Confirm:$false
To rename your virtual machine checkpoint, you can run the following command:
Rename-VMCheckpoint -VMName <VMName> -Name <Checkpoint Name> -NewName <New Checkpoint Name>
To delete your virtual machine checkpoint, you can run the following command:
Remove-VMCheckpoint -VMName <VMName> -Name <Checkpoint Name>
To export your virtual machine checkpoint, you can run the following command:
Export-VMCheckpoint -VMName <VMName> -Name <Checkpoint Name> -Path <path for export>
Starting in Windows Server 2012 R2, Microsoft enabled export of running virtual machines (clone) and its checkpoint as well.
- The Exporting and importing virtual machines recipe in Chapter 2, Migrating and Upgrading Physical and Virtual Servers
- The Creating and adding virtual hard disks recipe in Chapter 3, Managing disk and Network Settings
- The Backing up Hyper-V and VMs using Windows Server Backup recipe in this chapter
- The Restoring Hyper-V and VMs using Windows Server Backup recipe in this chapter